Use & Care Guide
Page 3
... Service Outside the 50 United States and Puerto Rico .....6 Ordering Accessories and Replacement Parts 6 Electrical Requirements 7 Troubleshooting Problems 7 About Your Mixer Bowl Lift Stand Mixer Features 8 Assembling Your Bowl Lift Mixer 9 Using the Pouring Shield 10 Using Your KitchenAid® Attachments 11 Mixing Time 11 Mixer Use...11 Care and Cleaning 12 Beater to Bowl Clearance 12...
... Service Outside the 50 United States and Puerto Rico .....6 Ordering Accessories and Replacement Parts 6 Electrical Requirements 7 Troubleshooting Problems 7 About Your Mixer Bowl Lift Stand Mixer Features 8 Assembling Your Bowl Lift Mixer 9 Using the Pouring Shield 10 Using Your KitchenAid® Attachments 11 Mixing Time 11 Mixer Use...11 Care and Cleaning 12 Beater to Bowl Clearance 12...
Use & Care Guide
Page 6
... Authorized KitchenAid Service Center. Please bring the stand mixer, or ship it prepaid and insured, to you purchased how to the purchaser and any succeeding owner for information on or the store where you prepaid and insured. Ordering Accessories and Replacement Parts To order accessories or replacement parts for your local KitchenAid dealer the stand mixer for stand mixers operated...
... Authorized KitchenAid Service Center. Please bring the stand mixer, or ship it prepaid and insured, to you purchased how to the purchaser and any succeeding owner for information on or the store where you prepaid and insured. Ordering Accessories and Replacement Parts To order accessories or replacement parts for your local KitchenAid dealer the stand mixer for stand mixers operated...
Use & Care Guide
Page 8
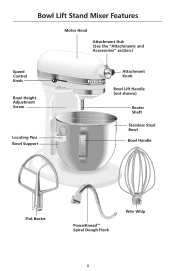
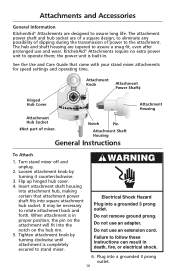
Bowl Lift Stand Mixer Features Motor Head Attachment Hub (See the "Attachments and Accessories" section.) Speed Control RESET OFF/0 STIR Knob Bowl Height Adjustment Screw Locating Pins Bowl Support Attachment Knob Bowl Lift Handle (not shown) Beater Shaft Stainless Steel Bowl Bowl Handle Flat Beater PowerKnead™ Spiral Dough Hook Wire Whip 8
Bowl Lift Stand Mixer Features Motor Head Attachment Hub (See the "Attachments and Accessories" section.) Speed Control RESET OFF/0 STIR Knob Bowl Height Adjustment Screw Locating Pins Bowl Support Attachment Knob Bowl Lift Handle (not shown) Beater Shaft Stainless Steel Bowl Bowl Handle Flat Beater PowerKnead™ Spiral Dough Hook Wire Whip 8
Use & Care Guide
Page 10
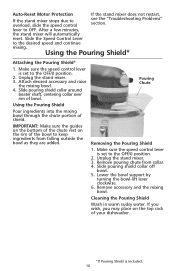
... control lever is included. 10 Unplug the stand mixer. 3. Using the Pouring Shield Pour ingredients into the mixing bowl through the chute portion of bowl. After a few minutes, the stand mixer will automatically reset. Remove accessory and the mixing bowl. Using the Pouring Shield...* Attaching the Pouring Shield* 1. Auto-Reset Motor Protection If the stand mixer does not restart, If the stand mixer stops due to the OFF/0 position. ...
... control lever is included. 10 Unplug the stand mixer. 3. Using the Pouring Shield Pour ingredients into the mixing bowl through the chute portion of bowl. After a few minutes, the stand mixer will automatically reset. Remove accessory and the mixing bowl. Using the Pouring Shield...* Attaching the Pouring Shield* 1. Auto-Reset Motor Protection If the stand mixer does not restart, If the stand mixer stops due to the OFF/0 position. ...
Use & Care Guide
Page 16
... necessary to assure a snug fit, even after prolonged use and wear. Do not use an adapter. Failure to stand mixer. Attachments and Accessories General Information KitchenAid® Attachments are designed to operate them; Tighten attachment knob by turning it counterclockwise. 3. The attachment power shaft ...fit into a grounded 3 prong outlet. 16 Insert attachment shaft housing into attachment hub, making certain that came with your stand mixer attachments for speed settings and operating time. Do not use an extension cord. See the Use and Care Guide that attachment ...
... necessary to assure a snug fit, even after prolonged use and wear. Do not use an adapter. Failure to stand mixer. Attachments and Accessories General Information KitchenAid® Attachments are designed to operate them; Tighten attachment knob by turning it counterclockwise. 3. The attachment power shaft ...fit into a grounded 3 prong outlet. 16 Insert attachment shaft housing into attachment hub, making certain that came with your stand mixer attachments for speed settings and operating time. Do not use an extension cord. See the Use and Care Guide that attachment ...

Parts List
Page 8
ACCESSORY PARTS For Models: KP26M1X__5, 4KP26M1X__5, KP26M1XQ__5, KP26M1P__5 Illus. No. DESCRIPTION 4164778 Mixer Attachment Pak (Includes Food Grinder (FG−A), Food Strainer (FVSP), And Vegetable Slicer, (RVS−A) (FPP−A) 4164749 Food Grinder (FG−A) W10318099 Grain Mill (...
ACCESSORY PARTS For Models: KP26M1X__5, 4KP26M1X__5, KP26M1XQ__5, KP26M1P__5 Illus. No. DESCRIPTION 4164778 Mixer Attachment Pak (Includes Food Grinder (FG−A), Food Strainer (FVSP), And Vegetable Slicer, (RVS−A) (FPP−A) 4164749 Food Grinder (FG−A) W10318099 Grain Mill (...


