Owners Manual
Page 1
... the chance of your microwave oven at www.kitchenaid.com/owners. For future reference, please make a note of injury, and tell you what the potential hazard is the safety alert symbol. These words mean: DANGER You can be heated in accordance with the provided Installation Instructions. I Read all safety messages. This is , tell...
... the chance of your microwave oven at www.kitchenaid.com/owners. For future reference, please make a note of injury, and tell you what the potential hazard is the safety alert symbol. These words mean: DANGER You can be heated in accordance with the provided Installation Instructions. I Read all safety messages. This is , tell...
Owners Manual
Page 3
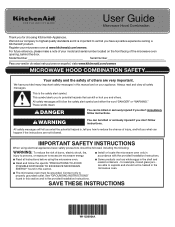
... result in the display. Scroll Speed Scrolling speed options will not work. Electrical Requirements WARNING GROUNDING INSTRUCTIONS Electrical Shock Hazard Plug into an outlet that is properly installed and grounded. Do not remove ground prong. Failure to reach the Sound submenu. 1. Required: ■■ .... The microwave oven is a 12-hour (12:00-11:59) clock. Consult a qualified electrician or serviceman if the grounding instructions are four available speeds HIGH--->MEDIUM--->MEDIUM LOW--LOW-->OFF. If the power supply cord is active in death, fire, or electrical...
... result in the display. Scroll Speed Scrolling speed options will not work. Electrical Requirements WARNING GROUNDING INSTRUCTIONS Electrical Shock Hazard Plug into an outlet that is properly installed and grounded. Do not remove ground prong. Failure to reach the Sound submenu. 1. Required: ■■ .... The microwave oven is a 12-hour (12:00-11:59) clock. Consult a qualified electrician or serviceman if the grounding instructions are four available speeds HIGH--->MEDIUM--->MEDIUM LOW--LOW-->OFF. If the power supply cord is active in death, fire, or electrical...

Owners Manual
Page 10
...in this major appliance is effective from state to state or province to correct product damage or defects caused by a KitchenAid designated service company. Consumable parts (i.e. Parts and repair labor to review the Troubleshooting or Problem Solver section of 5....or water inlet hoses). light bulbs, batteries, air or water filters, preservation solutions, etc.). This limited warranty is installed, installation instructions. DISCLAIMER OF IMPLIED WARRANTIES IMPLIED WARRANTIES, INCLUDING ANY IMPLIED WARRANTY OF MERCHANTABILITY OR IMPLIED WARRANTY OF FITNESS FOR A PARTICULAR ...
...in this major appliance is effective from state to state or province to correct product damage or defects caused by a KitchenAid designated service company. Consumable parts (i.e. Parts and repair labor to review the Troubleshooting or Problem Solver section of 5....or water inlet hoses). light bulbs, batteries, air or water filters, preservation solutions, etc.). This limited warranty is installed, installation instructions. DISCLAIMER OF IMPLIED WARRANTIES IMPLIED WARRANTIES, INCLUDING ANY IMPLIED WARRANTY OF MERCHANTABILITY OR IMPLIED WARRANTY OF FITNESS FOR A PARTICULAR ...
Installation Instructions
Page 1
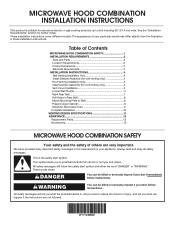
... and Parts 2 Location Requirements 2 Product Dimensions 3 Electrical Requirements 3 INSTALLATION INSTRUCTIONS 4 Wall Venting Installation Only 4 Install Damper Assembly (for wall venting only 4 Roof Venting Installation Only 4 Install Damper Assembly (for roof venting only 4 Vent Cover Installation 5 Locate Wall Stud(s 5 Mark Rear Wall 7 Drill Holes in these installation instructions. MICROWAVE HOOD COMBINATION INSTALLATION INSTRUCTIONS This product is suitable for use above electric or...
... and Parts 2 Location Requirements 2 Product Dimensions 3 Electrical Requirements 3 INSTALLATION INSTRUCTIONS 4 Wall Venting Installation Only 4 Install Damper Assembly (for wall venting only 4 Roof Venting Installation Only 4 Install Damper Assembly (for roof venting only 4 Vent Cover Installation 5 Locate Wall Stud(s 5 Mark Rear Wall 7 Drill Holes in these installation instructions. MICROWAVE HOOD COMBINATION INSTALLATION INSTRUCTIONS This product is suitable for use above electric or...
Installation Instructions
Page 2
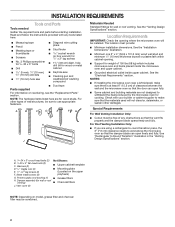
...venting. A B C D E FG H J Materials Needed Standard fittings for wall or roof venting) ■ Charcoal filters J. For Roof Venting Installation Only: ■■ If you are using a rectangular-to-round transition piece, the 3" (7.6 cm) clearance needs to exist above the microwave ... used will be combined. 2 Vent cover (2) NOTE: Depending on reordering, see the "Replacement Parts" section. Read and follow the instructions provided with your builder or cabinet supplier to withstand the heat produced by the microwave oven for 1/4" x 2" lag screws ■■...
...venting. A B C D E FG H J Materials Needed Standard fittings for wall or roof venting) ■ Charcoal filters J. For Roof Venting Installation Only: ■■ If you are using a rectangular-to-round transition piece, the 3" (7.6 cm) clearance needs to exist above the microwave ... used will be combined. 2 Vent cover (2) NOTE: Depending on reordering, see the "Replacement Parts" section. Read and follow the instructions provided with your builder or cabinet supplier to withstand the heat produced by the microwave oven for 1/4" x 2" lag screws ■■...
Installation Instructions
Page 3
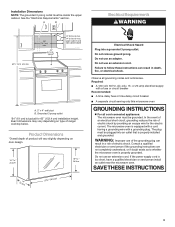
...SAVE THESE INSTRUCTIONS 3 upper cabinet and side cabinet depth A. 2" x 4" wall stud B. Failure to whether the microwave oven is properly grounded. In the event of an electrical short circuit, grounding reduces the risk of electric shock. The microwave oven is properly installed and grounded. Installation Dimensions NOTE...oven must be inside the upper cabinet. Grounded 3 prong outlet *24" (61 cm) is too short, have a qualified electrician or serviceman install an outlet near the microwave oven. Do not use an adapter. Do not remove ground prong. Required: ■ A 120-volt, 60 ...
...SAVE THESE INSTRUCTIONS 3 upper cabinet and side cabinet depth A. 2" x 4" wall stud B. Failure to whether the microwave oven is properly grounded. In the event of an electrical short circuit, grounding reduces the risk of electric shock. The microwave oven is properly installed and grounded. Installation Dimensions NOTE...oven must be inside the upper cabinet. Grounded 3 prong outlet *24" (61 cm) is too short, have a qualified electrician or serviceman install an outlet near the microwave oven. Do not use an adapter. Do not remove ground prong. Required: ■ A 120-volt, 60 ...

Installation Instructions
Page 4
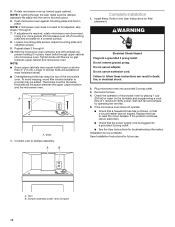
... B A. Screws B. Sheet metal screw 3. Top of the microwave oven and lift up. Position the damper assembly on the damper plate. Install Damper Assembly (for wall venting only) 1. Back of microwave oven exterior. Damper blade D. Using diagonal wire cutting pliers, gently snip out .... Damper vent covers A. Check that damper blade moves freely, and opens fully. 2. A BC D B A C A. Screws B. INSTALLATION INSTRUCTIONS Wall Venting Installation Only 1. Damper assembly C. Remove screws attaching damper plate to top of microwave oven B. Damper blade D. Roof Venting...
... B A. Screws B. Sheet metal screw 3. Top of the microwave oven and lift up. Position the damper assembly on the damper plate. Install Damper Assembly (for wall venting only) 1. Back of microwave oven exterior. Damper blade D. Using diagonal wire cutting pliers, gently snip out .... Damper vent covers A. Check that damper blade moves freely, and opens fully. 2. A BC D B A C A. Screws B. INSTALLATION INSTRUCTIONS Wall Venting Installation Only 1. Damper assembly C. Remove screws attaching damper plate to top of microwave oven B. Damper blade D. Roof Venting...
Installation Instructions
Page 10
... be the same thickness as the space between upper cabinet and microwave oven. Connect vent to follow these instructions can result in the wall cutout. 6. Save Installation Instructions for filter placement. Install filters. Plug microwave oven into a grounded 3 prong outlet. Push microwave oven against mounting plate and hold in place, insert bolts through 9. 7. Using...
... be the same thickness as the space between upper cabinet and microwave oven. Connect vent to follow these instructions can result in the wall cutout. 6. Save Installation Instructions for filter placement. Install filters. Plug microwave oven into a grounded 3 prong outlet. Push microwave oven against mounting plate and hold in place, insert bolts through 9. 7. Using...


