Owners Manual
Page 6
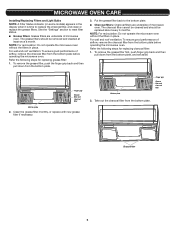
... before operating the microwave oven. Put the grease filter back to the bottom plate. ■■ Charcoal filters: Charcoal filters are underside of microwave oven. Clean the grease filter monthly, or replace with new grease filter if necessary. The charcoal filter cannot be cleaned and should be replaced about every 6 months. Charcoal filter 6 For wall and roof ventilation: To ensure good...
... before operating the microwave oven. Put the grease filter back to the bottom plate. ■■ Charcoal filters: Charcoal filters are underside of microwave oven. Clean the grease filter monthly, or replace with new grease filter if necessary. The charcoal filter cannot be cleaned and should be replaced about every 6 months. Charcoal filter 6 For wall and roof ventilation: To ensure good...
Owners Manual
Page 7
... sure both left vent top cover Top front of the microwave oven. To replace the cooktop light refer the following steps: 1. Terminal Screw 7 Replace a new charcoal filter and reattach it back to "T" shape bottom lighting cover. ■■ Cooktop light: The cooktop light is located on the underside of the microwave oven...
... sure both left vent top cover Top front of the microwave oven. To replace the cooktop light refer the following steps: 1. Terminal Screw 7 Replace a new charcoal filter and reattach it back to "T" shape bottom lighting cover. ■■ Cooktop light: The cooktop light is located on the underside of the microwave oven...
Owners Manual
Page 8
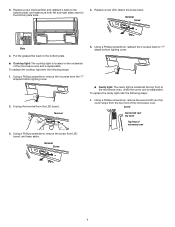
... ■■ Affresh® Kitchen Appliance Cleaner ■■ Turntable hub ■■ Affresh® Stainless Steel Cleaner ■■ Grease filter ■■ Affresh® Stainless Steel Wipes ■■ Charcoal filter ■■ Cooktop light bulb ■■ Cavity light bulb 8 Unplug the LED terminal. Hook 6. Terminal 5. Screw Second left top...
... ■■ Affresh® Kitchen Appliance Cleaner ■■ Turntable hub ■■ Affresh® Stainless Steel Cleaner ■■ Grease filter ■■ Affresh® Stainless Steel Wipes ■■ Charcoal filter ■■ Cooktop light bulb ■■ Cavity light bulb 8 Unplug the LED terminal. Hook 6. Terminal 5. Screw Second left top...
Installation Instructions
Page 2
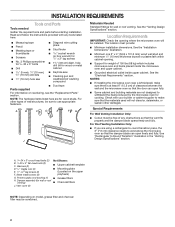
...on the upper polyfoam) G. For other damages. A B C D E FG H J Materials Needed Standard fittings for wall or roof venting) ■ Charcoal filters J. See the "Venting Design Specifications" section. Location Requirements IMPORTANT: Check the opening . ■■ Support for wood studs. Sheet metal screws (2) ... x 2" lag screws ■■ 1½" (3.8 cm) diam. Vent cover (2) NOTE: Depending on model, grease filter and charcoal filter may be free of clearance between the wall and the microwave oven so that the vent fits properly and the damper blade ...
...on the upper polyfoam) G. For other damages. A B C D E FG H J Materials Needed Standard fittings for wall or roof venting) ■ Charcoal filters J. See the "Venting Design Specifications" section. Location Requirements IMPORTANT: Check the opening . ■■ Support for wood studs. Sheet metal screws (2) ... x 2" lag screws ■■ 1½" (3.8 cm) diam. Vent cover (2) NOTE: Depending on model, grease filter and charcoal filter may be free of clearance between the wall and the microwave oven so that the vent fits properly and the damper blade ...
Installation Instructions
Page 5
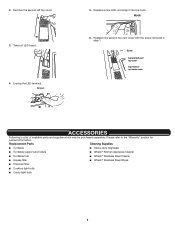
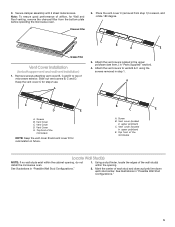
...ensure good performance of the microwave NOTE: Keep the vent cover B and vent cover D for Wall and Roof venting, remove the charcoal filter from step 1) to top of the microwave Locate Wall Stud(s) NOTE: If no wall studs exist within the opening , do ...C. 3. Attach the vent covers located in the upper polyfoam (see item J in step 1. B C E A. Secure damper assembly with 2 sheet metal screws. Charcoal Filter C B A E Grease Filter Vent Cover Installation (for step 2 use. Slide out vent covers B, C and D. A 3. Attach the vent covers to vents B & C using the screws ...
...ensure good performance of the microwave NOTE: Keep the vent cover B and vent cover D for Wall and Roof venting, remove the charcoal filter from step 1) to top of the microwave Locate Wall Stud(s) NOTE: If no wall studs exist within the opening , do ...C. 3. Attach the vent covers located in the upper polyfoam (see item J in step 1. B C E A. Secure damper assembly with 2 sheet metal screws. Charcoal Filter C B A E Grease Filter Vent Cover Installation (for step 2 use. Slide out vent covers B, C and D. A 3. Attach the vent covers to vents B & C using the screws ...


