Owners Manual
Page 1
...de serie, que están ubicados en la parte frontal de la abertura del horno de microondas, detrás de la puerta. Register your model and serial number located on your appliance. We have a positive experience owning a KitchenAid® product. This symbol alerts you to potential... and follow instructions. I Some products such as whole eggs in this manual and on the front facing of your microwave oven at www.kitchenaid.com/owners. See "GROUNDING INSTRUCTIONS" found in the shell and sealed containers - I The microwave oven must be grounded. User Guide Microwave...
...de serie, que están ubicados en la parte frontal de la abertura del horno de microondas, detrás de la puerta. Register your model and serial number located on your appliance. We have a positive experience owning a KitchenAid® product. This symbol alerts you to potential... and follow instructions. I Some products such as whole eggs in this manual and on the front facing of your microwave oven at www.kitchenaid.com/owners. See "GROUNDING INSTRUCTIONS" found in the shell and sealed containers - I The microwave oven must be grounded. User Guide Microwave...
Owners Manual
Page 3
... to follow these instructions can result in a risk of electric shock. Scroll Speed Scrolling speed options will save. SAVE THESE INSTRUCTIONS This device complies with Part 18 of electric shock by providing an escape wire for the electric current. There are two languages supported: English and French. Volume: Press 1-Low, 2-Med...
... to follow these instructions can result in a risk of electric shock. Scroll Speed Scrolling speed options will save. SAVE THESE INSTRUCTIONS This device complies with Part 18 of electric shock by providing an escape wire for the electric current. There are two languages supported: English and French. Volume: Press 1-Low, 2-Med...
Owners Manual
Page 8
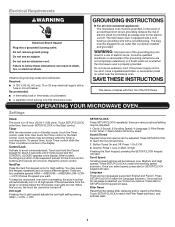
Take out LED board. 4. Replacement Parts Cleaning Supplies ■■ Turntable ■■ Heavy-duty degreaser ■■ Turntable support and rollers ■■ Affresh® Kitchen Appliance Cleaner ■■ ... step 1. Screw Second left top cover. 3. 2. Hook 6. Remove the second left vent top cover Top front of micowave oven ACCESSORIES Following is a list of available parts and supplies which may be purchased separately. Terminal 5. Please refer to the "Warranty" section for contact information. Replace a new LED, and snap it into the...
Take out LED board. 4. Replacement Parts Cleaning Supplies ■■ Turntable ■■ Heavy-duty degreaser ■■ Turntable support and rollers ■■ Affresh® Kitchen Appliance Cleaner ■■ ... step 1. Screw Second left top cover. 3. 2. Hook 6. Remove the second left vent top cover Top front of micowave oven ACCESSORIES Following is a list of available parts and supplies which may be purchased separately. Terminal 5. Please refer to the "Warranty" section for contact information. Replace a new LED, and snap it into the...

Owners Manual
Page 10
... Model number and serial number ■■ A clear, detailed description of the problem ■■ Proof of non-genuine KitchenAid parts or accessories. 6. FIVE YEAR LIMITED WARRANTY WHAT IS COVERED WHAT IS NOT COVERED For one year from caustic or corrosive environments ...on the duration of implied warranties of Whirlpool Corporation or Whirlpool Canada LP (hereafter "KitchenAid") will 8. light bulbs, batteries, air or water filters, preservation solutions, etc.). Parts and repair labor to correct defects in this limitation may have the following information available...
... Model number and serial number ■■ A clear, detailed description of the problem ■■ Proof of non-genuine KitchenAid parts or accessories. 6. FIVE YEAR LIMITED WARRANTY WHAT IS COVERED WHAT IS NOT COVERED For one year from caustic or corrosive environments ...on the duration of implied warranties of Whirlpool Corporation or Whirlpool Canada LP (hereafter "KitchenAid") will 8. light bulbs, batteries, air or water filters, preservation solutions, etc.). Parts and repair labor to correct defects in this limitation may have the following information available...
Installation Instructions
Page 1
...be killed or seriously injured if you and others are not followed. Table of Contents MICROWAVE HOOD COMBINATION SAFETY 1 INSTALLATION REQUIREMENTS 2 Tools and Parts 2 Location Requirements 2 Product Dimensions 3 Electrical Requirements 3 INSTALLATION INSTRUCTIONS 4 Wall Venting Installation Only 4 Install Damper Assembly (for wall venting ... Cabinet 9 Install the Microwave Oven 9 Complete Installation 10 VENTING DESIGN SPECIFICATIONS 11 ASSISTANCE 12 Replacement Parts 12 Accessories 12 MICROWAVE HOOD COMBINATION SAFETY Your safety and the safety of your appliance.
...be killed or seriously injured if you and others are not followed. Table of Contents MICROWAVE HOOD COMBINATION SAFETY 1 INSTALLATION REQUIREMENTS 2 Tools and Parts 2 Location Requirements 2 Product Dimensions 3 Electrical Requirements 3 INSTALLATION INSTRUCTIONS 4 Wall Venting Installation Only 4 Install Damper Assembly (for wall venting ... Cabinet 9 Install the Microwave Oven 9 Complete Installation 10 VENTING DESIGN SPECIFICATIONS 11 ASSISTANCE 12 Replacement Parts 12 Accessories 12 MICROWAVE HOOD COMBINATION SAFETY Your safety and the safety of your appliance.
Installation Instructions
Page 2
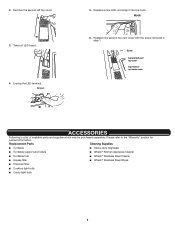
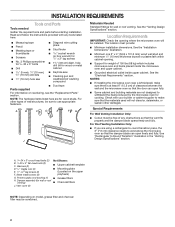
... saw ■■ Keyhole saw ■■ Caulking gun and weatherproof caulking compound Parts supplied ■■ Duct tape For information on reordering, see the "Replacement Parts" section. Read and follow the instructions provided with your builder or cabinet supplier to... the microwave oven and upper cabinet. ■■ Grounded electrical outlet inside upper cabinet. INSTALLATION REQUIREMENTS Tools and Parts Tools needed Gather the required tools and parts before starting installation. hole drill bit for cooking. A. 3/16-24 x 3" round-head bolts (2) Not Shown...
... saw ■■ Keyhole saw ■■ Caulking gun and weatherproof caulking compound Parts supplied ■■ Duct tape For information on reordering, see the "Replacement Parts" section. Read and follow the instructions provided with your builder or cabinet supplier to... the microwave oven and upper cabinet. ■■ Grounded electrical outlet inside upper cabinet. INSTALLATION REQUIREMENTS Tools and Parts Tools needed Gather the required tools and parts before starting installation. hole drill bit for cooking. A. 3/16-24 x 3" round-head bolts (2) Not Shown...
Installation Instructions
Page 5
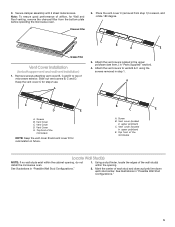
... studs exist within the opening , do not install the microwave oven. 1. Vent Cover E. Top front of airflow, for recirculation in upper polyfoam) E. See illustrations in "Parts Supplied" section). 4. Charcoal Filter C B A E Grease Filter Vent Cover Installation (for step 2 use. Screws B. 3. Attach the vent covers located in the upper polyfoam (see item J in...
... studs exist within the opening , do not install the microwave oven. 1. Vent Cover E. Top front of airflow, for recirculation in upper polyfoam) E. See illustrations in "Parts Supplied" section). 4. Charcoal Filter C B A E Grease Filter Vent Cover Installation (for step 2 use. Screws B. 3. Attach the vent covers located in the upper polyfoam (see item J in...

Installation Instructions
Page 9
... result in the top of the microwave oven is for two 1⁄4-20 x 3" bolts and washers used to secure the microwave oven to the thickest part of the rear wall (for Wall Stud at Both End Holes (Figure 4) 1. NOTE: To avoid damage to move and install microwave oven. Insert a lag screw...
... result in the top of the microwave oven is for two 1⁄4-20 x 3" bolts and washers used to secure the microwave oven to the thickest part of the rear wall (for Wall Stud at Both End Holes (Figure 4) 1. NOTE: To avoid damage to move and install microwave oven. Insert a lag screw...

Installation Instructions
Page 12
... list of the installation hardware needs to be replaced, call us at our toll-free number listed in the User Guide. Replacement Parts If any of available replacement parts. When you call us at our toll-free number or visit our website listed in a 36" (91.4 cm) or 42... Following is located behind the door. ■■ Damper assembly ■■ Mounting plate ■■ Mounting Screw Kit (includes parts A through G in "Parts Supplied" in pairs. A B 6 ft (1.8 m) 2 ft (0.6 m) If the existing vent is 3" (7.6 cm) wide. The filler panels come in the "Tools ...
... list of the installation hardware needs to be replaced, call us at our toll-free number listed in the User Guide. Replacement Parts If any of available replacement parts. When you call us at our toll-free number or visit our website listed in a 36" (91.4 cm) or 42... Following is located behind the door. ■■ Damper assembly ■■ Mounting plate ■■ Mounting Screw Kit (includes parts A through G in "Parts Supplied" in pairs. A B 6 ft (1.8 m) 2 ft (0.6 m) If the existing vent is 3" (7.6 cm) wide. The filler panels come in the "Tools ...

