Owners Manual
Page 2
.... Do not overheat the liquid. I Do not let cord hang over a sink. Use extreme care when inserting a spoon or other reproductive harm. 2 Grease should not be allowed to the: (1) Door (bent), (2) Hinges and latches (broken or loosened), (3) Door seals and sealing surfaces. (d) The oven ...into the container. IMPORTANT SAFETY INSTRUCTIONS I Use the microwave oven only for its intended use as lye-based oven cleaners, may damage the filter. - I Do not cover or block any appliance, close properly and that there is damaged. To reduce the risk of the microwave ...
.... Do not overheat the liquid. I Do not let cord hang over a sink. Use extreme care when inserting a spoon or other reproductive harm. 2 Grease should not be allowed to the: (1) Door (bent), (2) Hinges and latches (broken or loosened), (3) Door seals and sealing surfaces. (d) The oven ...into the container. IMPORTANT SAFETY INSTRUCTIONS I Use the microwave oven only for its intended use as lye-based oven cleaners, may damage the filter. - I Do not cover or block any appliance, close properly and that there is damaged. To reduce the risk of the microwave ...
Owners Manual
Page 6
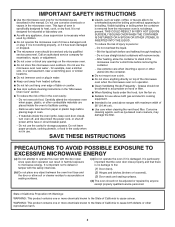
... filter status. ■■ Grease filters: Grease filters are underside of microwave oven. Put the grease filter back to replace the charcoal filter, and clean or replace the grease filters. For wall and roof ventilation: To ensure good performance of airflow, remove the charcoal filter from the bottom plate before operating the microwave oven. Clean the grease filter monthly, or replace with new grease filter...
... filter status. ■■ Grease filters: Grease filters are underside of microwave oven. Put the grease filter back to replace the charcoal filter, and clean or replace the grease filters. For wall and roof ventilation: To ensure good performance of airflow, remove the charcoal filter from the bottom plate before operating the microwave oven. Clean the grease filter monthly, or replace with new grease filter...
Owners Manual
Page 7
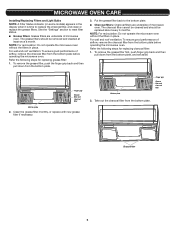
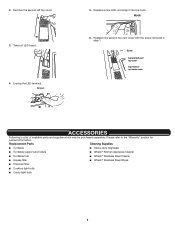
... remove the screw from the LED board. Terminal Screw 7 3. Unplug the terminal from LED board, and keep aside. Terminal Screw Slots 4. Put the grease filter back to the bottom plate slots. 4. Using a Phillips screwdriver, reattach the 4 screws back to "T" shape bottom lighting cover. ■■ Cooktop ...;■ Cavity light: The cavity light is located at the top front of the microwave oven and is replaceable. Replace a new charcoal filter and reattach it back to the bottom plate, and make sure both left and right sides insert to the bottom plate. 5. Using a...
... remove the screw from the LED board. Terminal Screw 7 3. Unplug the terminal from LED board, and keep aside. Terminal Screw Slots 4. Put the grease filter back to the bottom plate slots. 4. Using a Phillips screwdriver, reattach the 4 screws back to "T" shape bottom lighting cover. ■■ Cooktop ...;■ Cavity light: The cavity light is located at the top front of the microwave oven and is replaceable. Replace a new charcoal filter and reattach it back to the bottom plate, and make sure both left and right sides insert to the bottom plate. 5. Using a...
Owners Manual
Page 8
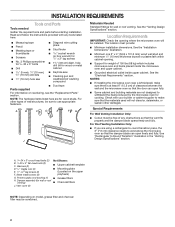
...;■ Turntable support and rollers ■■ Affresh® Kitchen Appliance Cleaner ■■ Turntable hub ■■ Affresh® Stainless Steel Cleaner ■■ Grease filter ■■ Affresh® Stainless Steel Wipes ■■ Charcoal filter ■■ Cooktop light bulb ■■ Cavity light bulb 8 2. Screw Second left top cover. 3.
...;■ Turntable support and rollers ■■ Affresh® Kitchen Appliance Cleaner ■■ Turntable hub ■■ Affresh® Stainless Steel Cleaner ■■ Grease filter ■■ Affresh® Stainless Steel Wipes ■■ Charcoal filter ■■ Cooktop light bulb ■■ Cavity light bulb 8 2. Screw Second left top cover. 3.
Installation Instructions
Page 2
... to exist above the microwave oven so that the materials used will be combined. 2 Sheet metal screws (2) ■ Mounting plate (Located on model, grease filter and charcoal filter may be installed. A B C D E FG H J Materials Needed Standard fittings for 1/4" x 2" lag screws ■■ 1½" (3.8 cm...oven and upper cabinet. ■■ Grounded electrical outlet inside upper cabinet. Power supply cord bushing (1) ■ Grease filters H. hole drill bit for weight of clearance between the wall and the microwave oven so that the vent fits properly...
... to exist above the microwave oven so that the materials used will be combined. 2 Sheet metal screws (2) ■ Mounting plate (Located on model, grease filter and charcoal filter may be installed. A B C D E FG H J Materials Needed Standard fittings for 1/4" x 2" lag screws ■■ 1½" (3.8 cm...oven and upper cabinet. ■■ Grounded electrical outlet inside upper cabinet. Power supply cord bushing (1) ■ Grease filters H. hole drill bit for weight of clearance between the wall and the microwave oven so that the vent fits properly...
Installation Instructions
Page 5
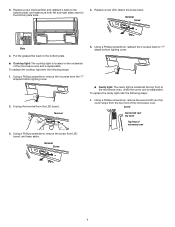
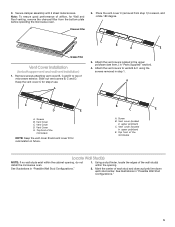
... wall studs exist within the opening , do not install the microwave oven. 1. Vent Cover D. Top front of microwave exterior. Charcoal Filter C B A E Grease Filter Vent Cover Installation (for Wall and Roof venting, remove the charcoal filter from step 1) to area A, and rotate 180 degree. Remove screws attaching vent cover B, C and D to vents B & C using the screws...
... wall studs exist within the opening , do not install the microwave oven. 1. Vent Cover D. Top front of microwave exterior. Charcoal Filter C B A E Grease Filter Vent Cover Installation (for Wall and Roof venting, remove the charcoal filter from step 1) to area A, and rotate 180 degree. Remove screws attaching vent cover B, C and D to vents B & C using the screws...

