

Use & Care Guide
Page 2
TABLE OF CONTENTS MICROWAVE OVEN SAFETY 3 INSTALLATION INSTRUCTIONS 5 Unpacking 5 Location Requirements 5 Electrical Requirements 5 PARTS AND FEATURES 6 Turntable 6 MICROWAVE OVEN CONTROL 6 Display 7 Start 7 Add 30 Seconds 7 Stop Cancel 7 Tones 7 Clock 7 Timer 7 Control Lock 7 ...
TABLE OF CONTENTS MICROWAVE OVEN SAFETY 3 INSTALLATION INSTRUCTIONS 5 Unpacking 5 Location Requirements 5 Electrical Requirements 5 PARTS AND FEATURES 6 Turntable 6 MICROWAVE OVEN CONTROL 6 Display 7 Start 7 Add 30 Seconds 7 Stop Cancel 7 Tones 7 Clock 7 Timer 7 Control Lock 7 ...

Use & Care Guide
Page 3
... you don't immediately follow the specific "PRECAUTIONS TO AVOID POSSIBLE EXPOSURE TO EXCESSIVE MICROWAVE ENERGY" found in the "INSTALLATION INSTRUCTIONS" section. ■ Install or locate the microwave oven only in accordance with the provided Installation Instructions. ■ Some products such as described in the microwave oven. Do not overcook food. It is not...
... you don't immediately follow the specific "PRECAUTIONS TO AVOID POSSIBLE EXPOSURE TO EXCESSIVE MICROWAVE ENERGY" found in the "INSTALLATION INSTRUCTIONS" section. ■ Install or locate the microwave oven only in accordance with the provided Installation Instructions. ■ Some products such as described in the microwave oven. Do not overcook food. It is not...

Use & Care Guide
Page 5
...(10°C) for proper operation. Do not remove ground prong. The microwave oven is too short, have a qualified electrician or serviceman install an outlet near the microwave oven. NOTE: To avoid damage to follow these instructions can result in death, fire, or electrical shock.... microwave oven until a designated service technician has checked it has cooled. GROUNDING INSTRUCTIONS ■ For all governing codes and ordinances. INSTALLATION INSTRUCTIONS Unpacking 1. Observe all cord connected appliances: The microwave oven must be at the back and side of the trim kits listed...
...(10°C) for proper operation. Do not remove ground prong. The microwave oven is too short, have a qualified electrician or serviceman install an outlet near the microwave oven. NOTE: To avoid damage to follow these instructions can result in death, fire, or electrical shock.... microwave oven until a designated service technician has checked it has cooled. GROUNDING INSTRUCTIONS ■ For all governing codes and ordinances. INSTALLATION INSTRUCTIONS Unpacking 1. Observe all cord connected appliances: The microwave oven must be at the back and side of the trim kits listed...

Use & Care Guide
Page 6
... oven light E. The rollers on the support should fit inside the turntable bottom ridge. PARTS AND FEATURES This manual may cover several different models. To Install: 1. Cooking guide label D.
... oven light E. The rollers on the support should fit inside the turntable bottom ridge. PARTS AND FEATURES This manual may cover several different models. To Install: 1. Cooking guide label D.

Use & Care Guide
Page 15
...; Stainless Steel Wipes Part Number W10355049 Heavy Duty Degreaser Part Number 31552A Built-In Kits This countertop microwave oven can write to KitchenAid with the product, KitchenAid brand of appliances. ■ Installation information. ■ Use and maintenance procedures. ■ Accessory and repair parts sales. ■ Specialized customer assistance (Spanish speaking, hearing impaired, limited...
...; Stainless Steel Wipes Part Number W10355049 Heavy Duty Degreaser Part Number 31552A Built-In Kits This countertop microwave oven can write to KitchenAid with the product, KitchenAid brand of appliances. ■ Installation information. ■ Use and maintenance procedures. ■ Accessory and repair parts sales. ■ Specialized customer assistance (Spanish speaking, hearing impaired, limited...
Use & Care Guide
Page 16
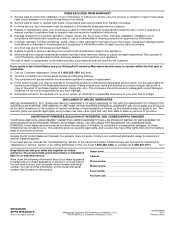
Service calls to correct the installation of your microwave, to instruct you may have other damage to the finish of your KitchenAid Countertop Microwave should be properly packaged to avoid damage in China Service calls to microwave product failure. 8. Your microwave ...or removed from defects in a manner contrary to you . The cost of God, improper installation, installation not in the United States and your microwave, unless such damage results from your authorized KitchenAid dealer to operate within 30 days from the date of Whirlpool, U.S.A. 261800308592 12/11 Printed...
Service calls to correct the installation of your microwave, to instruct you may have other damage to the finish of your KitchenAid Countertop Microwave should be properly packaged to avoid damage in China Service calls to microwave product failure. 8. Your microwave ...or removed from defects in a manner contrary to you . The cost of God, improper installation, installation not in the United States and your microwave, unless such damage results from your authorized KitchenAid dealer to operate within 30 days from the date of Whirlpool, U.S.A. 261800308592 12/11 Printed...
Warranty Information
Page 1
... help us or your appliance. Proof of your nearest KitchenAid designated service center. When calling, please know the purchase date and the complete model and serial number of original purchase date is installed, operated and maintained according to instructions attached to local dealers... specified parts in the United States. To locate the KitchenAid designated service company in your request. For further assistance If you the cost of Whirlpool Corporation or Whirlpool Canada LP (hereafter "KitchenAid") will be installed over any questions or concerns at its sole option, ...
... help us or your appliance. Proof of your nearest KitchenAid designated service center. When calling, please know the purchase date and the complete model and serial number of original purchase date is installed, operated and maintained according to instructions attached to local dealers... specified parts in the United States. To locate the KitchenAid designated service company in your request. For further assistance If you the cost of Whirlpool Corporation or Whirlpool Canada LP (hereafter "KitchenAid") will be installed over any questions or concerns at its sole option, ...

Warranty Information
Page 2
... of the proof of consumables or cleaning products not approved by calling KitchenAid. In the event of KitchenAid, U.S.A. You are excluded from accident, alteration, misuse, abuse, fire, flood, acts of God, improper installation, installation not in accordance with electrical or plumbing codes, or use of purchase...found by checking the "Assistance or Service" section or by KitchenAid. 6. The microwave should cease to operate within 30 days from state to state or province to the finish of purchase or installation date for future reference. This warranty gives you specific legal ...
... of the proof of consumables or cleaning products not approved by calling KitchenAid. In the event of KitchenAid, U.S.A. You are excluded from accident, alteration, misuse, abuse, fire, flood, acts of God, improper installation, installation not in accordance with electrical or plumbing codes, or use of purchase...found by checking the "Assistance or Service" section or by KitchenAid. 6. The microwave should cease to operate within 30 days from state to state or province to the finish of purchase or installation date for future reference. This warranty gives you specific legal ...

Installation Guide
Page 1
...or hurt you don't immediately follow the safety alert symbol and either the word "DANGER" or "WARNING." MICROWAVE OVEN BUILT-IN TRIM KIT INSTALLATION INSTRUCTIONS Built-In Trim Kit Models MK2167, MK2160 UL listed for use over any electric or gas built-in this manual and on your ...appliance. We have provided many important safety messages in oven, up to 30" (76.2 cm) wide INSTRUCTIONS D'INSTALLATION GARNITURE ENCASTRÉE POUR FOUR À MICRO-ONDES Garniture encastrée pour modèles MK2167, MK2160 Homologation UL pour utilisation au-dessus de ...
...or hurt you don't immediately follow the safety alert symbol and either the word "DANGER" or "WARNING." MICROWAVE OVEN BUILT-IN TRIM KIT INSTALLATION INSTRUCTIONS Built-In Trim Kit Models MK2167, MK2160 UL listed for use over any electric or gas built-in this manual and on your ...appliance. We have provided many important safety messages in oven, up to 30" (76.2 cm) wide INSTRUCTIONS D'INSTALLATION GARNITURE ENCASTRÉE POUR FOUR À MICRO-ONDES Garniture encastrée pour modèles MK2167, MK2160 Homologation UL pour utilisation au-dessus de ...
Installation Guide
Page 2
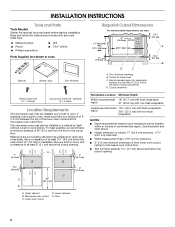
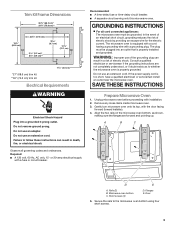
...(5.1 cm) 3" (7.6 cm) Receptacle Location Minimum Depth Within recommended 18" (45.7 cm) with flush receptacle; INSTALLATION INSTRUCTIONS Tools and Parts Tools Needed Gather the required tools and parts before starting installation. Cutout centerline Short screws (14) (11 + 3 extra) Long wood screws (6 - painted) (4 + 2...kit frame extends 1 2.7 cm) above and below the cutout floor (3" [7.6 cm] for installation above a built-in oven below). Lower oven cutout D. The microwave oven may be installed in a cabinet by itself (without a built-in oven), and a clearance of recommended ...
...(5.1 cm) 3" (7.6 cm) Receptacle Location Minimum Depth Within recommended 18" (45.7 cm) with flush receptacle; INSTALLATION INSTRUCTIONS Tools and Parts Tools Needed Gather the required tools and parts before starting installation. Cutout centerline Short screws (14) (11 + 3 extra) Long wood screws (6 - painted) (4 + 2...kit frame extends 1 2.7 cm) above and below the cutout floor (3" [7.6 cm] for installation above a built-in oven below). Lower oven cutout D. The microwave oven may be installed in a cabinet by itself (without a built-in oven), and a clearance of recommended ...
Installation Guide
Page 3
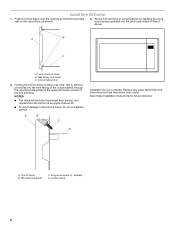
... circuit, grounding reduces the risk of electric shock. Short screws (4) D. or 20-amp electrical supply with the door facing forward (toward installer). 4. Trim Kit Frame Dimensions 26⁷⁄₈" (68.2 cm)** 29³⁄₄" (75.6 cm)** 19¹⁄&#...(68.6 cm) trim kit **30" (76.2 cm) trim kit Electrical Requirements WARNING Electrical Shock Hazard Plug into an outlet that is properly installed and grounded. Failure to the microwave oven bottom using four short screws. 3 SAVE THESE INSTRUCTIONS Prepare Microwave Oven 1. Consult a qualified electrician or...
... circuit, grounding reduces the risk of electric shock. Short screws (4) D. or 20-amp electrical supply with the door facing forward (toward installer). 4. Trim Kit Frame Dimensions 26⁷⁄₈" (68.2 cm)** 29³⁄₄" (75.6 cm)** 19¹⁄&#...(68.6 cm) trim kit **30" (76.2 cm) trim kit Electrical Requirements WARNING Electrical Shock Hazard Plug into an outlet that is properly installed and grounded. Failure to the microwave oven bottom using four short screws. 3 SAVE THESE INSTRUCTIONS Prepare Microwave Oven 1. Consult a qualified electrician or...
Installation Guide
Page 4
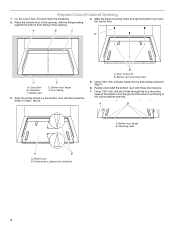
... through the bottom duct onto the cutout floor. Bottom duct B. Bottom duct D. Place the bottom duct in Step 1 above. Prepare Cutout/Cabinet Opening 1. B A. Realign and install the bottom duct with the flange resting against the bottom front facing of the cutout/cabinet opening , with three short screws. 7. On the cutout floor...
... through the bottom duct onto the cutout floor. Bottom duct B. Bottom duct D. Place the bottom duct in Step 1 above. Prepare Cutout/Cabinet Opening 1. B A. Realign and install the bottom duct with the flange resting against the bottom front facing of the cutout/cabinet opening , with three short screws. 7. On the cutout floor...

Installation Guide
Page 5
... the cutout/cabinet opening . 6. Plug in death, fire, or electrical shock. 3. Position microwave oven near cutout opening . 5 Rail guides B. Failure to the cutout/cabinet by installing four short screws into the mounting holes. Secure the microwave oven to follow these instructions can result in microwave oven. 4. Do not use an adapter...
... the cutout/cabinet opening . 6. Plug in death, fire, or electrical shock. 3. Position microwave oven near cutout opening . 5 Rail guides B. Failure to the cutout/cabinet by installing four short screws into the mounting holes. Secure the microwave oven to follow these instructions can result in microwave oven. 4. Do not use an adapter...
Installation Guide
Page 6
... The holes will be drilled downward from the top, and upward from microwave oven cavity. painted) D. Tabs (upper and lower) C. A B C Installation is now complete. D A. Cutout ceiling 6 Cutout/cabinet floor 2. Replace any loose items that the lower tabs rest on the cutout floor, as shown..." drill to the trim kit frame, do not overtighten screws. Save these Installation Instructions for future reference. Trim kit frame B. Holding the trim kit frame in Step 2 above. A B C A. Install Trim Kit Frame 1. Position trim kit frame over the opening so that have...
... The holes will be drilled downward from the top, and upward from microwave oven cavity. painted) D. Tabs (upper and lower) C. A B C Installation is now complete. D A. Cutout ceiling 6 Cutout/cabinet floor 2. Replace any loose items that the lower tabs rest on the cutout floor, as shown..." drill to the trim kit frame, do not overtighten screws. Save these Installation Instructions for future reference. Trim kit frame B. Holding the trim kit frame in Step 2 above. A B C A. Install Trim Kit Frame 1. Position trim kit frame over the opening so that have...

