Use and Care Guide
Page 1
KITCHENAID® Gas Sealed Burner Cooktop MODELS KGCR055G KGCT055G KGCS105G KGCS127G KGCS166G KGCT305G KGCT365G KGCT366G 3191828 www.kitchenaid.com Use and Care Guide Table of Contents...2 A Note to You...2 Cooktop Safety ...3 Using Your Cooktop ...5 Caring For Your Cooktop...13 Troubleshooting ...17 Requesting Assistance or Service...18 Warranty...20 For assistance or service in Canada, see page 19. For assistance or service in the U.S.A., call the Consumer Assistance Center.
KITCHENAID® Gas Sealed Burner Cooktop MODELS KGCR055G KGCT055G KGCS105G KGCS127G KGCS166G KGCT305G KGCT365G KGCT366G 3191828 www.kitchenaid.com Use and Care Guide Table of Contents...2 A Note to You...2 Cooktop Safety ...3 Using Your Cooktop ...5 Caring For Your Cooktop...13 Troubleshooting ...17 Requesting Assistance or Service...18 Warranty...20 For assistance or service in Canada, see page 19. For assistance or service in the U.S.A., call the Consumer Assistance Center.

Use and Care Guide
Page 2
... safe place for location of plate). Please read it carefully. Because your life is getting busier and more complicated, KitchenAid appliances are easy to use, save time, and help you enjoy many years of trouble-free operation, we developed .... Table of Contents A Note to You ...2 Cooktop Safety ...3 Using Your Cooktop ...5 Using the Surface Burners...5 Characteristics of cookware materials ...12 Caring for Your Cooktop...13 Cleaning chart ...13 Stainless steel surfaces ...14 Sealed surface burners and cooktop ..15 Troubleshooting...17 Requesting Assistance or Service...18 Warranty...
... safe place for location of plate). Please read it carefully. Because your life is getting busier and more complicated, KitchenAid appliances are easy to use, save time, and help you enjoy many years of trouble-free operation, we developed .... Table of Contents A Note to You ...2 Cooktop Safety ...3 Using Your Cooktop ...5 Using the Surface Burners...5 Characteristics of cookware materials ...12 Caring for Your Cooktop...13 Cleaning chart ...13 Stainless steel surfaces ...14 Sealed surface burners and cooktop ..15 Troubleshooting...17 Requesting Assistance or Service...18 Warranty...
Use and Care Guide
Page 4
children climbing on or near surface units. • Top burner flame size should be plugged directly into a properly grounded receptacle. Flammable materials should be adjusted so it does not extend beyond the edge of local... grounding prong from this plug. • Disconnect the electrical supply before servicing the cooktop. • Never Use the Cooktop for your protection against shock hazard and should not be stored on the cooktop to persons, or damage when using the cooktop, follow basic precautions, including the following: • CAUTION - SAVE THESE INSTRUCTIONS - 4 Be ...
children climbing on or near surface units. • Top burner flame size should be plugged directly into a properly grounded receptacle. Flammable materials should be adjusted so it does not extend beyond the edge of local... grounding prong from this plug. • Disconnect the electrical supply before servicing the cooktop. • Never Use the Cooktop for your protection against shock hazard and should not be stored on the cooktop to persons, or damage when using the cooktop, follow basic precautions, including the following: • CAUTION - SAVE THESE INSTRUCTIONS - 4 Be ...
Use and Care Guide
Page 5
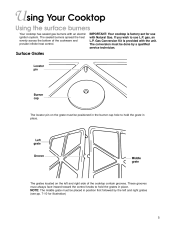
... be done by the left and right side of the cookware and provide infinite heat control. The sealed burners spread the heat evenly across the bottom of the cooktop contain grooves. gas, an L.P. Surface Grates Locator pin Burner cap The locator pin on the left and right grates (see pp. 7-10 for use L.P. The conversion...
... be done by the left and right side of the cookware and provide infinite heat control. The sealed burners spread the heat evenly across the bottom of the cooktop contain grooves. gas, an L.P. Surface Grates Locator pin Burner cap The locator pin on the left and right grates (see pp. 7-10 for use L.P. The conversion...
Use and Care Guide
Page 6
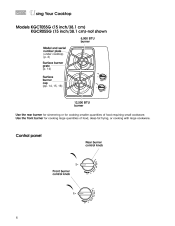
... frying, or cooking with large cookware. U sing Your Cooktop Models KGCT055G (15 inch/38.1 cm) KGCR055G (15 inch/38.1 cm)-not shown 6,000 BTU burner Model and serial number plate (under cooktop) (p. 2) Surface burner grate (p. 14) Surface burner cap (pp. 14, 15, 16) 12,500 BTU burner Use the rear burner for simmering or for cooking large quantities of...
... frying, or cooking with large cookware. U sing Your Cooktop Models KGCT055G (15 inch/38.1 cm) KGCR055G (15 inch/38.1 cm)-not shown 6,000 BTU burner Model and serial number plate (under cooktop) (p. 2) Surface burner grate (p. 14) Surface burner cap (pp. 14, 15, 16) 12,500 BTU burner Use the rear burner for simmering or for cooking large quantities of...
Use and Care Guide
Page 7
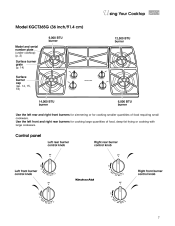
U sing Your Cooktop Model KGCT365G (36 inch/91.4 cm) 9,000 BTU burner Model and serial number plate (under cooktop) (p. 2) Surface burner grate (p. 14) Surface burner cap (pp. 14, 15, 16) 12,500 BTU burner 14,000 BTU burner 6,000 BTU burner Use the left front and right rear burners for cooking smaller quantities of food, deep-fat frying or cooking with...
U sing Your Cooktop Model KGCT365G (36 inch/91.4 cm) 9,000 BTU burner Model and serial number plate (under cooktop) (p. 2) Surface burner grate (p. 14) Surface burner cap (pp. 14, 15, 16) 12,500 BTU burner 14,000 BTU burner 6,000 BTU burner Use the left front and right rear burners for cooking smaller quantities of food, deep-fat frying or cooking with...
Use and Care Guide
Page 8
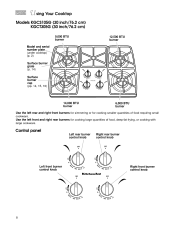
U sing Your Cooktop Models KGCS105G (30 inch/76.2 cm) KGCT305G (30 inch/76.2 cm) 9,000 BTU burner Model and serial number plate (under cooktop) (p. 2) Surface burner grate (p. 14) Surface burner cap (pp. 14, 15, 16) 12,500 BTU burner 14,000 BTU burner 6,000 BTU burner Use the left front and right rear burners for cooking smaller quantities of food, deep-fat frying, or...
U sing Your Cooktop Models KGCS105G (30 inch/76.2 cm) KGCT305G (30 inch/76.2 cm) 9,000 BTU burner Model and serial number plate (under cooktop) (p. 2) Surface burner grate (p. 14) Surface burner cap (pp. 14, 15, 16) 12,500 BTU burner 14,000 BTU burner 6,000 BTU burner Use the left front and right rear burners for cooking smaller quantities of food, deep-fat frying, or...
Use and Care Guide
Page 9
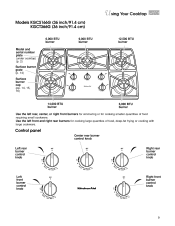
... LO LO HI MED MED LO LO 9 9 U sing Your Cooktop Models KGCS166G (36 inch/91.4 cm) KGCT366G (36 inch/91.4 cm) 6,000 BTU burner Model and serial number plate (under cooktop) (p. 2) Surface burner grate (p. 14) LITE 9,000 BTU burner 12,500 BTU burner OFF OFF OFF LITE Surface burner cap (pp. 14, 15, 16) ED HI ED LITE HI...
... LO LO HI MED MED LO LO 9 9 U sing Your Cooktop Models KGCS166G (36 inch/91.4 cm) KGCT366G (36 inch/91.4 cm) 6,000 BTU burner Model and serial number plate (under cooktop) (p. 2) Surface burner grate (p. 14) LITE 9,000 BTU burner 12,500 BTU burner OFF OFF OFF LITE Surface burner cap (pp. 14, 15, 16) ED HI ED LITE HI...

Use and Care Guide
Page 10
U sing Your Cooktop Model KGCS127G (43 inch/109 cm) 9,000 BTU burner Model and serial number plate (under cooktop) (p. 2) Surface burner grate (p. 14) Surface burner cap (pp. 14, 15, 16) 14,000 BTU burner LITE 6,000 BTU burner 9,000 BTU burner 12,500 BTU burner LITE LITE LITE LITE HI HI HI ED LITE HI ED HI... HI D MED MED LO LO HI D MED MED LO LO HI D E E E E MED MED LO LO HI MED MED LO LO Left front burner control knob OFF OFF Right front burner control knob LO LITE LITE HI M M HI D HI D E E MED MED LO LO HI MED MED LO 10 HI M HI MED MED LO...
U sing Your Cooktop Model KGCS127G (43 inch/109 cm) 9,000 BTU burner Model and serial number plate (under cooktop) (p. 2) Surface burner grate (p. 14) Surface burner cap (pp. 14, 15, 16) 14,000 BTU burner LITE 6,000 BTU burner 9,000 BTU burner 12,500 BTU burner LITE LITE LITE LITE HI HI HI ED LITE HI ED HI... HI D MED MED LO LO HI D MED MED LO LO HI D E E E E MED MED LO LO HI MED MED LO LO Left front burner control knob OFF OFF Right front burner control knob LO LITE LITE HI M M HI D HI D E E MED MED LO LO HI MED MED LO 10 HI M HI MED MED LO...

Use and Care Guide
Page 11
... not leave empty cookware, or cookware which has boiled dry, on the grate. SETTING LITE HI MED HI MED RECOMMENDED USE • To light the burner. • To start food cooking. • To bring liquid to a boil. • To hold a boil. • To fry chicken or pancakes...., and icing. • To cook large amounts of time without having cookware on a hot surface burner. U sing Your Cooktop Using Your Cooktop Using the Surface Burners (cont.) Using the control knobs Your cooktop comes with the control knob turned to LITE is the ignitor sparking. The cookware could overheat causing damage...
... not leave empty cookware, or cookware which has boiled dry, on the grate. SETTING LITE HI MED HI MED RECOMMENDED USE • To light the burner. • To start food cooking. • To bring liquid to a boil. • To hold a boil. • To fry chicken or pancakes...., and icing. • To cook large amounts of time without having cookware on a hot surface burner. U sing Your Cooktop Using Your Cooktop Using the Surface Burners (cont.) Using the control knobs Your cooktop comes with the control knob turned to LITE is the ignitor sparking. The cookware could overheat causing damage...
Use and Care Guide
Page 12
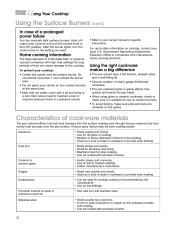
...who manufacture home canning products. Hold a lit match near a burner and turn the control knob to the setting you want. • Refer to your cooktop: • Center the canner over the pan bottom. After the burner lights, turn the control knob to the LITE position. To ...; Used as a core or base in a pressure canner. U sing Your Cooktop Using the Surface Burners (cont.) In case of a prolonged power failure You can cause damage to the cooktop. Do not extend more than 1 inch outside the burner area. • Do not place your local U.S. Using the right cookware makes...
...who manufacture home canning products. Hold a lit match near a burner and turn the control knob to the setting you want. • Refer to your cooktop: • Center the canner over the pan bottom. After the burner lights, turn the control knob to the LITE position. To ...; Used as a core or base in a pressure canner. U sing Your Cooktop Using the Surface Burners (cont.) In case of a prolonged power failure You can cause damage to the cooktop. Do not extend more than 1 inch outside the burner area. • Do not place your local U.S. Using the right cookware makes...
Use and Care Guide
Page 13
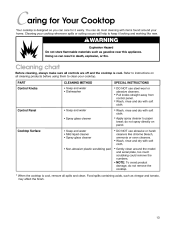
... PART Control Knobs CLEANING METHOD SPECIAL INSTRUCTIONS • Soap and water • Dishwasher • DO NOT use abrasive or harsh cleaners like new. Cooktop Surface • Soap and water • Mild liquid cleaner • Spray glass cleaner • Non-abrasive plastic scrubbing pad • DO NOT...panel. • Wash, rinse and dry with soft cloth. • Apply spray cleaner to paper towel; You can care for Your Cooktop Your cooktop is designed so you can do most cleaning with items found around the model and serial plate, too much scrubbing could remove the numbers...
... PART Control Knobs CLEANING METHOD SPECIAL INSTRUCTIONS • Soap and water • Dishwasher • DO NOT use abrasive or harsh cleaners like new. Cooktop Surface • Soap and water • Mild liquid cleaner • Spray glass cleaner • Non-abrasive plastic scrubbing pad • DO NOT...panel. • Wash, rinse and dry with soft cloth. • Apply spray cleaner to paper towel; You can care for Your Cooktop Your cooktop is designed so you can do most cleaning with items found around the model and serial plate, too much scrubbing could remove the numbers...
Use and Care Guide
Page 14
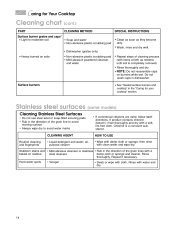
... of cleaning process (with a baked-on burners while wet. Repeat if necessary. Caring for your cooktop" section. Do not wash caps in the "Caring for Your Cooktop Cleaning chart PART Surface burner grates and caps* • Light to ...avoid water marks CLEANING AGENT Routine cleaning and fingerprints (some models) • If commercial cleaners are used, follow label directions. Surface burners • See "Sealed surface burners and cooktop...
... of cleaning process (with a baked-on burners while wet. Repeat if necessary. Caring for your cooktop" section. Do not wash caps in the "Caring for Your Cooktop Cleaning chart PART Surface burner grates and caps* • Light to ...avoid water marks CLEANING AGENT Routine cleaning and fingerprints (some models) • If commercial cleaners are used, follow label directions. Surface burners • See "Sealed surface burners and cooktop...

Use and Care Guide
Page 15
... holes in the control area. Ignitor Burner base • Occasionally check the burner flames for Your Cooktop Sealed surface burners and cooktop Cleaning the surface burners • You should routinely remove and clean the burn- Gas tube opening for the burner to clean the burners. You must keep the burner cap in place whenever a surface burner is blue in use oven cleaners...
... holes in the control area. Ignitor Burner base • Occasionally check the burner flames for Your Cooktop Sealed surface burners and cooktop Cleaning the surface burners • You should routinely remove and clean the burn- Gas tube opening for the burner to clean the burners. You must keep the burner cap in place whenever a surface burner is blue in use oven cleaners...
Use and Care Guide
Page 16
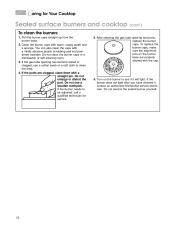
... with a straight pin. Do not service the sealed burner yourself. 16 If the gas tube opening and ports, replace the burner caps. After cleaning the gas tube opening has become soiled or clogged, use a wooden toothpick. Turn on the burner base are clogged, clean them with the cap.... soft cloth to clean the area. 4. To replace the burner caps, make sure the alignment pins on the burner to be adjusted, call a qualified technician for Your Cooktop Sealed surface burners and cooktop To clean the burners: 1. If the burner does not light after you have cleaned it will light....
... with a straight pin. Do not service the sealed burner yourself. 16 If the gas tube opening and ports, replace the burner caps. After cleaning the gas tube opening has become soiled or clogged, use a wooden toothpick. Turn on the burner base are clogged, clean them with the cap.... soft cloth to clean the area. 4. To replace the burner caps, make sure the alignment pins on the burner to be adjusted, call a qualified technician for Your Cooktop Sealed surface burners and cooktop To clean the burners: 1. If the burner does not light after you have cleaned it will light....
Use and Care Guide
Page 17
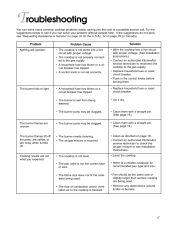
... page 16. • Contact an authorized KitchenAid service technician to check the air/gas mixture or see if you can solve many common cooktop problems easily, saving you expected. • The cooktop is not level. • The pan used...gas mixture is not the correct type or size. • The flame size does not fit the cookware being used . • Remove any obstructions around knobs or burners. Solution • Wire the cooktop into a live circuit with proper voltage. (See installation instructions.) • Contact an authorized KitchenAid service technician to reconnect the cooktop...
... page 16. • Contact an authorized KitchenAid service technician to check the air/gas mixture or see if you can solve many common cooktop problems easily, saving you expected. • The cooktop is not level. • The pan used...gas mixture is not the correct type or size. • The flame size does not fit the cookware being used . • Remove any obstructions around knobs or burners. Solution • Wire the cooktop into a live circuit with proper voltage. (See installation instructions.) • Contact an authorized KitchenAid service technician to reconnect the cooktop...
Use and Care Guide
Page 20
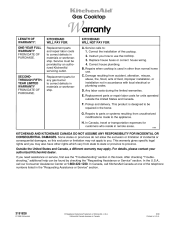
... Service" section. 3191828 © 1998 KitchenAid ® Registered trademark/Trademark of the cooktop. 2. Damage resulting from unauthorized modifications made to province. Correct the installation of KitchenAid, U.S.A. Replacement parts or repair labor costs for customers who reside in materials or workmanship. Pickup and delivery. Replacement parts for any gas burner to correct defects in remote areas...
... Service" section. 3191828 © 1998 KitchenAid ® Registered trademark/Trademark of the cooktop. 2. Damage resulting from unauthorized modifications made to province. Correct the installation of KitchenAid, U.S.A. Replacement parts or repair labor costs for customers who reside in materials or workmanship. Pickup and delivery. Replacement parts for any gas burner to correct defects in remote areas...
Installation Instructions
Page 1
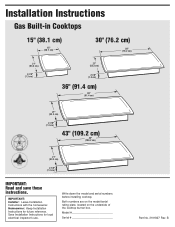
Installation Instructions Gas Built-in Cooktops 15" (38.1 cm) 15" (38.1 cm) 30" (76.2 cm) 30" (76.2 cm) 21" (53.3 cm) 2-7/8" (7.3 cm) 21" (53.3 cm) 2-7/8" (7.3 cm) 36" (91.4 cm) 36" (91.4 cm) 21" (53.3 cm) 2-7/8" (7.3 cm)...cooktop. Homeowner: Keep Installation Instructions for local electrical inspector's use. IMPORTANT: Installer: Leave Installation Instructions with the homeowner. B Save Installation Instructions for future reference. Model Serial Part No. 3191827 Rev. Both numbers are on the model/serial rating plate, located on the underside of the cooktop burner...
Installation Instructions Gas Built-in Cooktops 15" (38.1 cm) 15" (38.1 cm) 30" (76.2 cm) 30" (76.2 cm) 21" (53.3 cm) 2-7/8" (7.3 cm) 21" (53.3 cm) 2-7/8" (7.3 cm) 36" (91.4 cm) 36" (91.4 cm) 21" (53.3 cm) 2-7/8" (7.3 cm)...cooktop. Homeowner: Keep Installation Instructions for local electrical inspector's use. IMPORTANT: Installer: Leave Installation Instructions with the homeowner. B Save Installation Instructions for future reference. Model Serial Part No. 3191827 Rev. Both numbers are on the model/serial rating plate, located on the underside of the cooktop burner...
Installation Instructions
Page 2
...International 8501 East Pleasant Valley Rd. The location should be sealed. See "Electrical Requirements," Pages 4-5. Cleveland, OH 44131-5575 Tools needed for correct installation. This is your gas supplier from a neighbor's phone. Proper gas supply connection must be killed or seriously injured if you... strong heating vents or fans. Copies of the cooktop burner box. WHAT TO DO IF YOU SMELL GAS • Do not try to L.P./Propane gas, see instructions in the Gas Conversion Kit provided in conformance with Natural gas. Always read and obey all safety messages. Before...
...International 8501 East Pleasant Valley Rd. The location should be sealed. See "Electrical Requirements," Pages 4-5. Cleveland, OH 44131-5575 Tools needed for correct installation. This is your gas supplier from a neighbor's phone. Proper gas supply connection must be killed or seriously injured if you... strong heating vents or fans. Copies of the cooktop burner box. WHAT TO DO IF YOU SMELL GAS • Do not try to L.P./Propane gas, see instructions in the Gas Conversion Kit provided in conformance with Natural gas. Always read and obey all safety messages. Before...
Installation Instructions
Page 3
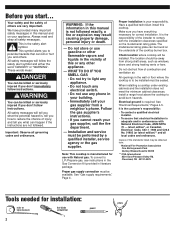
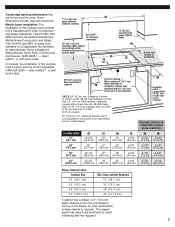
... Ạ ả min. 13" (33 cm) recommended upper cabinet depth Ấ ạ Do not seal cooktop to countertop. 25" (63.5 cm) min.deep countertop is required Gas line opening dimensions that are shown must be shortened to be used. The drawer depth may need to avoid interfering... cm) flame retardant millboard covered with local codes. Ả 1" (2.5 cm) min. Minimum distance to the top of cutout. Base Cabinet Required 15" (38.1 cm) 30" (76.2 cm) 36" (91.4 cm) 44" (111.8 cm) If cabinet has a drawer, a 4" (10.2 cm) depth clearance from the countertop to combustible...
... Ạ ả min. 13" (33 cm) recommended upper cabinet depth Ấ ạ Do not seal cooktop to countertop. 25" (63.5 cm) min.deep countertop is required Gas line opening dimensions that are shown must be shortened to be used. The drawer depth may need to avoid interfering... cm) flame retardant millboard covered with local codes. Ả 1" (2.5 cm) min. Minimum distance to the top of cutout. Base Cabinet Required 15" (38.1 cm) 30" (76.2 cm) 36" (91.4 cm) 44" (111.8 cm) If cabinet has a drawer, a 4" (10.2 cm) depth clearance from the countertop to combustible...


