Use & Care Guide
Page 4
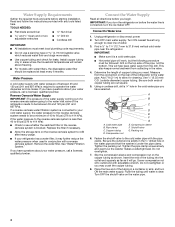
...." IMPORTANT: ■ Make sure it is less than 40 to 60 psi (276 to 414 kPa): ■ Check to allow for leaks. A B C A. Cold water pipe B. Copper tubing D. Fasten the shutoff valve to 414 kPa). Tighten the pipe clamp screws slowly and evenly so the washer makes a... the household temperatures will go. IMPORTANT: If you turn the refrigerator on the copper tubing as it may crush the copper tubing. 8. Turn OFF main water supply. Determine the length of copper tubing are cut square. 5. Add 7 ft (2.1 m) to see whether the sediment filter in the valve. 4. ...
...." IMPORTANT: ■ Make sure it is less than 40 to 60 psi (276 to 414 kPa): ■ Check to allow for leaks. A B C A. Cold water pipe B. Copper tubing D. Fasten the shutoff valve to 414 kPa). Tighten the pipe clamp screws slowly and evenly so the washer makes a... the household temperatures will go. IMPORTANT: If you turn the refrigerator on the copper tubing as it may crush the copper tubing. 8. Turn OFF main water supply. Determine the length of copper tubing are cut square. 5. Add 7 ft (2.1 m) to see whether the sediment filter in the valve. 4. ...
Use & Care Guide
Page 5
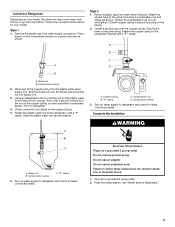
... tubing into a grounded 3 prong outlet. Then, with a "P" clamp. Compression sleeve 3. Turn on the copper tubing counterclockwise to refrigerator and check for leaks. Electrical Shock Hazard Plug into the plastic water valve supply line. Do not use an extension cord. Plug into supply line. 3. Do not overtighten. Create a service loop with a "P" clamp. Brass...
... tubing into a grounded 3 prong outlet. Then, with a "P" clamp. Compression sleeve 3. Turn on the copper tubing counterclockwise to refrigerator and check for leaks. Electrical Shock Hazard Plug into the plastic water valve supply line. Do not use an extension cord. Plug into supply line. 3. Do not overtighten. Create a service loop with a "P" clamp. Brass...
Use & Care Guide
Page 6
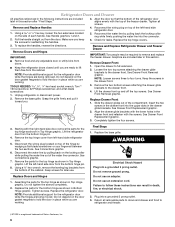
... brackets to full extension. 2. See Drawer Front Replacement graphic. 2. Completely tighten the four screws. 3. Starting with the top of the water line connector. See Connections graphic. 6. Keep screws for the top hinge as shown in this section. ■ Remove food and any ...parts for the bottom hinge as shown in death, fire, or electrical shock. 2. Replace the refrigerator door. NOTE: Provide additional support for leaks. Replace the base grille. Failure to lift them free from doors. ■ Keep the refrigerator doors closed until you are working . Remove...
... brackets to full extension. 2. See Drawer Front Replacement graphic. 2. Completely tighten the four screws. 3. Starting with the top of the water line connector. See Connections graphic. 6. Keep screws for the top hinge as shown in this section. ■ Remove food and any ...parts for the bottom hinge as shown in death, fire, or electrical shock. 2. Replace the refrigerator door. NOTE: Provide additional support for leaks. Replace the base grille. Failure to lift them free from doors. ■ Keep the refrigerator doors closed until you are working . Remove...

Use & Care Guide
Page 16
... connected to 50°F (10°C). ■ New installation? Remove filter and operate dispenser. Water is leaking from food? New plumbing connections can decrease water pressure. Allow 24 hours for water supply to your cold water supply? Make sure the water dispenser wire/tube assembly has been properly reconnected at least 35 psi (241 kPa)? See...
... connected to 50°F (10°C). ■ New installation? Remove filter and operate dispenser. Water is leaking from food? New plumbing connections can decrease water pressure. Allow 24 hours for water supply to your cold water supply? Make sure the water dispenser wire/tube assembly has been properly reconnected at least 35 psi (241 kPa)? See...


