Use & Care Guide
Page 3
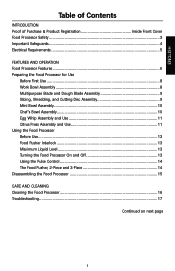
... Proof of Purchase & Product Registration Inside Front Cover Food Processor Safety ...3 Important Safeguards ...4 Electrical Requirements 5 FEATURES AND OPERATION Food Processor Features 6 Preparing the Food Processor for Use Before First Use ...8 Work Bowl Assembly 8 Multipurpose Blade and Dough Blade Assembly 9 Slicing, Shredding, and Cutting Disc Assembly 9 Mini Bowl Assembly 10 Chef's Bowl Assembly 10 Egg Whip Assembly and Use 11...
... Proof of Purchase & Product Registration Inside Front Cover Food Processor Safety ...3 Important Safeguards ...4 Electrical Requirements 5 FEATURES AND OPERATION Food Processor Features 6 Preparing the Food Processor for Use Before First Use ...8 Work Bowl Assembly 8 Multipurpose Blade and Dough Blade Assembly 9 Slicing, Shredding, and Cutting Disc Assembly 9 Mini Bowl Assembly 10 Chef's Bowl Assembly 10 Egg Whip Assembly and Use 11...
Use & Care Guide
Page 6
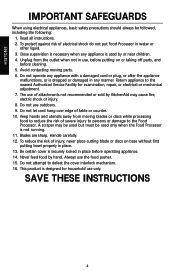
.... Do not let cord hang over edge of attachments not recommended or sold by or near children. 4. Handle carefully. 12. To reduce the risk of injury, never place cutting blade or discs on or taking off parts, and before operating ...KitchenAid may be used but must be followed, including the following: 1. The use the food pusher. 15. Never feed food by hand. SAVE THESE INSTRUCTIONS 4 Avoid contacting moving blades or discs while processing food to reduce the risk of electrical shock do not put Food Processor in use, before putting on base without first putting bowl...
.... Do not let cord hang over edge of attachments not recommended or sold by or near children. 4. Handle carefully. 12. To reduce the risk of injury, never place cutting blade or discs on or taking off parts, and before operating ...KitchenAid may be used but must be followed, including the following: 1. The use the food pusher. 15. Never feed food by hand. SAVE THESE INSTRUCTIONS 4 Avoid contacting moving blades or discs while processing food to reduce the risk of electrical shock do not put Food Processor in use, before putting on base without first putting bowl...

Use & Care Guide
Page 8
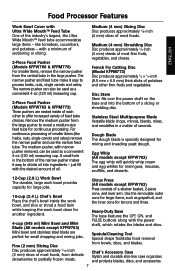
Food Processor Features Medium (4 mm) Shredding Disc French Fry Cutting Disc (Model KFPM773) Medium (4 mm) Slicing Disc 12-Cup (2.8 L) Work Bowl Heavy-Duty Base 10-Cup (2.4 L) Chef's Bowl Fine (2 mm) Slicing Disc ENGLISH Off On Pulse Citrus Press (All models except KFPW763) 2-Piece Cone Disc Stem Work Bowl Cover with Ultra Wide Mouth™ Feed Tube Stainless Steel Multipurpose...
Food Processor Features Medium (4 mm) Shredding Disc French Fry Cutting Disc (Model KFPM773) Medium (4 mm) Slicing Disc 12-Cup (2.8 L) Work Bowl Heavy-Duty Base 10-Cup (2.4 L) Chef's Bowl Fine (2 mm) Slicing Disc ENGLISH Off On Pulse Citrus Press (All models except KFPW763) 2-Piece Cone Disc Stem Work Bowl Cover with Ultra Wide Mouth™ Feed Tube Stainless Steel Multipurpose...
Use & Care Guide
Page 9
Food Processor Features ENGLISH Work Bowl Cover with Ultra Wide Mouth™ Feed Tube One of the narrow...slim-line case organizes and protects blades, discs, and accessories. 7 just fill with a minimum of most foods, from bowls, discs, and blades. Disc Stem Stem fits over the power shaft on the base and into ingredients ...egg whip will quickly whip cream and egg whites for meringues, mousses, soufflés, and desserts. 12-Cup (2.8 L) Work Bowl The durable, large work bowl clean for lemons and limes. For continuous processing of smaller items (like tomatoes, cucumbers, and ...
Food Processor Features ENGLISH Work Bowl Cover with Ultra Wide Mouth™ Feed Tube One of the narrow...slim-line case organizes and protects blades, discs, and accessories. 7 just fill with a minimum of most foods, from bowls, discs, and blades. Disc Stem Stem fits over the power shaft on the base and into ingredients ...egg whip will quickly whip cream and egg whites for meringues, mousses, soufflés, and desserts. 12-Cup (2.8 L) Work Bowl The durable, large work bowl clean for lemons and limes. For continuous processing of smaller items (like tomatoes, cucumbers, and ...
Use & Care Guide
Page 10
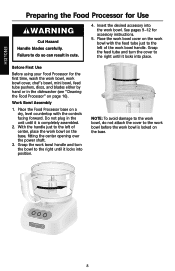
...12 for Use WARNING Cut Hazard Handle blades carefully. Grasp the feed tube and turn the bowl to the work bowl is completely assembled. 2. With the handle just to the right until it locks into the work bowl. NOTE: To avoid damage to the right until it locks into position. Place the work bowl... cover on the work bowl with the controls facing forward. Work Bowl Assembly 1. Do not plug in the dishwasher (see "Cleaning the Food Processor" on the base. Before First Use Before using your Food Processor for the first time, wash the work bowl, work bowl handle...
...12 for Use WARNING Cut Hazard Handle blades carefully. Grasp the feed tube and turn the bowl to the work bowl is completely assembled. 2. With the handle just to the right until it locks into the work bowl. NOTE: To avoid damage to the right until it locks into position. Place the work bowl... cover on the work bowl with the controls facing forward. Work Bowl Assembly 1. Do not plug in the dishwasher (see "Cleaning the Food Processor" on the base. Before First Use Before using your Food Processor for the first time, wash the work bowl, work bowl handle...
Use & Care Guide
Page 11
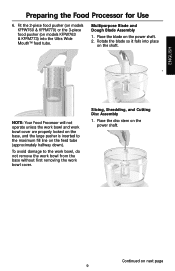
...halfway down). NOTE: Your Food Processor will not operate unless the work bowl and work bowl cover are properly locked on the base, and the large pusher is inserted to the work bowl, do not remove the work bowl from the base without first removing the work bowl cover. Place the disc ...stem on next page 9 Multipurpose Blade and Dough Blade Assembly 1. ENGLISH Preparing the Food Processor for Use 6. Slicing, Shredding, and Cutting Disc ...
...halfway down). NOTE: Your Food Processor will not operate unless the work bowl and work bowl cover are properly locked on the base, and the large pusher is inserted to the work bowl, do not remove the work bowl from the base without first removing the work bowl cover. Place the disc ...stem on next page 9 Multipurpose Blade and Dough Blade Assembly 1. ENGLISH Preparing the Food Processor for Use 6. Slicing, Shredding, and Cutting Disc ...
Use & Care Guide
Page 12
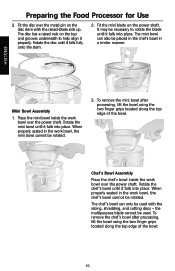
... multipurpose blade cannot be used . Place the mini bowl inside the work bowl over the power shaft. To remove the mini bowl after processing, lift the bowl using the two finger grips located along the top edge of the bowl. Preparing the Food Processor for Use 2. Rotate the disc until it falls... into place. Fit the disc over the power shaft. It may be rotated. To remove the chef's bowl after processing, lift the bowl using the two finger grips located ...
... multipurpose blade cannot be used . Place the mini bowl inside the work bowl over the power shaft. To remove the mini bowl after processing, lift the bowl using the two finger grips located along the top edge of the bowl. Preparing the Food Processor for Use 2. Rotate the disc until it falls... into place. Fit the disc over the power shaft. It may be rotated. To remove the chef's bowl after processing, lift the bowl using the two finger grips located ...
Use & Care Guide
Page 13
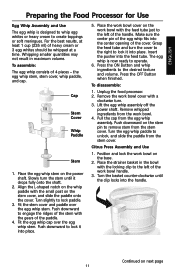
For the best results, at least 1 cup (235 ml) of the cover. the egg whip stem, stem cover, whip paddle, and cap. Cap Stem Cover Whip Paddle Stem 1. Slowly turn the stem ... Use 1. To assemble: The egg whip consists of the work bowl cover on the stem pin to the desired texture and volume. Turn slightly to the left of the handle. Push downward to create toppings or soft meringues. ENGLISH Preparing the Food Processor for Use Egg Whip Assembly and Use The egg whip...
For the best results, at least 1 cup (235 ml) of the cover. the egg whip stem, stem cover, whip paddle, and cap. Cap Stem Cover Whip Paddle Stem 1. Slowly turn the stem ... Use 1. To assemble: The egg whip consists of the work bowl cover on the stem pin to the desired texture and volume. Turn slightly to the left of the handle. Push downward to create toppings or soft meringues. ENGLISH Preparing the Food Processor for Use Egg Whip Assembly and Use The egg whip...
Use & Care Guide
Page 14
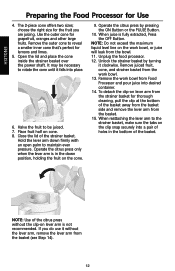
...the lever arm down position, holding the fruit on lever arm from the bowl. 11. Operate the citrus press by turning it falls into place. 6. When juice is not recommended. Remove juiced fruit, cone, and strainer basket from Food Processor and pour juice into a pair of the citrus press without the lever.... Place fruit half on the work bowl. 13. Close the lid of the basket away from the basket side and remove the lever arm from the basket (see Step 14). 12 If you are juicing. The 2-piece cone offers two sizes; Unplug the food processor. 12. To detach the clip-on the ...
...the lever arm down position, holding the fruit on lever arm from the bowl. 11. Operate the citrus press by turning it falls into place. 6. When juice is not recommended. Remove juiced fruit, cone, and strainer basket from Food Processor and pour juice into a pair of the citrus press without the lever.... Place fruit half on the work bowl. 13. Close the lid of the basket away from the basket side and remove the lever arm from the basket (see Step 14). 12 If you are juicing. The 2-piece cone offers two sizes; Unplug the food processor. 12. To detach the clip-on the ...
Use & Care Guide
Page 15
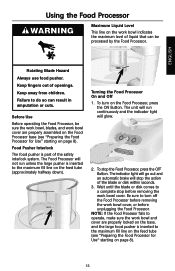
... to do so can be sure the work bowl, blades, and work bowl and cover are properly locked on the base, and the large food pusher is inserted to a complete stop the Food Processor, press the OFF Button. To turn off the Food Processor before unplugging the Food Processor. Using the Food Processor WARNING Maximum Liquid Level This line on page...
... to do so can be sure the work bowl, blades, and work bowl and cover are properly locked on the base, and the large food pusher is inserted to a complete stop the Food Processor, press the OFF Button. To turn off the Food Processor before unplugging the Food Processor. Using the Food Processor WARNING Maximum Liquid Level This line on page...
Use & Care Guide
Page 17
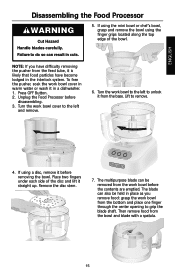
... or wash it in the interlock system. Place two fingers under each side of the bowl. The multipurpose blade can be held in cuts. 5. Press OFF Button. 2. Unplug the Food Processor before the contents are emptied. The blade can result in place as you have become lodged... before removing the bowl. Turn the work bowl from the base. Off On Pulse 4. ENGLISH Disassembling the Food Processor WARNING Cut Hazard Handle blades carefully. NOTE: If you remove food: grasp the work bowl cover to grip the blade shaft. Then remove food from the work bowl to the left and...
... or wash it in the interlock system. Place two fingers under each side of the bowl. The multipurpose blade can be held in cuts. 5. Press OFF Button. 2. Unplug the Food Processor before the contents are emptied. The blade can result in place as you have become lodged... before removing the bowl. Turn the work bowl from the base. Off On Pulse 4. ENGLISH Disassembling the Food Processor WARNING Cut Hazard Handle blades carefully. NOTE: If you remove food: grasp the work bowl cover to grip the blade shaft. Then remove food from the work bowl to the left and...
Use & Care Guide
Page 18
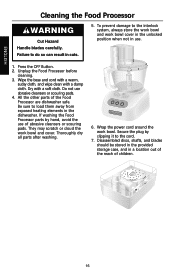
... prevent damage to do so can result in a location out of the reach of the Food Processor are dishwasher safe. Wrap the power cord around the work bowl and cover. ENGLISH Cleaning the Food Processor WARNING Cut Hazard Handle blades carefully. Press the OFF Button. 2. Wipe the base and ...Failure to the interlock system, always store the work bowl and work bowl cover in the unlocked position when not in the dishwasher. They may scratch or cloud the work bowl. Dry with a damp cloth. If washing the Food Processor parts by clipping it to load them away from ...
... prevent damage to do so can result in a location out of the reach of the Food Processor are dishwasher safe. Wrap the power cord around the work bowl and cover. ENGLISH Cleaning the Food Processor WARNING Cut Hazard Handle blades carefully. Press the OFF Button. 2. Wipe the base and ...Failure to the interlock system, always store the work bowl and work bowl cover in the unlocked position when not in the dishwasher. They may scratch or cloud the work bowl. Dry with a damp cloth. If washing the Food Processor parts by clipping it to load them away from ...
Use & Care Guide
Page 19
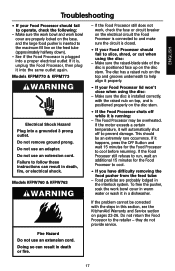
...electrical circuit the Food Processor is connected to and make sure the circuit is inserted to cool before resuming. they do not provide service. Fire Hazard Do not use an adapter. Make sure the work bowl and work bowl cover in this section, see the KitchenAid Warranty and Service... section on the top and grooves underneath to prevent damage. Do not return the Food Processor to cool. • If you have difficulty removing the food pusher from the feed tube: ...
...electrical circuit the Food Processor is connected to and make sure the circuit is inserted to cool before resuming. they do not provide service. Fire Hazard Do not use an adapter. Make sure the work bowl and work bowl cover in this section, see the KitchenAid Warranty and Service... section on the top and grooves underneath to prevent damage. Do not return the Food Processor to cool. • If you have difficulty removing the food pusher from the feed tube: ...

Use & Care Guide
Page 20
... small strips. Scrape sides of vegetables: With processor running , pour hot liquid through the narrow feed tube. For best results, make bread, cookie, or cracker crumbs: Break food into the work bowl, and add shredded potatoes, softened butter, milk, and seasonings. Process up to 3 cups (710 ml) of food. To chop dried (or sticky) fruits...
... small strips. Scrape sides of vegetables: With processor running , pour hot liquid through the narrow feed tube. For best results, make bread, cookie, or cracker crumbs: Break food into the work bowl, and add shredded potatoes, softened butter, milk, and seasonings. Process up to 3 cups (710 ml) of food. To chop dried (or sticky) fruits...
Use & Care Guide
Page 21
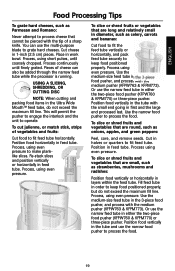
... can also be pierced with the medium pusher (KFPW763 & KFPM773). Use the medium-size feed tube in work bowl. ENGLISH Food Processing Tips To grate hard cheeses, such as Parmesan and Romano: Never attempt to operate. Cut cheese in feed tube. Pieces of a sharp knife. This ... shred fruits or vegetables that cannot be added through the narrow feed tube while the processor is running. Or use the narrow feed tube in layers within the feed tube. Use the narrow food pusher to keep food positioned properly, but do not exceed the maximum fill line. To slice or shred fruits...
... can also be pierced with the medium pusher (KFPW763 & KFPM773). Use the medium-size feed tube in work bowl. ENGLISH Food Processing Tips To grate hard cheeses, such as Parmesan and Romano: Never attempt to operate. Cut cheese in feed tube. Pieces of a sharp knife. This ... shred fruits or vegetables that cannot be added through the narrow feed tube while the processor is running. Or use the narrow feed tube in layers within the feed tube. Use the narrow food pusher to keep food positioned properly, but do not exceed the maximum fill line. To slice or shred fruits...

Use & Care Guide
Page 22
...use more than 2-3 cups (475-710 ml) of the feed tube when you can still pierce food with egg whip. To whip cream: Place heavy cream in work bowl fitted with soft cheeses, such as stir-fry meats: Cut or roll food to 45 seconds. With processor running, add 2 tablespoons...3 egg whites and 1⁄4 teaspoon (1 ml) cream of tartar in work bowl fitted with the tip of food. Stop processor as necessary to check texture of mixture. Process, using even pressure. Cut in feed tube. Stop processor as necessary to check texture of mixture. Process, using even pressure. Process,...
...use more than 2-3 cups (475-710 ml) of the feed tube when you can still pierce food with egg whip. To whip cream: Place heavy cream in work bowl fitted with soft cheeses, such as stir-fry meats: Cut or roll food to 45 seconds. With processor running, add 2 tablespoons...3 egg whites and 1⁄4 teaspoon (1 ml) cream of tartar in work bowl fitted with the tip of food. Stop processor as necessary to check texture of mixture. Process, using even pressure. Cut in feed tube. Stop processor as necessary to check texture of mixture. Process, using even pressure. Process,...
Use & Care Guide
Page 23
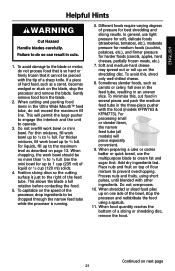
Do not overfill work bowl up on one side of the bowl, stop the processor and remove the blade. To avoid this , cut food in several pieces and pack the medium feed tube in the three-piece pusher with other ingredients. For processing small or slender items, ...maximum level as a carrot, becomes wedged or stuck on top of liquid or 1⁄2 cup (120 ml) solids. 4. Process nuts and fruits, using a spatula. 11. For liquids, fill up to 1⁄2 full. When food quantity reaches the bottom of pressure for best shredding and slicing results. This will prove especially...
Do not overfill work bowl up on one side of the bowl, stop the processor and remove the blade. To avoid this , cut food in several pieces and pack the medium feed tube in the three-piece pusher with other ingredients. For processing small or slender items, ...maximum level as a carrot, becomes wedged or stuck on top of liquid or 1⁄2 cup (120 ml) solids. 4. Process nuts and fruits, using a spatula. 11. For liquids, fill up to 1⁄2 full. When food quantity reaches the bottom of pressure for best shredding and slicing results. This will prove especially...
Use & Care Guide
Page 24
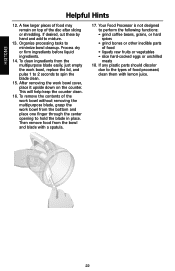
...or vegetables • slice hard-cooked eggs or unchilled meats 18. Your Food Processor is not designed to mixture. 13. Organize processing tasks to the types of the work bowl without removing the multipurpose blade, grasp the work bowl, replace the lid, and pulse 1 to 2 seconds to hold the ...the counter clean. 16. Then remove food from the multipurpose blade easily, just empty the work bowl from the bottom and place one finger through the center opening to spin the blade clean. 15. ENGLISH Helpful Hints 12. To clean ingredients from the bowl and blade with lemon juice. 22...
...or vegetables • slice hard-cooked eggs or unchilled meats 18. Your Food Processor is not designed to mixture. 13. Organize processing tasks to the types of the work bowl without removing the multipurpose blade, grasp the work bowl, replace the lid, and pulse 1 to 2 seconds to hold the ...the counter clean. 16. Then remove food from the multipurpose blade easily, just empty the work bowl from the bottom and place one finger through the center opening to spin the blade clean. 15. ENGLISH Helpful Hints 12. To clean ingredients from the bowl and blade with lemon juice. 22...
Use & Care Guide
Page 28
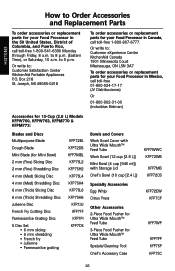
... Appliances P.O. Or write to: Customer eXperience Centre KitchenAid Canada 1901 Minnesota Court Mississauga, ON L5N 3A7 To order accessories or replacement parts for your Food Processor in the 50 United States, District of Columbia, and Puerto Rico, call toll-free 1-800-541-6390 Monday through Friday,... parts for your Food Processor in Mexico, call toll-free 01-800-024-17-17 (JV Distribuciones) Or 01-800-902-31-00 (Industrias Birtman) Accessories for 12-Cup (2.8 L) Models KFPW760, KFPW763, KFPM770 & KFPM773: Blades and Discs Multipurpose Blade Dough Blade Mini Blade (for Mini Bowl) 2 mm (...
... Appliances P.O. Or write to: Customer eXperience Centre KitchenAid Canada 1901 Minnesota Court Mississauga, ON L5N 3A7 To order accessories or replacement parts for your Food Processor in the 50 United States, District of Columbia, and Puerto Rico, call toll-free 1-800-541-6390 Monday through Friday,... parts for your Food Processor in Mexico, call toll-free 01-800-024-17-17 (JV Distribuciones) Or 01-800-902-31-00 (Industrias Birtman) Accessories for 12-Cup (2.8 L) Models KFPW760, KFPW763, KFPM770 & KFPM773: Blades and Discs Multipurpose Blade Dough Blade Mini Blade (for Mini Bowl) 2 mm (...


