Use & Care Guide
Page 3
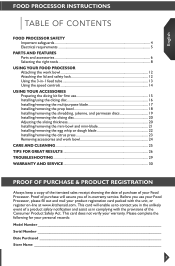
This card does not verify your Food Processor. English Food Processor Instructions Table of Contents FOOD PROCESSOR SAFETY Important safeguards 4 Electrical requirements 5 PARTS AND FEATURES Parts and accessories 6 Selecting the right tools 8 Using YOUR Food Processor Attaching the work bowl 24 CARE AND CLEANING 25 Tips for ... your Food Processor, please fill out and mail your personal records: Model Number Serial Number Date Purchased Store Name 3 This card will assure you in the unlikely event of in complying with the unit, or register on-line at www.kitchenaid.com....
This card does not verify your Food Processor. English Food Processor Instructions Table of Contents FOOD PROCESSOR SAFETY Important safeguards 4 Electrical requirements 5 PARTS AND FEATURES Parts and accessories 6 Selecting the right tools 8 Using YOUR Food Processor Attaching the work bowl 24 CARE AND CLEANING 25 Tips for ... your Food Processor, please fill out and mail your personal records: Model Number Serial Number Date Purchased Store Name 3 This card will assure you in the unlikely event of in complying with the unit, or register on-line at www.kitchenaid.com....

Use & Care Guide
Page 4
... is, tell you how to reduce the chance of attachments not recommended or sold by KitchenAid may be used but must be killed or seriously injured if you to the Food Processor. Return appliance to defeat the cover interlock mechanism. 16. Handle carefully. 12. Always ...to persons or damage to potential hazards that can be used by hand. SAVE THESE INSTRUCTIONS 4 Close supervision is used only when the Food Processor is designed for examination, repair, or electrical or mechanical adjustment. 7. All safety messages will tell you what can be followed, including ...
... is, tell you how to reduce the chance of attachments not recommended or sold by KitchenAid may be used but must be killed or seriously injured if you to the Food Processor. Return appliance to defeat the cover interlock mechanism. 16. Handle carefully. 12. Always ...to persons or damage to potential hazards that can be used by hand. SAVE THESE INSTRUCTIONS 4 Close supervision is used only when the Food Processor is designed for examination, repair, or electrical or mechanical adjustment. 7. All safety messages will tell you what can be followed, including ...
Use & Care Guide
Page 5
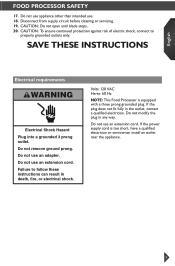
...fully in any way. Do not use . 18. CAUTION: Do not open until blade stops. 20. Volts: 120 VAC Hertz: 60 Hz NOTE: This Food Processor is too short, have a qualified electrician or serviceman install an outlet near the appliance. 5 If the power supply cord is equipped with a three prong .... Do not modify the plug in the outlet, contact a qualified electrician. Do not use appliance other than intended use an extension cord. English Food Processor Safety 17. SAVE THESE INSTRUCTIONS Electrical requirements WARNING Electrical Shock Hazard Plug into a grounded 3 prong outlet.
...fully in any way. Do not use . 18. CAUTION: Do not open until blade stops. 20. Volts: 120 VAC Hertz: 60 Hz NOTE: This Food Processor is too short, have a qualified electrician or serviceman install an outlet near the appliance. 5 If the power supply cord is equipped with a three prong .... Do not modify the plug in the outlet, contact a qualified electrician. Do not use appliance other than intended use an extension cord. English Food Processor Safety 17. SAVE THESE INSTRUCTIONS Electrical requirements WARNING Electrical Shock Hazard Plug into a grounded 3 prong outlet.
Use & Care Guide
Page 12
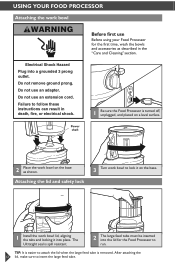
...feed tube is turned off, unplugged, and placed on the base as described in death, fire, or electrical shock. 1 Be sure the Food Processor is removed. Do not use an adapter. Electrical Shock Hazard Plug into place. Failure to run. The Ultratight seal is spill resistant. ... lock 3 Turn work bowl to lock it into a grounded 3 prong outlet. Do not remove ground prong. Using Your Food Processor Attaching the work bowl WARNING Before first use Before using your Food Processor for the Food Processor to follow these instructions can result in the "Care and Cleaning" section.
...feed tube is turned off, unplugged, and placed on the base as described in death, fire, or electrical shock. 1 Be sure the Food Processor is removed. Do not use an adapter. Electrical Shock Hazard Plug into place. Failure to run. The Ultratight seal is spill resistant. ... lock 3 Turn work bowl to lock it into a grounded 3 prong outlet. Do not remove ground prong. Using Your Food Processor Attaching the work bowl WARNING Before first use Before using your Food Processor for the Food Processor to follow these instructions can result in the "Care and Cleaning" section.

Use & Care Guide
Page 13
...ideal for making mayonnaise. Max Fill line Large food pusher Medium food pusher 1 Use entire feed tube and the large food pusher to slowly drizzle oil or other liquid ingredients into the work bowl cover are properly assembled on the Food Processor base. Drizzle hole 4 Use the drizzle ...hole in the small food pusher to process large items. Small food pusher 2 Use the medium food pusher in -1 feed tube Before use Before operating the Food Processor, be sure the work bowl, blades and ...
...ideal for making mayonnaise. Max Fill line Large food pusher Medium food pusher 1 Use entire feed tube and the large food pusher to slowly drizzle oil or other liquid ingredients into the work bowl cover are properly assembled on the Food Processor base. Drizzle hole 4 Use the drizzle ...hole in the small food pusher to process large items. Small food pusher 2 Use the medium food pusher in -1 feed tube Before use Before operating the Food Processor, be sure the work bowl, blades and ...

Use & Care Guide
Page 14
... locked on , flip the speed lever to High or Low, then turn on the base, and the large food pusher is fully in place. Using Your Food Processor Using the speed controls NOTE: If the Food Processor fails to change speeds. 14 High Low 3 To pulse, flip the speed lever to High or Low, then...
... locked on , flip the speed lever to High or Low, then turn on the base, and the large food pusher is fully in place. Using Your Food Processor Using the speed controls NOTE: If the Food Processor fails to change speeds. 14 High Low 3 To pulse, flip the speed lever to High or Low, then...
Use & Care Guide
Page 16
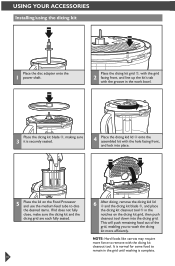
...; onto the assembled kit with the hole facing front, and lock into place. 5 Place the lid on the Food Processor and use the medium feed tube to remove with the groove in the grid until washing is complete. NOTE: Hard... foods like carrots may require more efficiently. This will push remaining food out of the grid, enabling you to wash the dicing kit more force to dice the...the 1 power shaft. Place the dicing kit blade ➂, making sure 3 it is normal for some food to remain in the work bowl.
...; onto the assembled kit with the hole facing front, and lock into place. 5 Place the lid on the Food Processor and use the medium feed tube to remove with the groove in the grid until washing is complete. NOTE: Hard... foods like carrots may require more efficiently. This will push remaining food out of the grid, enabling you to wash the dicing kit more force to dice the...the 1 power shaft. Place the dicing kit blade ➂, making sure 3 it is normal for some food to remain in the work bowl.

Use & Care Guide
Page 17
... bowl with one hand, using the handle, not the rim of the bowl indicate the maximum recommended levels for thick and thin liquids in the Food Processor. 3 The multipurpose blade has a leak resistant seal, so you may leave the blade in work bowl, or removed before the contents are emptied. 1 Place the...
... bowl with one hand, using the handle, not the rim of the bowl indicate the maximum recommended levels for thick and thin liquids in the Food Processor. 3 The multipurpose blade has a leak resistant seal, so you may leave the blade in work bowl, or removed before the contents are emptied. 1 Place the...

Use & Care Guide
Page 24
...remove blade accessories: Grasp blade and pull straight up . Using Your Accessories Removing accessories and work bowl IMPORTANT: Be sure the Food Processor is still attached to 4 Food Processor: Turn the work bowl and lift to remove, and then turn and lift the lid. lift it straight up . To ...remove accessories before removing work bowl from Food Processor before disassembling. 1 To remove work bowl from Food Processor: Turn the work bowl cover to unlock, as shown, and lift the lid to remove, continuing next steps ...
...remove blade accessories: Grasp blade and pull straight up . Using Your Accessories Removing accessories and work bowl IMPORTANT: Be sure the Food Processor is still attached to 4 Food Processor: Turn the work bowl and lift to remove, and then turn and lift the lid. lift it straight up . To ...remove accessories before removing work bowl from Food Processor before disassembling. 1 To remove work bowl from Food Processor: Turn the work bowl cover to unlock, as shown, and lift the lid to remove, continuing next steps ...
Use & Care Guide
Page 25
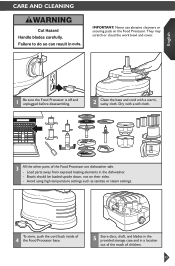
... with a warm, sudsy cloth. To store, push the cord back inside of 4 the Food Processor base. 5 Store discs, shaft, and blades in the provided storage case and in the dishwasher. -- CARE AND CLEANING IMPORTANT: Never use abrasive cleansers or...sides. -- Load parts away from exposed heating elements in a location out of the reach of the Food Processor are dishwasher safe. -- Avoid using high temperature settings such as sanitize or steam settings. English 1 Be sure the Food Processor is off and unplugged before disassembling. 2 Clean the base and cord with a soft cloth. 3 All...
... with a warm, sudsy cloth. To store, push the cord back inside of 4 the Food Processor base. 5 Store discs, shaft, and blades in the provided storage case and in the dishwasher. -- CARE AND CLEANING IMPORTANT: Never use abrasive cleansers or...sides. -- Load parts away from exposed heating elements in a location out of the reach of the Food Processor are dishwasher safe. -- Avoid using high temperature settings such as sanitize or steam settings. English 1 Be sure the Food Processor is off and unplugged before disassembling. 2 Clean the base and cord with a soft cloth. 3 All...
Use & Care Guide
Page 26
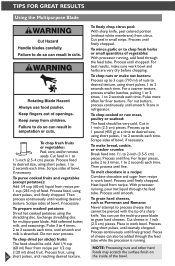
... to 3 cups (710 ml) of a sharp knife. Scrape sides of bowl, if necessary. Then process until finely chopped. With processor running , add food through the feed tube. To grate hard cheeses, such as Parmesan and Romano: Never attempt to desired size, using short pulses, until.... Cut cheese in refrigerator. Process, using the shredding disc. Pieces of vegetables: With processor running , pour hot liquid through the feed tube while the processor is absorbed. NOTE: Processing nuts and other hard foods may scratch the surface finish on the inside of bowl, if necessary.
... to 3 cups (710 ml) of a sharp knife. Scrape sides of bowl, if necessary. Then process until finely chopped. With processor running , add food through the feed tube. To grate hard cheeses, such as Parmesan and Romano: Never attempt to desired size, using short pulses, until.... Cut cheese in refrigerator. Process, using the shredding disc. Pieces of vegetables: With processor running , pour hot liquid through the feed tube while the processor is absorbed. NOTE: Processing nuts and other hard foods may scratch the surface finish on the inside of bowl, if necessary.
Use & Care Guide
Page 28
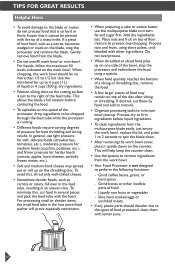
...keep the counter clean. • Use the spatula to remove ingredients from the multipurpose blade easily, just empty the work bowl. • Your Food Processor is just to prevent overchopping. TIPS FOR GREAT RESULTS Helpful Hints • To avoid damage to cream fat and sugar first. Slice hard-cooked eggs... or unchilled meats. • If any plastic parts should be chopped through the feed tube while the processor is so hard or firmly frozen that it upside down on top of hard food, such as carrots or celery, fall over in the feed tube, resulting in an uneven slice. If...
...keep the counter clean. • Use the spatula to remove ingredients from the multipurpose blade easily, just empty the work bowl. • Your Food Processor is just to prevent overchopping. TIPS FOR GREAT RESULTS Helpful Hints • To avoid damage to cream fat and sugar first. Slice hard-cooked eggs... or unchilled meats. • If any plastic parts should be chopped through the feed tube while the processor is so hard or firmly frozen that it upside down on top of hard food, such as carrots or celery, fall over in the feed tube, resulting in an uneven slice. If...

Use & Care Guide
Page 29
... on the drive adapter. • Try to one of the disc is positioned face up on the feed tube. • Check to make sure the Food Processor is plugged in. • Is the fuse in the circuit to the retailer. If the problem is not due to close : • Make sure the... disc is installed correctly, with the large food pusher removed. Do not return the Food Processor to the Food Processor in the feed tube. • When using the adjustable slicing blade, make sure that the bowl and lid are suitable for...
... on the drive adapter. • Try to one of the disc is positioned face up on the feed tube. • Check to make sure the Food Processor is plugged in. • Is the fuse in the circuit to the retailer. If the problem is not due to close : • Make sure the... disc is installed correctly, with the large food pusher removed. Do not return the Food Processor to the Food Processor in the feed tube. • When using the adjustable slicing blade, make sure that the bowl and lid are suitable for...


