Owners Manual
Page 2
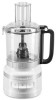
PARTS AND FEATURES PARTS AND ACCESSORIES 2-piece food pusher 9-cup (2.1 L) work bowl Drive pin Lid latch Work bowl cover with 2-in-1 feed tube Lid hinge Handle hinge Heavy-duty base Power cord and cord storage (not shown) Drive adapter 2 | PARTS AND FEATURES W11212365A.indb 2 Reversible thin slicing/shredding disc Reversible medium slicing/shredding disc Multipurpose stainless steel blade Thick slicing disc Dough blade 5/8/2018 11:22:54 AM
PARTS AND FEATURES PARTS AND ACCESSORIES 2-piece food pusher 9-cup (2.1 L) work bowl Drive pin Lid latch Work bowl cover with 2-in-1 feed tube Lid hinge Handle hinge Heavy-duty base Power cord and cord storage (not shown) Drive adapter 2 | PARTS AND FEATURES W11212365A.indb 2 Reversible thin slicing/shredding disc Reversible medium slicing/shredding disc Multipurpose stainless steel blade Thick slicing disc Dough blade 5/8/2018 11:22:54 AM
Owners Manual
Page 3
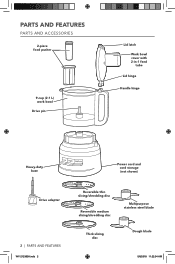
... power cord. 5. Do not operate any appliance with a damaged cord or plug, or after the appliance malfunctions, or is not intended for their safety. Read all instructions. 2. This appliance is dropped or damaged in any appliance is used by KitchenAid may cause fire, electric shock, or injury. 8. Do not use , before assembling or disassembling parts, and before cleaning. W11212365A.indb 3 FOOD PROCESSOR...
... power cord. 5. Do not operate any appliance with a damaged cord or plug, or after the appliance malfunctions, or is not intended for their safety. Read all instructions. 2. This appliance is dropped or damaged in any appliance is used by KitchenAid may cause fire, electric shock, or injury. 8. Do not use , before assembling or disassembling parts, and before cleaning. W11212365A.indb 3 FOOD PROCESSOR...
Owners Manual
Page 4
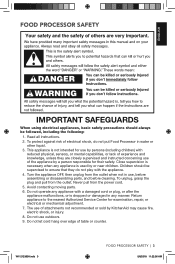
... plug in a polarized outlet only one blade is designed for household use the food pusher. 15. FOOD PROCESSOR SAFETY 10. To reduce the risk of injury, never place cutting blade or discs on base without first putting bowl properly in the outlet, reverse the plug. Do not attempt to the cover or bowl. SAVE THESE INSTRUCTIONS This product is wider than the other...
... plug in a polarized outlet only one blade is designed for household use the food pusher. 15. FOOD PROCESSOR SAFETY 10. To reduce the risk of injury, never place cutting blade or discs on base without first putting bowl properly in the outlet, reverse the plug. Do not attempt to the cover or bowl. SAVE THESE INSTRUCTIONS This product is wider than the other...
Owners Manual
Page 5
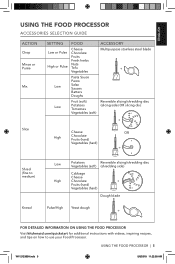
... (soft) ACCESSORY Multipurpose stainless steel blade + Reversible slicing/shredding disc (slicing side) OR slicing disc + High Cheese Chocolate Fruits (hard) Vegetables (hard) OR + Shred (fine to medium) Knead Low High Potatoes Reversible slicing/shredding disc Vegetables (soft) (shredding side) Cabbage Cheese Chocolate + Fruits (hard) Vegetables (hard) Dough blade Pulse/High Yeast dough + FOR DETAILED INFORMATION ON USING THE FOOD PROCESSOR Visit kitchenaid.com/quickstart for additional instructions with videos, inspiring recipes, and tips...
... (soft) ACCESSORY Multipurpose stainless steel blade + Reversible slicing/shredding disc (slicing side) OR slicing disc + High Cheese Chocolate Fruits (hard) Vegetables (hard) OR + Shred (fine to medium) Knead Low High Potatoes Reversible slicing/shredding disc Vegetables (soft) (shredding side) Cabbage Cheese Chocolate + Fruits (hard) Vegetables (hard) Dough blade Pulse/High Yeast dough + FOR DETAILED INFORMATION ON USING THE FOOD PROCESSOR Visit kitchenaid.com/quickstart for additional instructions with videos, inspiring recipes, and tips...
Owners Manual
Page 6
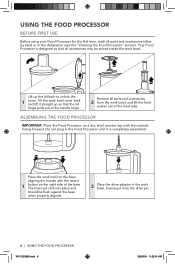
... drive adapter in the dishwasher (see the "Cleaning the Food Processor" section). Lift up so that all accessories may be stored inside the work bowl. USING THE FOOD PROCESSOR BEFORE FIRST USE Before using your Food Processor for the first time, wash all parts and accessories 2 from the work bowl, and lift the food pusher out of the feed tube. Tilt the work bowl on the right side of the base. Your Food Processor is completely assembled. Place the work bowl cover...
... drive adapter in the dishwasher (see the "Cleaning the Food Processor" section). Lift up so that all accessories may be stored inside the work bowl. USING THE FOOD PROCESSOR BEFORE FIRST USE Before using your Food Processor for the first time, wash all parts and accessories 2 from the work bowl, and lift the food pusher out of the feed tube. Tilt the work bowl on the right side of the base. Your Food Processor is completely assembled. Place the work bowl cover...

Owners Manual
Page 7
... the handle hinge on the drive adapter. 1 Rotate the blade so it falls down to the base of assembly, install the desired blade or disc before attaching the work bowl cover, hook 3 the lid hinge into the locked position. W11212365A.indb 7 USING THE FOOD PROCESSOR | 7 5/8/2018 11:23:02 AM Once the work bowl cover is closed and the work bowl and close the cover. ENGLISH USING THE FOOD PROCESSOR NOTE: For ease of the adapter. To attach the work bowl cover. INSTALLING...
... the handle hinge on the drive adapter. 1 Rotate the blade so it falls down to the base of assembly, install the desired blade or disc before attaching the work bowl cover, hook 3 the lid hinge into the locked position. W11212365A.indb 7 USING THE FOOD PROCESSOR | 7 5/8/2018 11:23:02 AM Once the work bowl cover is closed and the work bowl and close the cover. ENGLISH USING THE FOOD PROCESSOR NOTE: For ease of the adapter. To attach the work bowl cover. INSTALLING...

Owners Manual
Page 8
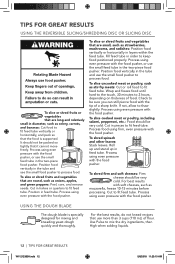
... perform as well. USING THE FOOD PROCESSOR INSTALLING THE REVERSIBLE SLICING/SHREDDING DISC OR SLICING DISC Process Storage To slice: Turn the disc so that the small, raised shredding blades are facing up . 1 To shred: Turn the disc so that the raised slicing blade is level with the top of the bowl for storage. If the disc falls to the storage position, lift it out, turn it 90°, and lower it onto the drive adapter, aligning the mark...
... perform as well. USING THE FOOD PROCESSOR INSTALLING THE REVERSIBLE SLICING/SHREDDING DISC OR SLICING DISC Process Storage To slice: Turn the disc so that the small, raised shredding blades are facing up . 1 To shred: Turn the disc so that the raised slicing blade is level with the top of the bowl for storage. If the disc falls to the storage position, lift it out, turn it 90°, and lower it onto the drive adapter, aligning the mark...
Owners Manual
Page 9
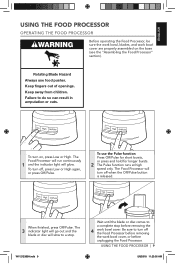
.... Failure to a complete stop . The Food Processor will turn on the base (see the "Assembling the Food Processor" section). To turn off the Food Processor before removing the work bowl cover, or before removing the 4 work bowl cover are properly assembled on , press Low or High. To use food pusher. Be sure to a stop before unplugging the Food Processor. When finished, press Off/Pulse. The 3 indicator light will go out and the blade or disc will glow. Keep away...
.... Failure to a complete stop . The Food Processor will turn on the base (see the "Assembling the Food Processor" section). To turn off the Food Processor before removing the work bowl cover, or before removing the 4 work bowl cover are properly assembled on , press Low or High. To use food pusher. Be sure to a stop before unplugging the Food Processor. When finished, press Off/Pulse. The 3 indicator light will go out and the blade or disc will glow. Keep away...
Owners Manual
Page 10
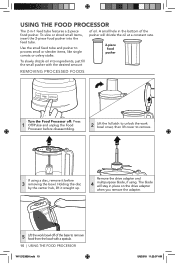
... amount REMOVING PROCESSED FOODS Turn the Food Processor off: Press 1 Off/Pulse and unplug the Food Processor before 3 removing the bowl. of the pusher will drizzle the oil at a constant rate. 2-piece food pusher To slowly drizzle oil into the feed tube. Remove the drive adapter and 4 multipurpose blade, if using a disc, remove it straight up. If using . Holding the disc by the center hub, lift it before disassembling. 2 Lift the lid latch to unlock the work bowl off...
... amount REMOVING PROCESSED FOODS Turn the Food Processor off: Press 1 Off/Pulse and unplug the Food Processor before 3 removing the bowl. of the pusher will drizzle the oil at a constant rate. 2-piece food pusher To slowly drizzle oil into the feed tube. Remove the drive adapter and 4 multipurpose blade, if using a disc, remove it straight up. If using . Holding the disc by the center hub, lift it before disassembling. 2 Lift the lid latch to unlock the work bowl off...
Owners Manual
Page 11
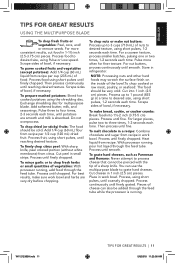
... citrus. With processor running , add food through the feed tube. Scrape sides of bowl, if necessary. Add softened butter, milk, and seasonings. Add 1/4 cup (60 mL) flour from recipe per cup (235 mL) of a sharp knife. For nut butters, process continuously until fine. Scrape sides of bowl, if necessary. For larger pieces, pulse two to desired size, using short pulses, until smooth. Then process until smooth...
... citrus. With processor running , add food through the feed tube. Scrape sides of bowl, if necessary. Add softened butter, milk, and seasonings. Add 1/4 cup (60 mL) flour from recipe per cup (235 mL) of a sharp knife. For nut butters, process continuously until fine. Scrape sides of bowl, if necessary. For larger pieces, pulse two to desired size, using short pulses, until smooth. Then process until smooth...
Owners Manual
Page 12
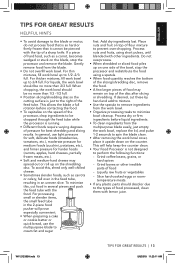
... remove seeds. Cut in halves or quarters to fit feed tube. Use Pulse to thaw slightly. To shred spinach and other leaves: Stack leaves. For best results with the food pusher. For the best results, do not knead recipes that use the small food pusher to process food. Position food vertically in the tube and use more than 3 cups (710 mL) of flour. Process using even pressure with the food pusher, or use...
... remove seeds. Cut in halves or quarters to fit feed tube. Use Pulse to thaw slightly. To shred spinach and other leaves: Stack leaves. For best results with the food pusher. For the best results, do not knead recipes that use the small food pusher to process food. Position food vertically in the tube and use more than 3 cups (710 mL) of flour. Process using even pressure with the food pusher, or use...
Owners Manual
Page 13
... plastic parts should be no more than 2/3 full. This allows the blade a full rotation before liquid ingredients. • To clean ingredients from the work bowl. When chopping, the work bowl should be no more than 1/3 -1/2 full. • Position slicing/shredding disc so the cutting surface is just to the right of food processed, clean them with the food. For processing small or slender items, the small feed tube in several pieces...
... plastic parts should be no more than 2/3 full. This allows the blade a full rotation before liquid ingredients. • To clean ingredients from the work bowl. When chopping, the work bowl should be no more than 1/3 -1/2 full. • Position slicing/shredding disc so the cutting surface is just to the right of food processed, clean them with the food. For processing small or slender items, the small feed tube in several pieces...
Owners Manual
Page 14
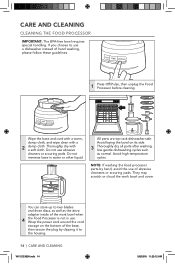
... to two blades and three discs, as well as normal. Avoid high-temperature cycles. Do not immerse base in use of hand washing, please follow these guidelines. 1 Press Off/Pulse, then unplug the Food Processor before cleaning. Use gentle dishwashing cycles such as the drive adapter inside of the work bowl and cover. They may scratch or cloud the work bowl when 4 the Food Processor is not...
... to two blades and three discs, as well as normal. Avoid high-temperature cycles. Do not immerse base in use of hand washing, please follow these guidelines. 1 Press Off/Pulse, then unplug the Food Processor before cleaning. Use gentle dishwashing cycles such as the drive adapter inside of the work bowl and cover. They may scratch or cloud the work bowl when 4 the Food Processor is not...
Owners Manual
Page 15
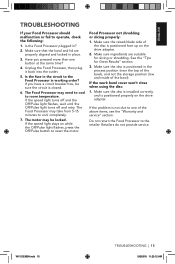
... the drive adapter. The motor may need to cool to the retailer. Make sure ingredients are properly aligned and locked in ? 2. Make sure the raised-blade side of the above items, see the "Warranty and service" section. Do not return the Food Processor to room temperature. Is the Food Processor plugged in place. 3. If the work bowl cover won't close when using the disc: 1. If the speed light turns off...
... the drive adapter. The motor may need to cool to the retailer. Make sure ingredients are properly aligned and locked in ? 2. Make sure the raised-blade side of the above items, see the "Warranty and service" section. Do not return the Food Processor to room temperature. Is the Food Processor plugged in place. 3. If the work bowl cover won't close when using the disc: 1. If the speed light turns off...
Owners Manual
Page 16
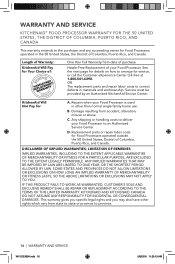
... of purchase. Replacement parts or repair labor costs for : A. This warranty gives you specific legal rights and you may also have other than normal single family home use. Any shipping or handling costs to deliver your Food Processor. Hassle-Free Replacement of Columbia, Puerto Rico, and Canada. Repairs when your Food Processor is used in materials and workmanship. D. WARRANTY AND SERVICE KITCHENAID® FOOD PROCESSOR WARRANTY FOR THE...
... of purchase. Replacement parts or repair labor costs for : A. This warranty gives you specific legal rights and you may also have other than normal single family home use. Any shipping or handling costs to deliver your Food Processor. Hassle-Free Replacement of Columbia, Puerto Rico, and Canada. Repairs when your Food Processor is used in materials and workmanship. D. WARRANTY AND SERVICE KITCHENAID® FOOD PROCESSOR WARRANTY FOR THE...
Owners Manual
Page 17
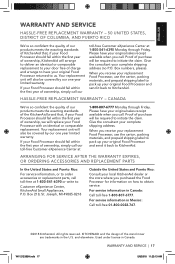
... products meets the exacting standards of KitchenAid that , if your Food Processor should fail within the first year of ownership, we will replace your Food Processor with an identical or comparable replacement. Your replacement unit will also be required to order accessories or replacement parts, call . Box numbers, please). ARRANGING FOR SERVICE AFTER THE WARRANTY EXPIRES, OR ORDERING ACCESSORIES AND REPLACEMENT PARTS In the United States and Puerto...
... products meets the exacting standards of KitchenAid that , if your Food Processor should fail within the first year of ownership, we will replace your Food Processor with an identical or comparable replacement. Your replacement unit will also be required to order accessories or replacement parts, call . Box numbers, please). ARRANGING FOR SERVICE AFTER THE WARRANTY EXPIRES, OR ORDERING ACCESSORIES AND REPLACEMENT PARTS In the United States and Puerto...


