Owners Manual
Page 2
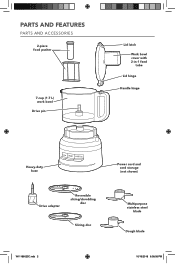
PARTS AND FEATURES PARTS AND ACCESSORIES 2-piece food pusher 7-cup (1.7 L) work bowl Drive pin Lid latch Work bowl cover with 2-in-1 feed tube Lid hinge Handle hinge Heavy-duty base Power cord and cord storage (not shown) Drive adapter Reversible slicing/shredding disc Slicing disc Multipurpose stainless steel blade Dough blade W11186023C.indb 2 10/19/2018 6:08:08 PM
PARTS AND FEATURES PARTS AND ACCESSORIES 2-piece food pusher 7-cup (1.7 L) work bowl Drive pin Lid latch Work bowl cover with 2-in-1 feed tube Lid hinge Handle hinge Heavy-duty base Power cord and cord storage (not shown) Drive adapter Reversible slicing/shredding disc Slicing disc Multipurpose stainless steel blade Dough blade W11186023C.indb 2 10/19/2018 6:08:08 PM
Owners Manual
Page 3
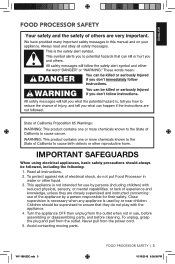
...are closely supervised and instructed concerning use of the appliance by a person responsible for use , before assembling or disassembling parts, and before cleaning. To protect against risk of experience and knowledge, unless they do not put Food Processor in use by persons (including ...instructions. 2. Avoid contacting moving parts. Turn the appliance OFF then unplug from the power cord. 5. Never pull from the outlet when not in water or other liquid. 3. To unplug, grasp the plug and pull from the outlet. FOOD PROCESSOR SAFETY ENGLISH IMPORTANT SAFEGUARDS When using...
...are closely supervised and instructed concerning use of the appliance by a person responsible for use , before assembling or disassembling parts, and before cleaning. To protect against risk of experience and knowledge, unless they do not put Food Processor in use by persons (including ...instructions. 2. Avoid contacting moving parts. Turn the appliance OFF then unplug from the power cord. 5. Never pull from the outlet when not in water or other liquid. 3. To unplug, grasp the plug and pull from the outlet. FOOD PROCESSOR SAFETY ENGLISH IMPORTANT SAFEGUARDS When using...
Owners Manual
Page 4
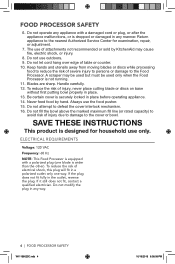
... securely locked in place before operating appliance. 14. Keep hands and utensils away from moving blades or discs while processing food to the cover or bowl. Be certain cover is wider than the other). If the plug does not fit fully in place. 13. Do not use the food pusher. 15. Handle carefully. 12. Never feed food by KitchenAid may be used but must be used only when the Food Processor...
... securely locked in place before operating appliance. 14. Keep hands and utensils away from moving blades or discs while processing food to the cover or bowl. Be certain cover is wider than the other). If the plug does not fit fully in place. 13. Do not use the food pusher. 15. Handle carefully. 12. Never feed food by KitchenAid may be used but must be used only when the Food Processor...
Owners Manual
Page 5
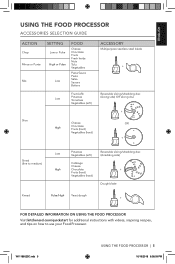
... (soft) ACCESSORY Multipurpose stainless steel blade + Reversible slicing/shredding disc (slicing side) OR slicing disc + Slice High Cheese Chocolate Fruits (hard) Vegetables (hard) OR + Shred (fine to medium) Low High Potatoes Vegetables (soft) Cabbage Cheese Chocolate Fruits (hard) Vegetables (hard) Reversible slicing/shredding disc (shredding side) + Dough blade Knead Pulse/High Yeast dough + FOR DETAILED INFORMATION ON USING THE FOOD PROCESSOR Visit kitchenaid.com/quickstart for additional instructions with videos, inspiring recipes, and tips...
... (soft) ACCESSORY Multipurpose stainless steel blade + Reversible slicing/shredding disc (slicing side) OR slicing disc + Slice High Cheese Chocolate Fruits (hard) Vegetables (hard) OR + Shred (fine to medium) Low High Potatoes Vegetables (soft) Cabbage Cheese Chocolate Fruits (hard) Vegetables (hard) Reversible slicing/shredding disc (shredding side) + Dough blade Knead Pulse/High Yeast dough + FOR DETAILED INFORMATION ON USING THE FOOD PROCESSOR Visit kitchenaid.com/quickstart for additional instructions with videos, inspiring recipes, and tips...
Owners Manual
Page 6
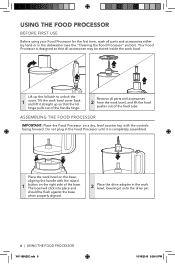
... 1 cover. Tilt the work bowl on the right side of the feed tube. ASSEMBLING THE FOOD PROCESSOR IMPORTANT: Place the Food Processor on a dry, level counter top with the raised 1 button on the base, aligning the handle with the controls facing forward. Lift up so that all accessories may be flush against the base when properly aligned. 2 Place the drive adapter in the dishwasher (see the "Cleaning...
... 1 cover. Tilt the work bowl on the right side of the feed tube. ASSEMBLING THE FOOD PROCESSOR IMPORTANT: Place the Food Processor on a dry, level counter top with the raised 1 button on the base, aligning the handle with the controls facing forward. Lift up so that all accessories may be flush against the base when properly aligned. 2 Place the drive adapter in the dishwasher (see the "Cleaning...
Owners Manual
Page 7
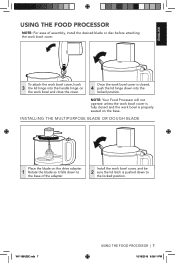
... the handle hinge on the base. Once the work bowl cover. W11186023C.indb 7 USING THE FOOD PROCESSOR | 7 10/19/2018 6:08:11 PM ENGLISH USING THE FOOD PROCESSOR NOTE: For ease of assembly, install the desired blade or disc before attaching the work bowl cover is closed and the work bowl cover, and be 2 sure the lid latch is pushed down to the base of the adapter. To attach the work bowl cover, hook 3 the lid hinge into the locked position...
... the handle hinge on the base. Once the work bowl cover. W11186023C.indb 7 USING THE FOOD PROCESSOR | 7 10/19/2018 6:08:11 PM ENGLISH USING THE FOOD PROCESSOR NOTE: For ease of assembly, install the desired blade or disc before attaching the work bowl cover is closed and the work bowl cover, and be 2 sure the lid latch is pushed down to the base of the adapter. To attach the work bowl cover, hook 3 the lid hinge into the locked position...
Owners Manual
Page 8
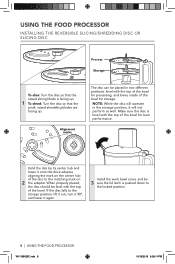
... the bowl for best performance. Install the work bowl cover, and be placed in the storage position, it again. NOTE: While the disc will not perform as well. USING THE FOOD PROCESSOR INSTALLING THE REVERSIBLE SLICING/SHREDDING DISC OR SLICING DISC Process Storage To slice: Turn the disc so that the small, raised shredding blades are facing up. Make sure the disc is level with the top of the disc to the storage position, lift it out, turn it...
... the bowl for best performance. Install the work bowl cover, and be placed in the storage position, it again. NOTE: While the disc will not perform as well. USING THE FOOD PROCESSOR INSTALLING THE REVERSIBLE SLICING/SHREDDING DISC OR SLICING DISC Process Storage To slice: Turn the disc so that the small, raised shredding blades are facing up. Make sure the disc is level with the top of the disc to the storage position, lift it out, turn it...
Owners Manual
Page 9
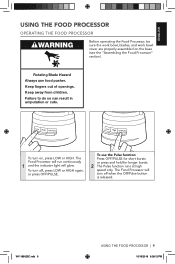
...use food pusher. To turn on the base (see the "Assembling the Food Processor" section). The Food Processor will glow. Keep ngers out of openings. The Food Processor will run continuously 1 and the indicator light will turn off , press LOW or HIGH again, or press OFF/PULSE. Rotating Blade Hazard Always use... children. ENGLISH USING THE FOOD PROCESSOR OPERATING THE FOOD PROCESSOR Before operating the Food Processor, be sure the work bowl, blades, and work bowl cover are properly assembled on , press LOW or HIGH. W11186023C.indb 9 USING THE FOOD PROCESSOR | 9 10/19/...
...use food pusher. To turn on the base (see the "Assembling the Food Processor" section). The Food Processor will glow. Keep ngers out of openings. The Food Processor will run continuously 1 and the indicator light will turn off , press LOW or HIGH again, or press OFF/PULSE. Rotating Blade Hazard Always use... children. ENGLISH USING THE FOOD PROCESSOR OPERATING THE FOOD PROCESSOR Before operating the Food Processor, be sure the work bowl, blades, and work bowl cover are properly assembled on , press LOW or HIGH. W11186023C.indb 9 USING THE FOOD PROCESSOR | 9 10/19/...
Owners Manual
Page 10
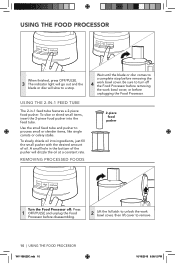
.... REMOVING PROCESSED FOODS 2-piece food pusher Turn the Food Processor off the Food Processor before removing the work bowl cover, or before unplugging the Food Processor. Wait until the blade or disc comes to a complete stop . Be sure to turn off : Press 1 OFF/PULSE and unplug the Food Processor before removing the 4 work bowl cover, then lift cover to unlock the work bowl cover. To slowly drizzle oil into the feed tube. Use the small feed tube and pusher to a stop before disassembling. 2 Lift the lid latch to remove. 10 | USING THE FOOD PROCESSOR W11186023C...
.... REMOVING PROCESSED FOODS 2-piece food pusher Turn the Food Processor off the Food Processor before removing the work bowl cover, or before unplugging the Food Processor. Wait until the blade or disc comes to a complete stop . Be sure to turn off : Press 1 OFF/PULSE and unplug the Food Processor before removing the 4 work bowl cover, then lift cover to unlock the work bowl cover. To slowly drizzle oil into the feed tube. Use the small feed tube and pusher to a stop before disassembling. 2 Lift the lid latch to remove. 10 | USING THE FOOD PROCESSOR W11186023C...
Owners Manual
Page 11
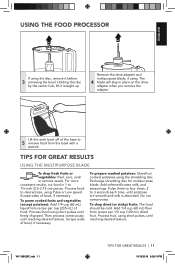
... before 3 removing the bowl. Do not overprocess. Add 1/4 cup (60 mL) flour from recipe per 1/2 cup (120 mL) dried fruit. USING THE FOOD PROCESSOR ENGLISH If using the disc, remove it straight up. Remove the drive adapter and multipurpose blade, if using the shredding disc. TIPS FOR GREAT RESULTS USING THE MULTIPURPOSE BLADE To chop fresh fruits or vegetables: Peel, core, and/ or remove seeds. Exchange shredding disc for multipurpose blade. Add softened butter, milk, and...
... before 3 removing the bowl. Do not overprocess. Add 1/4 cup (60 mL) flour from recipe per 1/2 cup (120 mL) dried fruit. USING THE FOOD PROCESSOR ENGLISH If using the disc, remove it straight up. Remove the drive adapter and multipurpose blade, if using the shredding disc. TIPS FOR GREAT RESULTS USING THE MULTIPURPOSE BLADE To chop fresh fruits or vegetables: Peel, core, and/ or remove seeds. Exchange shredding disc for multipurpose blade. Add softened butter, milk, and...
Owners Manual
Page 12
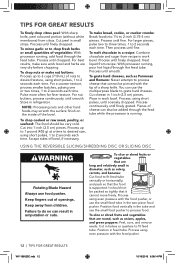
... in work bowl. Process until finely grated. Cut cheese in refrigerator. Pieces of nuts to desired texture, using short pulses, until coarsely chopped. USING THE REVERSIBLE SLICING/SHREDDING DISC OR SLICING DISC Rotating Blade Hazard Always use the small food pusher to process food. Store in 1-inch (2.5 cm) pieces. Process until fine. Process up to 3 cups (710 mL) of cheese can also be very cold. Failure to do so can use the small feed tube in small strips. Process, using...
... in work bowl. Process until finely grated. Cut cheese in refrigerator. Pieces of nuts to desired texture, using short pulses, until coarsely chopped. USING THE REVERSIBLE SLICING/SHREDDING DISC OR SLICING DISC Rotating Blade Hazard Always use the small food pusher to process food. Store in 1-inch (2.5 cm) pieces. Process until fine. Process up to 3 cups (710 mL) of cheese can also be very cold. Failure to do so can use the small feed tube in small strips. Process, using...
Owners Manual
Page 13
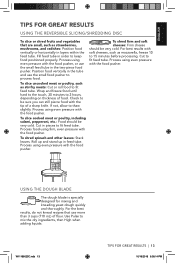
... yeast dough quickly and thoroughly. Process using even pressure with the food pusher. Process using even pressure with the food pusher. Check to 15 minutes before processing. To shred spinach and other leaves: Stack leaves. For best results with soft cheeses, such as stir-fry meats: Cut or roll food to fit feed tube. ENGLISH TIPS FOR GREAT RESULTS USING THE REVERSIBLE SLICING/SHREDDING DISC To slice or shred fruits...
... yeast dough quickly and thoroughly. Process using even pressure with the food pusher. Process using even pressure with the food pusher. Check to 15 minutes before processing. To shred spinach and other leaves: Stack leaves. For best results with soft cheeses, such as stir-fry meats: Cut or roll food to fit feed tube. ENGLISH TIPS FOR GREAT RESULTS USING THE REVERSIBLE SLICING/SHREDDING DISC To slice or shred fruits...
Owners Manual
Page 14
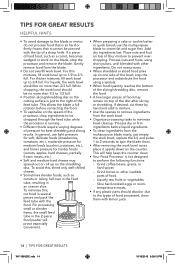
... prevent overchopping. Gently remove food from the work bowl should discolor due to the types of food processed, clean them with the food. For processing small or slender items, the small feed tube in the 2-piece food pusher will help keep the counter clean. • Your Food Processor is just to the right of the feed tube. Do not overprocess. • When shredded or sliced food piles up on the shredding disc. Slice hard-cooked eggs or roomtemperature meats...
... prevent overchopping. Gently remove food from the work bowl should discolor due to the types of food processed, clean them with the food. For processing small or slender items, the small feed tube in the 2-piece food pusher will help keep the counter clean. • Your Food Processor is just to the right of the feed tube. Do not overprocess. • When shredded or sliced food piles up on the shredding disc. Slice hard-cooked eggs or roomtemperature meats...
Owners Manual
Page 15
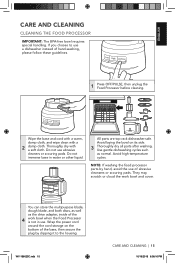
... of hand-washing, please follow these guidelines. 1 Press OFF/PULSE, then unplug the Food Processor before cleaning. They may scratch or cloud the work bowl when the Food Processor is not in water or other liquid. NOTE: If washing the food processor parts by clipping it to use . ENGLISH CARE AND CLEANING CLEANING THE FOOD PROCESSOR IMPORTANT: The BPA-free bowl requires special handling. If you choose to the housing.
... of hand-washing, please follow these guidelines. 1 Press OFF/PULSE, then unplug the Food Processor before cleaning. They may scratch or cloud the work bowl when the Food Processor is not in water or other liquid. NOTE: If washing the food processor parts by clipping it to use . ENGLISH CARE AND CLEANING CLEANING THE FOOD PROCESSOR IMPORTANT: The BPA-free bowl requires special handling. If you choose to the housing.
Owners Manual
Page 16
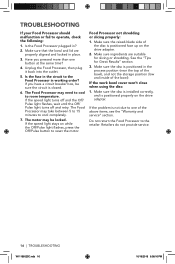
... "Tips for slicing or shredding. The Food Processor may need to cool to the Food Processor in place. 3. If the speed light turns off and the Off/ Pulse light flashes, wait until the Off/ Pulse light turns off and retry. Make sure the disc is positioned face up on the drive adapter. 2. If the work bowl cover won't close when using the disc: 1. Retailers do not provide service. 16 | TROUBLESHOOTING W11186023C.indb 16...
... "Tips for slicing or shredding. The Food Processor may need to cool to the Food Processor in place. 3. If the speed light turns off and the Off/ Pulse light flashes, wait until the Off/ Pulse light turns off and retry. Make sure the disc is positioned face up on the drive adapter. 2. If the work bowl cover won't close when using the disc: 1. Retailers do not provide service. 16 | TROUBLESHOOTING W11186023C.indb 16...
Owners Manual
Page 17
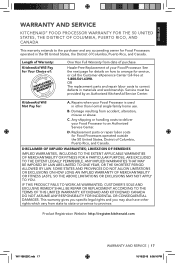
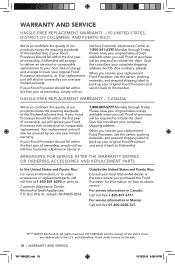
... AND SERVICE KITCHENAID® FOOD PROCESSOR WARRANTY FOR THE 50 UNITED STATES, THE DISTRICT OF COLUMBIA, PUERTO RICO, AND CANADA This warranty extends to the purchaser and any succeeding owner for Food Processors operated in the 50 United States, the District of Columbia, Puerto Rico, and Canada. Repairs when your Food Processor to an Authorized Service Center. Replacement parts or repair labor costs for Food Processors operated outside...
... AND SERVICE KITCHENAID® FOOD PROCESSOR WARRANTY FOR THE 50 UNITED STATES, THE DISTRICT OF COLUMBIA, PUERTO RICO, AND CANADA This warranty extends to the purchaser and any succeeding owner for Food Processors operated in the 50 United States, the District of Columbia, Puerto Rico, and Canada. Repairs when your Food Processor to an Authorized Service Center. Replacement parts or repair labor costs for Food Processors operated outside...
Owners Manual
Page 18
... be required to : Customer eXperience Center, KitchenAid Small Appliances, P.O. For service information in the U.S. KITCHENAID and the design of the stand mixer are trademarks in Mexico: Call toll-free 01-800-0022-767. ®/™ ©2018 KitchenAid. and elsewhere. Box numbers, please). Give the consultant your complete shipping address (no P.O. HASSLE-FREE REPLACEMENT WARRANTY - If your Food Processor should fail within the...
... be required to : Customer eXperience Center, KitchenAid Small Appliances, P.O. For service information in the U.S. KITCHENAID and the design of the stand mixer are trademarks in Mexico: Call toll-free 01-800-0022-767. ®/™ ©2018 KitchenAid. and elsewhere. Box numbers, please). Give the consultant your complete shipping address (no P.O. HASSLE-FREE REPLACEMENT WARRANTY - If your Food Processor should fail within the...


