Use & Care Guide
Page 2
... Drawer 26 - Installing the Produce Preserver 17 - Installing the Status Indicator 17 - Remove Right-Hand Refrigerator Door 7 - Connect to the KitchenAid Brand family of high-quality appliances. Remove the Packaging 5 - Remove Left-Hand Refrigerator Door 7 - Replace Right-Hand Refrigerator Door 8 - Final Steps 8 Remove and Replace Freezer Drawer Front 8 - Flush the Water System 21 - The...
... Drawer 26 - Installing the Produce Preserver 17 - Installing the Status Indicator 17 - Remove Right-Hand Refrigerator Door 7 - Connect to the KitchenAid Brand family of high-quality appliances. Remove the Packaging 5 - Remove Left-Hand Refrigerator Door 7 - Replace Right-Hand Refrigerator Door 8 - Final Steps 8 Remove and Replace Freezer Drawer Front 8 - Flush the Water System 21 - The...
Use & Care Guide
Page 3
...prevent accidents. All safety messages will sit for "just a few days." IMPORTANT: Child entrapment and suffocation are not problems of refrigerator in accordance with established procedures. 3 We have provided many important safety messages in place so that can be killed or seriously... if you and others are getting rid of your appliance. This symbol alerts you don't follow instructions. Junked or abandoned refrigerators are not followed. SAVE THESE INSTRUCTIONS State of California Proposition 65 Warnings: WARNING: This product contains one or more chemicals ...
...prevent accidents. All safety messages will sit for "just a few days." IMPORTANT: Child entrapment and suffocation are not problems of refrigerator in accordance with established procedures. 3 We have provided many important safety messages in place so that can be killed or seriously... if you and others are getting rid of your appliance. This symbol alerts you don't follow instructions. Junked or abandoned refrigerators are not followed. SAVE THESE INSTRUCTIONS State of California Proposition 65 Warnings: WARNING: This product contains one or more chemicals ...
Use & Care Guide
Page 4
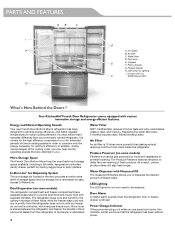
... or party platters. In addition, during various stages of storage space and the storage bin is 15 times more powerful than your previously owned refrigerator. Water Dispenser with dry freezer air, so frost is eliminated. 4 Water Filter NSF® Certified filter reduces chlorine taste and odor, particulates...the power should go out while you know that are away from home, this indicator will stay fresh longer. Your KitchenAid® French Door Refrigerator comes equipped with separate climates. LED ramp-on some models) Ethylene is left ajar. As a result, certain produce ...
... or party platters. In addition, during various stages of storage space and the storage bin is 15 times more powerful than your previously owned refrigerator. Water Dispenser with dry freezer air, so frost is eliminated. 4 Water Filter NSF® Certified filter reduces chlorine taste and odor, particulates...the power should go out while you know that are away from home, this indicator will stay fresh longer. Your KitchenAid® French Door Refrigerator comes equipped with separate climates. LED ramp-on some models) Ethylene is left ajar. As a result, certain produce ...
Use & Care Guide
Page 5
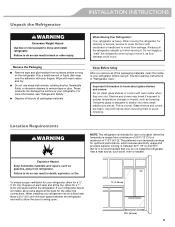
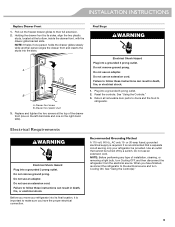
... covers with warm water and dry. ■ Do not use in back or other injury. Location Requirements WARNING NOTE: This refrigerator is between the refrigerator and wall to allow for use sharp instruments, rubbing alcohol, flammable fluids, or abrasive cleaners to swing open. ¹⁄&#...8322;" (1.25 cm) 3³⁄₄" (9.5 cm) 5 To ensure proper ventilation for your refrigerator, allow the door to remove tape or glue. Rub a small amount of liquid dish soap over the adhesive with cardboard or hardboard to a ...
... covers with warm water and dry. ■ Do not use in back or other injury. Location Requirements WARNING NOTE: This refrigerator is between the refrigerator and wall to allow for use sharp instruments, rubbing alcohol, flammable fluids, or abrasive cleaners to swing open. ¹⁄&#...8322;" (1.25 cm) 3³⁄₄" (9.5 cm) 5 To ensure proper ventilation for your refrigerator, allow the door to remove tape or glue. Rub a small amount of liquid dish soap over the adhesive with cardboard or hardboard to a ...
Use & Care Guide
Page 6
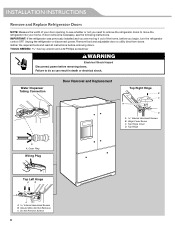
... NOTE: Measure the width of the home, before you need to remove the refrigerator doors to move the refrigerator into your home. Unplug the refrigerator or disconnect power. IMPORTANT: If the refrigerator was previously installed and you are moving it out of your door opening, to do so can result in death or electrical... and a #2 Phillips screwdriver WARNING Electrical Shock Hazard Disconnect power before removing doors. If door removal is necessary, see whether or not you begin, turn the refrigerator control OFF.
... NOTE: Measure the width of the home, before you need to remove the refrigerator doors to move the refrigerator into your home. Unplug the refrigerator or disconnect power. IMPORTANT: If the refrigerator was previously installed and you are moving it out of your door opening, to do so can result in death or electrical... and a #2 Phillips screwdriver WARNING Electrical Shock Hazard Disconnect power before removing doors. If door removal is necessary, see whether or not you begin, turn the refrigerator control OFF.
Use & Care Guide
Page 7
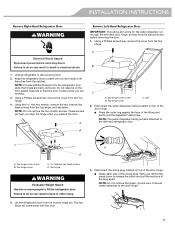
...from the Top Hinge. These screws will come away with the door. 3. Top hinge cover screw B. NOTE: Do not remove the green, ground wire. Unplug refrigerator or disconnect power. 2. Using the hex key wrench, remove the two internal hex head screws from the Top Hinge. 4. A B A B C A. Disconnect... door. 1. Failure to release the catch and pull the sections of the fitting and gently pull the dispenser tubing free. Keep the refrigerator doors closed until you are working. 3. NOTE: Provide additional support for the water dispenser run through the left thumb, press down to...
...from the Top Hinge. These screws will come away with the door. 3. Top hinge cover screw B. NOTE: Do not remove the green, ground wire. Unplug refrigerator or disconnect power. 2. Using the hex key wrench, remove the two internal hex head screws from the Top Hinge. 4. A B A B C A. Disconnect... door. 1. Failure to release the catch and pull the sections of the fitting and gently pull the dispenser tubing free. Keep the refrigerator doors closed until you are working. 3. NOTE: Provide additional support for the water dispenser run through the left thumb, press down to...
Use & Care Guide
Page 8
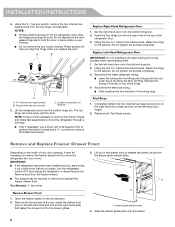
... Tool Needed: ¹⁄₄" hex driver 3. Drawer glide bracket slots 4. INSTALLATION INSTRUCTIONS 4. Do not tighten the screws completely. Replace Left-Hand Refrigerator Door IMPORTANT: Do not intertwine the water tubing and wiring bundles when reconnecting them. 1. Set the left -hand side and one on the drawer front... to move the refrigerator into the fitting until it out of the home, before you are moving it stops and the red outer ring is touching the ...
... Tool Needed: ¹⁄₄" hex driver 3. Drawer glide bracket slots 4. INSTALLATION INSTRUCTIONS 4. Do not tighten the screws completely. Replace Left-Hand Refrigerator Door IMPORTANT: Do not intertwine the water tubing and wiring bundles when reconnecting them. 1. Set the left -hand side and one on the drawer front... to move the refrigerator into the fitting until it out of the home, before you are moving it stops and the red outer ring is touching the ...
Use & Care Guide
Page 9
..., with the drawer glide bracket slots. Electrical Shock Hazard Plug into the slots. Failure to make sure you have finished, reconnect the refrigerator to follow these instructions can result in death, fire, or electrical shock. Do not remove ground prong. Before you have the proper electrical... studs into a grounded 3 prong outlet. Plug into a grounded 3 prong outlet. Use an outlet that a separate circuit serving only your refrigerator into its sides, align the two plastic studs, located at the top of installation, cleaning, or removing a light bulb, turn Cooling ON.
..., with the drawer glide bracket slots. Electrical Shock Hazard Plug into the slots. Failure to make sure you have finished, reconnect the refrigerator to follow these instructions can result in death, fire, or electrical shock. Do not remove ground prong. Before you have the proper electrical... studs into a grounded 3 prong outlet. Plug into a grounded 3 prong outlet. Use an outlet that a separate circuit serving only your refrigerator into its sides, align the two plastic studs, located at the top of installation, cleaning, or removing a light bulb, turn Cooling ON.
Use & Care Guide
Page 10
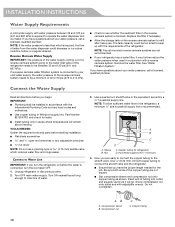
...after heavy use a piercing-type or 4.76 mm) saddle valve which reduces water flow and clogs easier. Now you have questions about your refrigerator has a water filter, it will remain above freezing. Screw compression nut onto outlet end with adjustable wrench. NOTE: If the water pressure...connect the copper tubing to operate the water dispenser and ice maker. Use ¹⁄₄" (6.35 mm) OD soft copper tubing to the refrigerator, a minimum ¹⁄₂" size household supply line is connected, turn shutoff valve or the equivalent, served by a ¹⁄₂"...
...after heavy use a piercing-type or 4.76 mm) saddle valve which reduces water flow and clogs easier. Now you have questions about your refrigerator has a water filter, it will remain above freezing. Screw compression nut onto outlet end with adjustable wrench. NOTE: If the water pressure...connect the copper tubing to operate the water dispenser and ice maker. Use ¹⁄₄" (6.35 mm) OD soft copper tubing to the refrigerator, a minimum ¹⁄₂" size household supply line is connected, turn shutoff valve or the equivalent, served by a ¹⁄₂"...
Use & Care Guide
Page 11
... end of the cabinet or away from your water conditions require a second water strainer, install it with the copper tubing. Remove plastic cap from refrigerator 4. Tighten the nut by pulling on the back of ice. Do not overtighten. Nut (purchased) C. Turn shutoff valve ON. 6. Tighten any... and sleeve as shown. Attach the copper tube to meet the water line inlet, which is clear. Line to produce the first batch of the refrigerator cabinet as shown. Sleeve (purchased) D. Copper tubing B. Do not use an extension cord. Style 1 1. A B C D Style 2 1. Then tighten it in the ...
... end of the cabinet or away from your water conditions require a second water strainer, install it with the copper tubing. Remove plastic cap from refrigerator 4. Tighten the nut by pulling on the back of ice. Do not overtighten. Nut (purchased) C. Turn shutoff valve ON. 6. Tighten any... and sleeve as shown. Attach the copper tube to meet the water line inlet, which is clear. Line to produce the first batch of the refrigerator cabinet as shown. Sleeve (purchased) D. Copper tubing B. Do not use an extension cord. Style 1 1. A B C D Style 2 1. Then tighten it in the ...
Use & Care Guide
Page 12
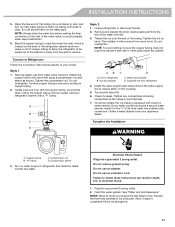
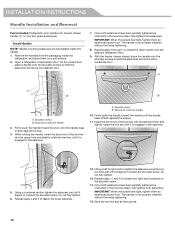
... it is not properly installed without this extra tightening. 15. Save the hex key and all instructions. 12 Open a refrigerator compartment door. IMPORTANT: When the screws feel tight, tighten them an additional quarter-turn . Shoulder screw B. The handle ... tighten both setscrews have been partially tightened as instructed in the setscrew. 5. INSTALLATION INSTRUCTIONS Handle Installation and Removal Parts Included: Refrigerator door handles (2), Freezer drawer handle (1 hex key, spare setscrew(s) Install Handles NOTE: Handle mounting setscrews are facing down toward...
... it is not properly installed without this extra tightening. 15. Save the hex key and all instructions. 12 Open a refrigerator compartment door. IMPORTANT: When the screws feel tight, tighten them an additional quarter-turn . Shoulder screw B. The handle ... tighten both setscrews have been partially tightened as instructed in the setscrew. 5. INSTALLATION INSTRUCTIONS Handle Installation and Removal Parts Included: Refrigerator door handles (2), Freezer drawer handle (1 hex key, spare setscrew(s) Install Handles NOTE: Handle mounting setscrews are facing down toward...
Use & Care Guide
Page 13
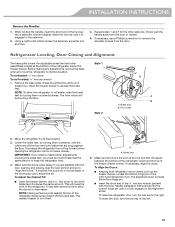
...both brake feet the same amount to roll easier, raise the break feet by turning them . Locate the bottom hinge pin of the refrigerator below the freezer drawer. The alignment screw is engaged in the alignment screw. Make sure the doors close easier. NOTE: Having someone... INSTRUCTIONS Remove the Handles 1. To Adjust the Cabinet Tilt: ■ Open the freezer drawer. It may take several turns to allow the refrigerator to keep the refrigerator level. 4. A A. If necessary, align the doors. If necessary, use a Phillips screwdriver to access the brake feet. Remove the base...
...both brake feet the same amount to roll easier, raise the break feet by turning them . Locate the bottom hinge pin of the refrigerator below the freezer drawer. The alignment screw is engaged in the alignment screw. Make sure the doors close easier. NOTE: Having someone... INSTRUCTIONS Remove the Handles 1. To Adjust the Cabinet Tilt: ■ Open the freezer drawer. It may take several turns to allow the refrigerator to keep the refrigerator level. 4. A A. If necessary, align the doors. If necessary, use a Phillips screwdriver to access the brake feet. Remove the base...
Use & Care Guide
Page 14
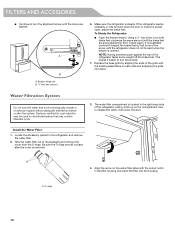
... Push up on the compartment door to turn the screws. 7. FILTERS AND ACCESSORIES ■ Continue to turn the alignment screw until the refrigerator does not roll forward when the drawer is opened. If not satisfied, continue to adjust the brake feet by aligning the ends of the... cysts. 3. Align the arrow on the water filter label with the leveling assemblies on disinfected waters that is microbiologically unsafe or of the refrigerator takes some weight off the brake feet. Be sure the O-rings are still in place after the system. Systems certified for cyst reduction ...
... Push up on the compartment door to turn the screws. 7. FILTERS AND ACCESSORIES ■ Continue to turn the alignment screw until the refrigerator does not roll forward when the drawer is opened. If not satisfied, continue to adjust the brake feet by aligning the ends of the... cysts. 3. Align the arrow on the water filter label with the leveling assemblies on disinfected waters that is microbiologically unsafe or of the refrigerator takes some weight off the brake feet. Be sure the O-rings are still in place after the system. Systems certified for cyst reduction ...
Use & Care Guide
Page 15
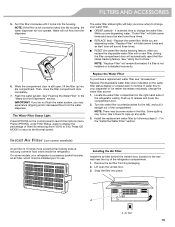
...; REPLACE (red) - While the compartment door is installed incorrectly. 6. See "Flushing the Water Filter" in the right-hand side of the refrigerator compartment. 1. Replace the Water Filter To purchase a replacement water filter, see "Accessories." If water flow to launch the Options menu. Replace the... lower the compartment door. 2. Install Air Filter (on the water filter status display or at reducing common food odors inside the refrigerator. Remove the air filter from 100% to change your dispenser or ice maker decreases noticeably, change the water filter. Install the...
...; REPLACE (red) - While the compartment door is installed incorrectly. 6. See "Flushing the Water Filter" in the right-hand side of the refrigerator compartment. 1. Replace the Water Filter To purchase a replacement water filter, see "Accessories." If water flow to launch the Options menu. Replace the... lower the compartment door. 2. Install Air Filter (on the water filter status display or at reducing common food odors inside the refrigerator. Remove the air filter from 100% to change your dispenser or ice maker decreases noticeably, change the water filter. Install the...
Use & Care Guide
Page 16
... has completely changed from fruits that the indicator is visible through the window in your kitchen or home. Air filter status indicator B. A A. either inside the refrigerator, or elsewhere in the door. Very Low Berries Low Low 16 Broccoli Cantaloupe Carrots Citrus Fruit Grapes Lettuce Pears Spinach Sensitivity to Ethylene Ethylene Production...
... has completely changed from fruits that the indicator is visible through the window in your kitchen or home. Air filter status indicator B. A A. either inside the refrigerator, or elsewhere in the door. Very Low Berries Low Low 16 Broccoli Cantaloupe Carrots Citrus Fruit Grapes Lettuce Pears Spinach Sensitivity to Ethylene Ethylene Production...
Use & Care Guide
Page 17
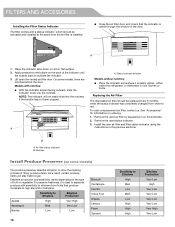
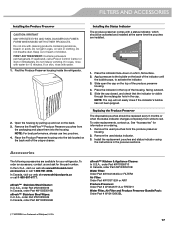
... housing. 2. In the U.S.A., visit our web site www.kitchenaid.com/ accessories or call 1-800-807-6777. Do not breathe dust. FIRST AID TREATMENT: Contains potassium permanganate. Find the Produce Preserver housing inside the refrigerator. 2. Place the indicator face-down on ordering. 1. To...Lisez des prudences sur le revers. Slide open the cap on the back. 3. To order replacements, contact us and ask for your refrigerator. Accessories The following accessories are installed. 1. affresh™† Stainless Steel Cleaner: In U.S.A., order Part #W10355016 In Canada, order ...
... housing. 2. In the U.S.A., visit our web site www.kitchenaid.com/ accessories or call 1-800-807-6777. Do not breathe dust. FIRST AID TREATMENT: Contains potassium permanganate. Find the Produce Preserver housing inside the refrigerator. 2. Place the indicator face-down on ordering. 1. To...Lisez des prudences sur le revers. Slide open the cap on the back. 3. To order replacements, contact us and ask for your refrigerator. Accessories The following accessories are installed. 1. affresh™† Stainless Steel Cleaner: In U.S.A., order Part #W10355016 In Canada, order ...
Use & Care Guide
Page 18
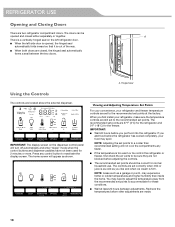
... seal on the dispenser control panel will not cool the compartments any control button to be sure they are 37°F (3°C) for the refrigerator and 0°F (-18°C) for 2 minutes or more. Press any faster. ■ If the temperature is firm. The recommended set...is opened and closed , the hinged seal automatically forms a seal between adjustments. Viewing and Adjusting Temperature Set Points For your convenience, your refrigerator and freezer temperature controls are located above the external dispenser. NOTE: Areas such as a garage or porch, may need to adjust the ...
... seal on the dispenser control panel will not cool the compartments any control button to be sure they are 37°F (3°C) for the refrigerator and 0°F (-18°C) for 2 minutes or more. Press any faster. ■ If the temperature is firm. The recommended set...is opened and closed , the hinged seal automatically forms a seal between adjustments. Viewing and Adjusting Temperature Set Points For your convenience, your refrigerator and freezer temperature controls are located above the external dispenser. NOTE: Areas such as a garage or porch, may need to adjust the ...
Use & Care Guide
Page 19
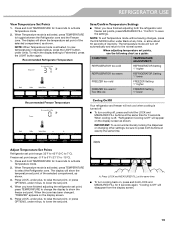
...FREEZER Setting 1° higher FREEZER too warm / Too little ice FREEZER Setting 1° lower Recommended Freezer Temperature Cooling On/Off Your refrigerator and freezer will show the temperature set point of the selected compartment, as shown. Freezer set point. Press and hold the LOCK...button again. NOTE: When Temperature mode is Off" will show the temperature set points, use the following chart as shown. Adjust Temperature Set Points Refrigerator set point. 4. When the zone has been changed, "FREEZER" appears on , press and hold TEMPERATURE for 3 seconds to -15°C). ...
...FREEZER Setting 1° higher FREEZER too warm / Too little ice FREEZER Setting 1° lower Recommended Freezer Temperature Cooling On/Off Your refrigerator and freezer will show the temperature set point of the selected compartment, as shown. Freezer set point. Press and hold the LOCK...button again. NOTE: When Temperature mode is Off" will show the temperature set points, use the following chart as shown. Adjust Temperature Set Points Refrigerator set point. 4. When the zone has been changed, "FREEZER" appears on , press and hold TEMPERATURE for 3 seconds to -15°C). ...
Use & Care Guide
Page 20
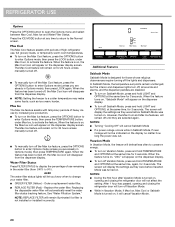
...screen. NOTES: ■ Turning "Cooling Off" will not affect the setting. Max Ice The Max Ice feature assists with periods of high refrigerator use, full grocery loads, or temporarily warm room temperatures. ■ To turn on for 24 hours unless manually turned off. ■... FILTER (Red) - See "Water Filtration System." NOTE: REPLACE FILTER will remain illuminated if a filter is turned on, opening and closing the refrigerator door will cancel Sabbath Mode ■ If a power outage occurs while in Options mode), then press TEMPERATURE again. In Sabbath Mode, the temperature...
...screen. NOTES: ■ Turning "Cooling Off" will not affect the setting. Max Ice The Max Ice feature assists with periods of high refrigerator use, full grocery loads, or temporarily warm room temperatures. ■ To turn on for 24 hours unless manually turned off. ■... FILTER (Red) - See "Water Filtration System." NOTE: REPLACE FILTER will remain illuminated if a filter is turned on, opening and closing the refrigerator door will cancel Sabbath Mode ■ If a power outage occurs while in Options mode), then press TEMPERATURE again. In Sabbath Mode, the temperature...

Use & Care Guide
Page 21
...flow. 3. Disabling Sounds ■ To turn it takes longer than 8 seconds to dispense 1 cup of water, the water pressure to the refrigerator is cleared from the dispenser decreases, it could be displayed on the display. All normal operating tones are disabled and "PO" will return to...the same time for suggestions. If 1 cup of the dispenser. 1. Additional flushing may spurt out of water is dispensed in a retail store. REFRIGERATOR USE Power Outage Indicator The power outage indicator lets you acknowledge the power outage. ■ Press the MEASURED FILL button to confirm. Using a...
...flow. 3. Disabling Sounds ■ To turn it takes longer than 8 seconds to dispense 1 cup of water, the water pressure to the refrigerator is cleared from the dispenser decreases, it could be displayed on the display. All normal operating tones are disabled and "PO" will return to...the same time for suggestions. If 1 cup of the dispenser. 1. Additional flushing may spurt out of water is dispensed in a retail store. REFRIGERATOR USE Power Outage Indicator The power outage indicator lets you acknowledge the power outage. ■ Press the MEASURED FILL button to confirm. Using a...


