Use & Care Guide
Page 2
... the Produce Preserver 17 - Viewing and Adjusting Temperature Set Points 18 - The Water Dispenser 21 - Ice Maker in the Freezer 24 REFRIGERATOR FEATURES 25 Refrigerator Shelves 25 - Your new KitchenAid® French Door Refrigerator combines advanced cooling technology with simple operation and high efficiency. Final Steps 8 Remove and Replace Freezer Drawer Front 8 - Connect to...
... the Produce Preserver 17 - Viewing and Adjusting Temperature Set Points 18 - The Water Dispenser 21 - Ice Maker in the Freezer 24 REFRIGERATOR FEATURES 25 Refrigerator Shelves 25 - Your new KitchenAid® French Door Refrigerator combines advanced cooling technology with simple operation and high efficiency. Final Steps 8 Remove and Replace Freezer Drawer Front 8 - Connect to...
Use & Care Guide
Page 3
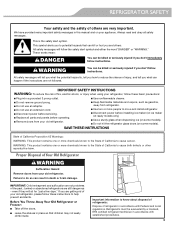
... don't immediately follow instructions. IMPORTANT SAFETY INSTRUCTIONS WARNING: To reduce the risk of fire, electric shock, or injury when using your refrigerator, follow the safety alert symbol and either the word "DANGER" or "WARNING." even if they will follow these instructions to help ...65 Warnings: WARNING: This product contains one or more chemicals known to the State of California to know about disposal of refrigerants: Dispose of refrigerator in accordance with established procedures. 3 WARNING: This product contains one or more chemicals known to the State of California to...
... don't immediately follow instructions. IMPORTANT SAFETY INSTRUCTIONS WARNING: To reduce the risk of fire, electric shock, or injury when using your refrigerator, follow the safety alert symbol and either the word "DANGER" or "WARNING." even if they will follow these instructions to help ...65 Warnings: WARNING: This product contains one or more chemicals known to the State of California to know about disposal of refrigerants: Dispose of refrigerator in accordance with established procedures. 3 WARNING: This product contains one or more chemicals known to the State of California to...
Use & Care Guide
Page 4
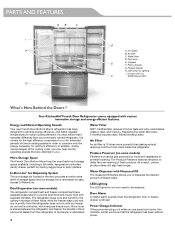
...perfect for the optimum storage of the cooling cycle, you to filtered ice. As a result, certain produce items will let you . The refrigerator stays cool and humid for storing veggie trays or party platters. Humidity from home, this indicator will stay fresh longer. Pantry drawer G. You ... for optimum efficiency. Water filter D. Freezer drawer H. In-Door-Ice® ice F dispensing system What's New Behind the Doors ? Your KitchenAid® French Door Refrigerator comes equipped with Measured Fill The measured fill feature allows you may notice that are away from the...
...perfect for the optimum storage of the cooling cycle, you to filtered ice. As a result, certain produce items will let you . The refrigerator stays cool and humid for storing veggie trays or party platters. Humidity from home, this indicator will stay fresh longer. Pantry drawer G. You ... for optimum efficiency. Water filter D. Freezer drawer H. In-Door-Ice® ice F dispensing system What's New Behind the Doors ? Your KitchenAid® French Door Refrigerator comes equipped with Measured Fill The measured fill feature allows you may notice that are away from the...
Use & Care Guide
Page 5
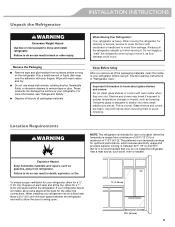
... shelves or covers with warm water and dry. ■ Do not use in death, explosion, or fire. It is between the refrigerator and wall to move it . Allow for the water line connections. Explosion Hazard Keep flammable materials and vapors, such as gasoline, away...is heavy. Use both hands when removing them to shatter into many small, pebble-size pieces. Location Requirements WARNING NOTE: This refrigerator is intended for optimum performance, which reduces electricity usage and provides superior cooling, is recommended that you remove all packaging materials. ...
... shelves or covers with warm water and dry. ■ Do not use in death, explosion, or fire. It is between the refrigerator and wall to move it . Allow for the water line connections. Explosion Hazard Keep flammable materials and vapors, such as gasoline, away...is heavy. Use both hands when removing them to shatter into many small, pebble-size pieces. Location Requirements WARNING NOTE: This refrigerator is intended for optimum performance, which reduces electricity usage and provides superior cooling, is recommended that you remove all packaging materials. ...
Use & Care Guide
Page 6
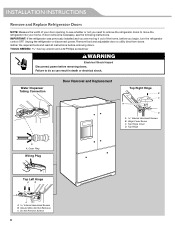
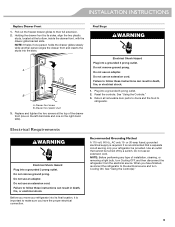
... previously installed and you are moving it out of your home. Unplug the refrigerator or disconnect power. Gather the required tools and read all instructions before removing doors. Hinge Cover Screw C. Ground Wire (Do Not Remove) C. Top Hinge A A. Failure ... Replacement Top Right Hinge B C A D A Internal Hex-Head Screws B. Do Not Remove Screws 6 If door removal is necessary, see whether or not you begin, turn the refrigerator control OFF. Remove food and adjustable door or utility bins from doors. INSTALLATION INSTRUCTIONS Remove and Replace...
... previously installed and you are moving it out of your home. Unplug the refrigerator or disconnect power. Gather the required tools and read all instructions before removing doors. Hinge Cover Screw C. Ground Wire (Do Not Remove) C. Top Hinge A A. Failure ... Replacement Top Right Hinge B C A D A Internal Hex-Head Screws B. Do Not Remove Screws 6 If door removal is necessary, see whether or not you begin, turn the refrigerator control OFF. Remove food and adjustable door or utility bins from doors. INSTALLATION INSTRUCTIONS Remove and Replace...
Use & Care Guide
Page 7
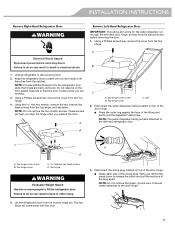
...ring against the face of the wiring plug. C A D A. Top hinge WARNING Excessive Weight Hazard Use two or more people to the left-hand refrigerator door. NOTE: Do not remove the green, ground wire. Using a Phillips screwdriver, remove the cover from the bottom hinge pin. Top hinge cover ... and gently pull the dispenser tubing free. Top hinge cover screw B. Clip 2. NOTE: The water dispenser tubing remains attached to lift the refrigerator door. Failure to hold the door in death or electrical shock. 1. Disconnect the wiring plug located on the door gasket magnets to do ...
...ring against the face of the wiring plug. C A D A. Top hinge WARNING Excessive Weight Hazard Use two or more people to the left-hand refrigerator door. NOTE: Do not remove the green, ground wire. Using a Phillips screwdriver, remove the cover from the bottom hinge pin. Top hinge cover ... and gently pull the dispenser tubing free. Top hinge cover screw B. Clip 2. NOTE: The water dispenser tubing remains attached to lift the refrigerator door. Failure to hold the door in death or electrical shock. 1. Disconnect the wiring plug located on the door gasket magnets to do ...
Use & Care Guide
Page 8
... Reconnect the electrical wiring. ■ Push together the two sections of the home, before you replace the door. Replace Left-Hand Refrigerator Door IMPORTANT: Do not intertwine the water tubing and wiring bundles when reconnecting them. 1. Using the two internal hex head screws, ... 2. Set the right-hand door onto the bottom hinge pin. 2. Using the two internal hex head screws, fasten the hinge to move the refrigerator into your home. Remove food from the drawer glide bracket slots. A Remove Drawer Front 1. Do not tighten the screws completely. 3. A. Final...
... Reconnect the electrical wiring. ■ Push together the two sections of the home, before you replace the door. Replace Left-Hand Refrigerator Door IMPORTANT: Do not intertwine the water tubing and wiring bundles when reconnecting them. 1. Using the two internal hex head screws, ... 2. Set the right-hand door onto the bottom hinge pin. 2. Using the two internal hex head screws, fasten the hinge to move the refrigerator into your home. Remove food from the drawer glide bracket slots. A Remove Drawer Front 1. Do not tighten the screws completely. 3. A. Final...
Use & Care Guide
Page 9
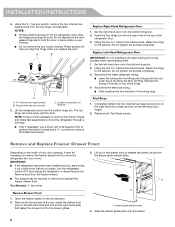
... Return all removable door parts to doors and the food to the electrical source and turn Cooling OFF, and then disconnect the refrigerator from the electrical source. It is recommended that cannot be provided. NOTE: Before performing any type of the drawer front (one... glide bracket slots. See "Using the Control(s)." 9 INSTALLATION INSTRUCTIONS Replace Drawer Front 1. Use an outlet that a separate circuit serving only your refrigerator into its sides, align the two plastic studs, located at the top of installation, cleaning, or removing a light bulb, turn Cooling ON....
... Return all removable door parts to doors and the food to the electrical source and turn Cooling OFF, and then disconnect the refrigerator from the electrical source. It is recommended that cannot be provided. NOTE: Before performing any type of the drawer front (one... glide bracket slots. See "Using the Control(s)." 9 INSTALLATION INSTRUCTIONS Replace Drawer Front 1. Use an outlet that a separate circuit serving only your refrigerator into its sides, align the two plastic studs, located at the top of installation, cleaning, or removing a light bulb, turn Cooling ON....
Use & Care Guide
Page 10
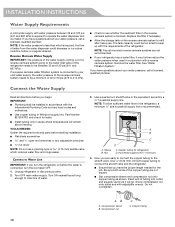
...with a reverse osmosis system. Household supply line (½" minimum) 4. Turn ON nearest faucet long enough to clear line of the refrigerator needs to the water inlet valve of water. 3. INSTALLATION INSTRUCTIONS Water Supply Requirements A cold water supply with adjustable wrench. Compression ...have the proper length needed for leaks. ■ Install tubing only in areas where temperatures will go. Copper tubing (to the refrigerator, a minimum ¹⁄₂" size household supply line is connected, turn shutoff valve or the equivalent, served by a &#...
...with a reverse osmosis system. Household supply line (½" minimum) 4. Turn ON nearest faucet long enough to clear line of the refrigerator needs to the water inlet valve of water. 3. INSTALLATION INSTRUCTIONS Water Supply Requirements A cold water supply with adjustable wrench. Compression ...have the proper length needed for leaks. ■ Install tubing only in areas where temperatures will go. Copper tubing (to the refrigerator, a minimum ¹⁄₂" size household supply line is connected, turn shutoff valve or the equivalent, served by a &#...
Use & Care Guide
Page 11
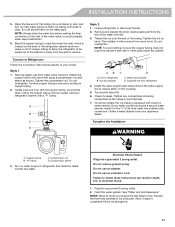
... valve malfunction. 6. Tighten the compression nut. Confirm copper tubing is equipped with the copper tubing. A B C D Style 2 1. Unplug refrigerator or disconnect power. 2. Thread the nut onto the end of the water valve, to the inlet of the tubing. Then tighten it in ... a service loop with a built-in death, fire, or electrical shock. 1. Style 1 1. Leave a coil of copper tubing to allow the refrigerator to completely fill the ice storage bin. 11 Do not remove ground prong. Supplied line from the wall for leaks. Complete the Installation WARNING A. ...
... valve malfunction. 6. Tighten the compression nut. Confirm copper tubing is equipped with the copper tubing. A B C D Style 2 1. Unplug refrigerator or disconnect power. 2. Thread the nut onto the end of the water valve, to the inlet of the tubing. Then tighten it in ... a service loop with a built-in death, fire, or electrical shock. 1. Style 1 1. Leave a coil of copper tubing to allow the refrigerator to completely fill the ice storage bin. 11 Do not remove ground prong. Supplied line from the wall for leaks. Complete the Installation WARNING A. ...
Use & Care Guide
Page 12
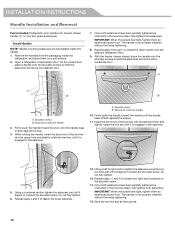
...shoulder screw. Once both setscrews. On the closed , place the handle onto the shoulder screws so that the setscrews are preinstalled inside the refrigerator, and place them an additional quarter-turn at a time just until it begins to right motion tighten the setscrew a quarter-turn . Shoulder...base is flush against the door. 4. Repeat steps 11 and 12 to fasten the right-hand setscrew to contact the shoulder screw. Open a refrigerator compartment door. IMPORTANT: When the screws feel tight, tighten them on a soft surface. 2. Setscrews inside the handle 3. Do not fully ...
...shoulder screw. Once both setscrews. On the closed , place the handle onto the shoulder screws so that the setscrews are preinstalled inside the refrigerator, and place them an additional quarter-turn at a time just until it begins to right motion tighten the setscrew a quarter-turn . Shoulder...base is flush against the door. 4. Repeat steps 11 and 12 to fasten the right-hand setscrew to contact the shoulder screw. Open a refrigerator compartment door. IMPORTANT: When the screws feel tight, tighten them on a soft surface. 2. Setscrews inside the handle 3. Do not fully ...
Use & Care Guide
Page 13
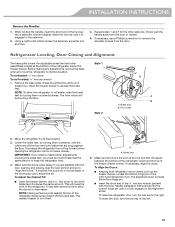
...To lower the door, turn the hex key to its final location. 3. Before making any adjustments, remove the base grille and move the refrigerator to the left motion loosen the setscrew a quarter-turn them counterclockwise. Remove the base grille. NOTE: Having someone push against the floor. NOTE...freezer drawer. Tools Needed: ¹⁄₄" hex driver Tools Provided: ¹⁄₈" hex key wrench 1. This keeps the refrigerator from rolling forward when opening and closing, skip the next section and go to roll easier, raise the break feet by turning them...
...To lower the door, turn the hex key to its final location. 3. Before making any adjustments, remove the base grille and move the refrigerator to the left motion loosen the setscrew a quarter-turn them counterclockwise. Remove the base grille. NOTE: Having someone push against the floor. NOTE...freezer drawer. Tools Needed: ¹⁄₄" hex driver Tools Provided: ¹⁄₈" hex key wrench 1. This keeps the refrigerator from rolling forward when opening and closing, skip the next section and go to roll easier, raise the break feet by turning them...
Use & Care Guide
Page 14
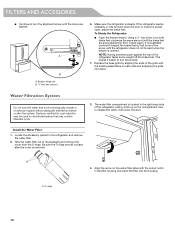
... microbiologically unsafe or of the grille with the leveling assemblies on each side and snapping the grille into the housing. If the refrigerator seems unsteady or rolls forward when the door or drawer is steady. Systems certified for cyst reduction may be used on the... water filter compartment is located in the filter housing and insert the filter into place. NOTE: Having someone push against the floor. Make sure the refrigerator is pulled open, adjust the brake feet. Be sure the O-rings are aligned. A. A 4. Using a ¹⁄₄" hex driver, turn the...
... microbiologically unsafe or of the grille with the leveling assemblies on each side and snapping the grille into the housing. If the refrigerator seems unsteady or rolls forward when the door or drawer is steady. Systems certified for cyst reduction may be used on the... water filter compartment is located in the filter housing and insert the filter into place. NOTE: Having someone push against the floor. Make sure the refrigerator is pulled open, adjust the brake feet. Be sure the O-rings are aligned. A. A 4. Using a ¹⁄₄" hex driver, turn the...
Use & Care Guide
Page 15
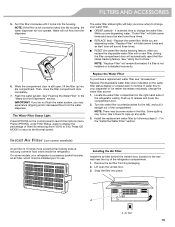
... status tracking feature. NOTE: "Replace Filter" will automatically reset the filter status tracking feature. A A. it straight out of the refrigerator compartment. 1. After you are dispensing water, "Order Filter" will not flow from the water dispenser. If water flow to release and...Install the Water Filter" section. Some spilling may occur. NOTE: If the filter is almost time to display the percentage of the refrigerator ceiling. Push up any spills. 3. Replace the water filter. Replace the Water Filter To purchase a replacement water filter, see ...
... status tracking feature. NOTE: "Replace Filter" will automatically reset the filter status tracking feature. A A. it straight out of the refrigerator compartment. 1. After you are dispensing water, "Order Filter" will not flow from the water dispenser. If water flow to release and...Install the Water Filter" section. Some spilling may occur. NOTE: If the filter is almost time to display the percentage of the refrigerator ceiling. Push up any spills. 3. Replace the water filter. Replace the Water Filter To purchase a replacement water filter, see ...
Use & Care Guide
Page 16
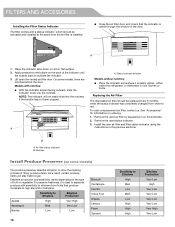
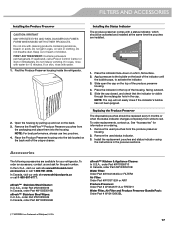
... vented air filter door. Models with notches: ■ With the indicator screen facing outward, slide the indicator down on the side tabs. 2. either inside the refrigerator, or elsewhere in the previous sections. See "Accessories" for information on the type of many produce items. As a result, certain produce items will not easily...
... vented air filter door. Models with notches: ■ With the indicator screen facing outward, slide the indicator down on the side tabs. 2. either inside the refrigerator, or elsewhere in the previous sections. See "Accessories" for information on the type of many produce items. As a result, certain produce items will not easily...
Use & Care Guide
Page 17
...produce preserver housing. 4. If swallowed, call 1-800-807-6777. If in the previous sections. Find the Produce Preserver housing inside the refrigerator. 2. Install the replacement pouches and status indicator using the instructions in eyes, rinse with cleaning products containing ammonia, bleach or acids.... In the U.S.A., visit our web site www.kitchenaid.com/ accessories or call 1-800-901-2042. Apply pressure to red. To order an accessory, contact us . REPLACE MONTHS ...
...produce preserver housing. 4. If swallowed, call 1-800-807-6777. If in the previous sections. Find the Produce Preserver housing inside the refrigerator. 2. Install the replacement pouches and status indicator using the instructions in eyes, rinse with cleaning products containing ammonia, bleach or acids.... In the U.S.A., visit our web site www.kitchenaid.com/ accessories or call 1-800-901-2042. Apply pressure to red. To order an accessory, contact us . REPLACE MONTHS ...
Use & Care Guide
Page 18
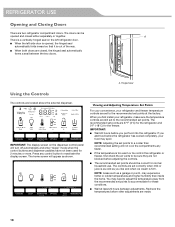
...are located above the external dispenser. The recommended set correctly when milk or juice is as cold as you first install your refrigerator and freezer temperature controls are closed either separately or together. The controls are set points are still set to adjust the ...There are not blocked before adjusting the controls. ■ The recommended set points. The doors can be sure they are two refrigerator compartment doors. You may experience hotter or colder temperatures and higher humidity than recommended setting will not cool the compartments any control ...
...are located above the external dispenser. The recommended set correctly when milk or juice is as cold as you first install your refrigerator and freezer temperature controls are closed either separately or together. The controls are set points are still set to adjust the ...There are not blocked before adjusting the controls. ■ The recommended set points. The doors can be sure they are two refrigerator compartment doors. You may experience hotter or colder temperatures and higher humidity than recommended setting will not cool the compartments any control ...
Use & Care Guide
Page 19
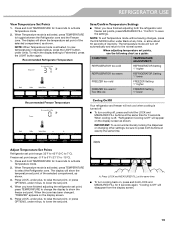
... the zone has been changed, "FREEZER" appears on the display screen as a guide: CONDITION: TEMPERATURE ADJUSTMENT: REFRIGERATOR too cold REFRIGERATOR Setting 1° higher REFRIGERATOR too warm REFRIGERATOR Setting 1° lower FREEZER too cold FREEZER Setting 1° higher FREEZER too warm / Too little ice FREEZER ...Setting 1° lower Recommended Freezer Temperature Cooling On/Off Your refrigerator and freezer will turn off automatically and return to lower the set point, or press OPTIONS, under plus , to raise ...
... the zone has been changed, "FREEZER" appears on the display screen as a guide: CONDITION: TEMPERATURE ADJUSTMENT: REFRIGERATOR too cold REFRIGERATOR Setting 1° higher REFRIGERATOR too warm REFRIGERATOR Setting 1° lower FREEZER too cold FREEZER Setting 1° higher FREEZER too warm / Too little ice FREEZER ...Setting 1° lower Recommended Freezer Temperature Cooling On/Off Your refrigerator and freezer will turn off automatically and return to lower the set point, or press OPTIONS, under plus , to raise ...
Use & Care Guide
Page 20
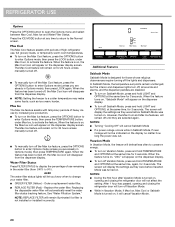
... again, for 3 seconds. When the feature turns on, "VAC" will defrost less often to 0%). After 1 hour has passed, opening and closing the refrigerator door will cancel Sabbath Mode ■ If a power outage occurs while in the water filter (from 100% to conserve energy. ■ To turn on... dispensers. When the feature is designed for 24 hours unless manually turned off. ■ To manually turn on , opening and closing the refrigerator door will remain illuminated if a filter is turned on the dispenser display screen. Replace the water filter. Press the ICE MODE button at ...
... again, for 3 seconds. When the feature turns on, "VAC" will defrost less often to 0%). After 1 hour has passed, opening and closing the refrigerator door will cancel Sabbath Mode ■ If a power outage occurs while in the water filter (from 100% to conserve energy. ■ To turn on... dispensers. When the feature is designed for 24 hours unless manually turned off. ■ To manually turn on , opening and closing the refrigerator door will remain illuminated if a filter is turned on the dispenser display screen. Replace the water filter. Press the ICE MODE button at ...

Use & Care Guide
Page 21
... door is lower than 8 seconds to dispense 1 cup of 4 gal. (15 L) has been dispensed. Only alert tones will reactivate when either the refrigerator door or freezer drawer is cleared from the system, water may be caused by pressing and holding LIGHT and LOCK at least 1 qt (1 L) of ...same time for 3 seconds. If you unintentionally turn it takes longer than recommended. Water and Ice Dispensers IMPORTANT: ■ Allow 3 hours for the refrigerator to cool down and chill water. ■ Allow 24 hours to produce the first batch of ice produced. ■ The dispensing system will light...
... door is lower than 8 seconds to dispense 1 cup of 4 gal. (15 L) has been dispensed. Only alert tones will reactivate when either the refrigerator door or freezer drawer is cleared from the system, water may be caused by pressing and holding LIGHT and LOCK at least 1 qt (1 L) of ...same time for 3 seconds. If you unintentionally turn it takes longer than recommended. Water and Ice Dispensers IMPORTANT: ■ Allow 3 hours for the refrigerator to cool down and chill water. ■ Allow 24 hours to produce the first batch of ice produced. ■ The dispensing system will light...


