Use & Care Guide
Page 4
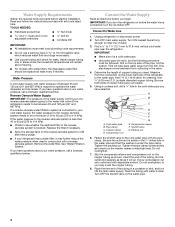
... water pipe. 4 Connect to the cold water pipe with a reverse osmosis system. Find a ¹⁄₂" to 1¹⁄₄" (12.7 mm to allow for leaks. This will help keep water away from the connection on the reverse osmosis system to refill after heavy usage. ■ If your water pressure, call...
... water pipe. 4 Connect to the cold water pipe with a reverse osmosis system. Find a ¹⁄₂" to 1¹⁄₄" (12.7 mm to allow for leaks. This will help keep water away from the connection on the reverse osmosis system to refill after heavy usage. ■ If your water pressure, call...
Use & Care Guide
Page 5
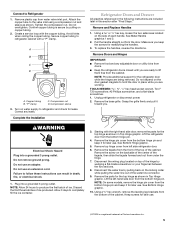
...while you are working. Compression sleeve 3. To replace the handles, reverse the directions. Remove Doors and Hinges IMPORTANT: ■ Remove food and any leaks. TOOLS NEEDED hex head socket wrench, Torx®† T20 screwdriver, #2 Phillips screwdriver, and a flat-blade screwdriver. 1. Remove the base grille.... inlet using a compression nut and sleeve as shown. Create a service loop with the right-hand side door, remove the parts for leaks. Discard the first three batches of each handle. Remove the hinge pin cover from the bottom hinge pin and keep it toward you ...
...while you are working. Compression sleeve 3. To replace the handles, reverse the directions. Remove Doors and Hinges IMPORTANT: ■ Remove food and any leaks. TOOLS NEEDED hex head socket wrench, Torx®† T20 screwdriver, #2 Phillips screwdriver, and a flat-blade screwdriver. 1. Remove the base grille.... inlet using a compression nut and sleeve as shown. Create a service loop with the right-hand side door, remove the parts for leaks. Discard the first three batches of each handle. Remove the hinge pin cover from the bottom hinge pin and keep it toward you ...
Use & Care Guide
Page 6
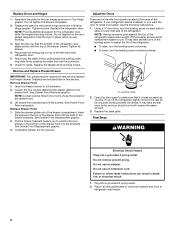
... the drawer brackets. It may take several turns of the drawer front into a grounded 3 prong outlet. 2. Do not use an adapter. Assemble the parts for leaks. Replace the refrigerator door. See Drawer Front Replacement graphic. 2. Tighten screws. NOTE: Loosen screws three to raise or lower that the bottom of the refrigerator...
... the drawer brackets. It may take several turns of the drawer front into a grounded 3 prong outlet. 2. Do not use an adapter. Assemble the parts for leaks. Replace the refrigerator door. See Drawer Front Replacement graphic. 2. Tighten screws. NOTE: Loosen screws three to raise or lower that the bottom of the refrigerator...

Use & Care Guide
Page 17
... installation for water supply to cool completely. ■ Recently dispensed large amount of water? See "Water Supply Requirements." ■ Water filter installed on ? Water is leaking from the dispenser is connected to a cold water pipe. Connect refrigerator to a cold water pipe? See "Refrigerator Doors and Drawer." ■ Reverse osmosis water filtration...
... installation for water supply to cool completely. ■ Recently dispensed large amount of water? See "Water Supply Requirements." ■ Water filter installed on ? Water is leaking from the dispenser is connected to a cold water pipe. Connect refrigerator to a cold water pipe? See "Refrigerator Doors and Drawer." ■ Reverse osmosis water filtration...


