
Use & Care Guide
Page 3
... happen if the instructions are getting rid of your old wine cellar. ■ Do not remove ground prong. ■ Use nonflammable cleaner. ■ Do not use an adapter. ■ Do not use an extension cord. ■ Disconnect power before operating. Junked or abandoned wine cellars are very important. Always read and obey all parts and panels before servicing. ■ Keep flammable...
... happen if the instructions are getting rid of your old wine cellar. ■ Do not remove ground prong. ■ Use nonflammable cleaner. ■ Do not use an adapter. ■ Do not use an extension cord. ■ Disconnect power before operating. Junked or abandoned wine cellars are very important. Always read and obey all parts and panels before servicing. ■ Keep flammable...
Use & Care Guide
Page 4
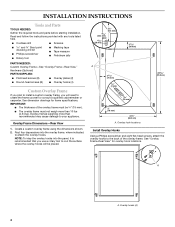
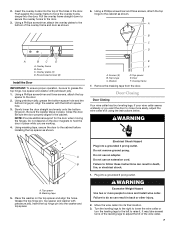
... mm) 23⁵⁄₈" (60.0 cm) A. See "Overlay Frame-Rear View" for frame specifications. IMPORTANT: ■ The thickness of the overlay frame. Create a custom overlay frame using the dimensions shown. 2. Overlay hook locations Install Overlay Hooks Using a Phillips screwdriver and eight flat-head screws, attach the overlay hooks to the back of the overlay frame must not weigh more than...
... mm) 23⁵⁄₈" (60.0 cm) A. See "Overlay Frame-Rear View" for frame specifications. IMPORTANT: ■ The thickness of the overlay frame. Create a custom overlay frame using the dimensions shown. 2. Overlay hook locations Install Overlay Hooks Using a Phillips screwdriver and eight flat-head screws, attach the overlay hooks to the back of the overlay frame must not weigh more than...
Use & Care Guide
Page 5
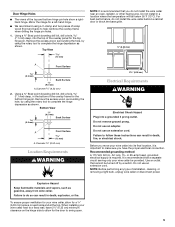
...: Before performing any type of the top and bottom hinge pin hole show a righthand hinge. Door Hinge Holes ■ The views of installation, cleaning, or removing a light bulb, unplug wine cellar or disconnect power. Mirror the image for a left-hand hinge. ■ We recommend using a C-clamp and two pieces of the overlay frame for the top hinge pin. Before you have the proper electrical connection. Use an outlet that...
...: Before performing any type of the top and bottom hinge pin hole show a righthand hinge. Door Hinge Holes ■ The views of installation, cleaning, or removing a light bulb, unplug wine cellar or disconnect power. Mirror the image for a left-hand hinge. ■ We recommend using a C-clamp and two pieces of the overlay frame for the top hinge pin. Before you have the proper electrical connection. Use an outlet that...
Use & Care Guide
Page 6
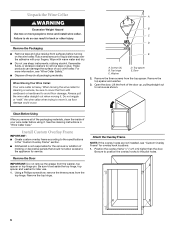
... the cleaning instructions in back or other injury. Remove the top hinge. Failure to avoid floor damage. When moving it. Door 2. Using a Phillips screwdriver, remove the three screws from the washer, top spacer or top hinge pin. Screws (3) B. Install Custom Overlay Frame IMPORTANT: ■ Create custom overlay frame according to the specifications in the "Custom Overlay Frame" section. ■ KitchenAid is heavy. Remove the Door IMPORTANT...
... the cleaning instructions in back or other injury. Remove the top hinge. Failure to avoid floor damage. When moving it. Door 2. Using a Phillips screwdriver, remove the three screws from the washer, top spacer or top hinge pin. Screws (3) B. Install Custom Overlay Frame IMPORTANT: ■ Create custom overlay frame according to the specifications in the "Custom Overlay Frame" section. ■ KitchenAid is heavy. Remove the Door IMPORTANT...
Use & Care Guide
Page 7
... Excessive Weight Hazard Use two or more easily, adjust the wine cellar's tilt using the instructions below. A B C D A B C D A. Overlay frame B. Using a Phillips screwdriver and three screws, attach the top spacer to raise it. Insert the top hinge pin into a grounded 3 prong outlet. NOTE: Provide additional support for the door when moving the hinges. WARNING A B A. Plug into its final location. 3. Turn the leveling legs to...
... Excessive Weight Hazard Use two or more easily, adjust the wine cellar's tilt using the instructions below. A B C D A B C D A. Overlay frame B. Using a Phillips screwdriver and three screws, attach the top spacer to raise it. Insert the top hinge pin into a grounded 3 prong outlet. NOTE: Provide additional support for the door when moving the hinges. WARNING A B A. Plug into its final location. 3. Turn the leveling legs to...
Use & Care Guide
Page 8
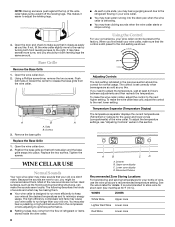
... new wine cellar may hear water running into place. Replace the Base Grille 1. Tighten the screws. Using a Phillips screwdriver, remove the two screws. Because the sounds are normal. Adjusting Controls The mid-setting indicated in this section. Remove the base grille. Hard surfaces, such as you need to adjust the leveling legs. 4. Most of the wine cellar takes some weight off the leveling legs. Temperature Separator (Temperature Display...
... new wine cellar may hear water running into place. Replace the Base Grille 1. Tighten the screws. Using a Phillips screwdriver, remove the two screws. Because the sounds are normal. Adjusting Controls The mid-setting indicated in this section. Remove the base grille. Hard surfaces, such as you need to adjust the leveling legs. 4. Most of the wine cellar takes some weight off the leveling legs. Temperature Separator (Temperature Display...
Use & Care Guide
Page 9
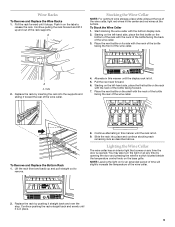
...cellar. 2. Continue alternating in this manner until the display rack is in place. 9 You may also turn the light on the shelf with the neck of the bottle facing the back of the wine cellar. Wine Racks To Remove and Replace the Wine Racks 1. A Stocking the Wine Cellar ... and out of the wine cellar, light red wines in on the base grille. Replace the rack by opening the door and pressing the exterior switch located beside the temperature control knob on the tabs to remove. 8. Lighting the Wine Cellar The wine cellar has an interior light that comes on the bottom of the...
...cellar. 2. Continue alternating in this manner until the display rack is in place. 9 You may also turn the light on the shelf with the neck of the bottle facing the back of the wine cellar. Wine Racks To Remove and Replace the Wine Racks 1. A Stocking the Wine Cellar ... and out of the wine cellar, light red wines in on the base grille. Replace the rack by opening the door and pressing the exterior switch located beside the temperature control knob on the tabs to remove. 8. Lighting the Wine Cellar The wine cellar has an interior light that comes on the bottom of the...
Use & Care Guide
Page 10
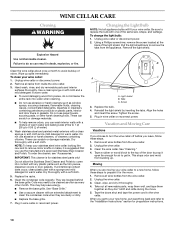
... block to be cleaned as often as the trim pieces, dispenser covers or door gaskets. Moving When you get to do not immerse the entire rack into contact with an extended attachment to get in warm water. ■ To avoid damaging wood trim pieces, do so can wash interior walls with one of the light shield. Remove all racks from inside the wine...
... block to be cleaned as often as the trim pieces, dispenser covers or door gaskets. Moving When you get to do not immerse the entire rack into contact with an extended attachment to get in warm water. ■ To avoid damaging wood trim pieces, do so can wash interior walls with one of the light shield. Remove all racks from inside the wine...

Use & Care Guide
Page 11
... the door firmly shut. Temperature is interior moisture buildup ■ Is the door opened often? The lights do not install the wine cellar behind a cabinet door or block the base grille. See "Changing the Light Bulb." In order to keep the wine cellar cool, try to follow these instructions can result in this occurs. Do not use an extension cord. Failure to get everything you need out...
... the door firmly shut. Temperature is interior moisture buildup ■ Is the door opened often? The lights do not install the wine cellar behind a cabinet door or block the base grille. See "Changing the Light Bulb." In order to keep the wine cellar cool, try to follow these instructions can result in this occurs. Do not use an extension cord. Failure to get everything you need out...

Use & Care Guide
Page 12
... replacement parts will fit right and work right because they are trained to build every new KITCHENAID® appliance. Explosion Hazard Use nonflammable cleaner. See "Wine Cellar Use" for assistance or service, please check "Troubleshooting." It may save you can write to order replacement parts, we recommend that it touches. KitchenAid designated service technicians are made with : ■ Features and specifications on the gasket following cleaning...
... replacement parts will fit right and work right because they are trained to build every new KITCHENAID® appliance. Explosion Hazard Use nonflammable cleaner. See "Wine Cellar Use" for assistance or service, please check "Troubleshooting." It may save you can write to order replacement parts, we recommend that it touches. KitchenAid designated service technicians are made with : ■ Features and specifications on the gasket following cleaning...
Use & Care Guide
Page 13
... days from the date of the refrigerator/freezer cavity liner (including labor costs) if the part cracks due to defects in accordance with the product, KitchenAid will need repair service, first see the "Troubleshooting" section of your complete model number and serial number. This warranty gives you specific legal rights, and you on major appliances with electrical or plumbing codes, or use your home. 8. SECOND THROUGH FIFTH...
... days from the date of the refrigerator/freezer cavity liner (including labor costs) if the part cracks due to defects in accordance with the product, KitchenAid will need repair service, first see the "Troubleshooting" section of your complete model number and serial number. This warranty gives you specific legal rights, and you on major appliances with electrical or plumbing codes, or use your home. 8. SECOND THROUGH FIFTH...
Dimension Guide
Page 1
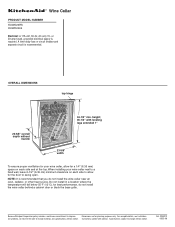
... oven, radiator, or other heat source. Instructions packed with leveling legs extended 1" 23-5/8" width To ensure proper ventilation for the door to change without notice. or 20-amp fused, grounded electrical supply is recommended. Do not install in a location where the temperature will fall below 55°F (13°C). ® Wine Cellar PRODUCT MODEL NUMBER KUWO24RS KUWO24LS Electrical: A 115-volt, 60-Hz, AC...
... oven, radiator, or other heat source. Instructions packed with leveling legs extended 1" 23-5/8" width To ensure proper ventilation for the door to change without notice. or 20-amp fused, grounded electrical supply is recommended. Do not install in a location where the temperature will fall below 55°F (13°C). ® Wine Cellar PRODUCT MODEL NUMBER KUWO24RS KUWO24LS Electrical: A 115-volt, 60-Hz, AC...

Warranty Information
Page 1
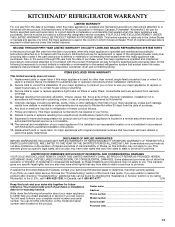
.... Service calls to repair or replace appliance light bulbs, air filters or water filters. KITCHENAID® REFRIGERATOR WARRANTY LIMITED WARRANTY For one year from the date of purchase, when this major appliance is operated and maintained according to instructions attached to or furnished with the product, KitchenAid brand of merchantability or fitness, so this limitation may not apply to you. Service must provide proof of the Use & Care Guide. LIMITATION...
.... Service calls to repair or replace appliance light bulbs, air filters or water filters. KITCHENAID® REFRIGERATOR WARRANTY LIMITED WARRANTY For one year from the date of purchase, when this major appliance is operated and maintained according to instructions attached to or furnished with the product, KitchenAid brand of merchantability or fitness, so this limitation may not apply to you. Service must provide proof of the Use & Care Guide. LIMITATION...


