
Owners Manual
Page 2
PARTS AND FEATURES PARTS AND ACCESSORIES Drizzle basin Stainless steel multipurpose blade Pour spout Lid Pulse/On button Work bowl with handle Chop/puree selection lever Power cord wrap Heavy-duty base 2 | PARTS AND FEATURES
PARTS AND FEATURES PARTS AND ACCESSORIES Drizzle basin Stainless steel multipurpose blade Pour spout Lid Pulse/On button Work bowl with handle Chop/puree selection lever Power cord wrap Heavy-duty base 2 | PARTS AND FEATURES
Owners Manual
Page 3
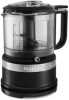
... or taking off parts, and before cleaning. 5. To protect against risk of electrical shock do not put motor body, cord, or electrical plug of this Mini Food Processor in use of attachments not recommended or sold by or near children. 4. Return appliance to the nearest Authorized Service Facility for examination, repair or electrical or mechanical adjustment. 7. ENGLISH MINI FOOD PROCESSOR SAFETY IMPORTANT SAFEGUARDS...
... or taking off parts, and before cleaning. 5. To protect against risk of electrical shock do not put motor body, cord, or electrical plug of this Mini Food Processor in use of attachments not recommended or sold by or near children. 4. Return appliance to the nearest Authorized Service Facility for examination, repair or electrical or mechanical adjustment. 7. ENGLISH MINI FOOD PROCESSOR SAFETY IMPORTANT SAFEGUARDS...
Owners Manual
Page 4
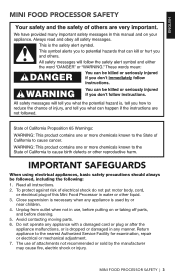
... power-supply cord is not running. 11. Make sure that the bowl and lid are properly aligned and locked in ? 2. Do not return the Mini Food Processor to defeat the cover interlock mechanism. MINI FOOD PROCESSOR SAFETY 8. SAVE THESE INSTRUCTIONS This product is sharp. TROUBLESHOOTING If your Mini Food Processor should malfunction or fail to reduce the risk of the above items, see the "Warranty and service" section...
... power-supply cord is not running. 11. Make sure that the bowl and lid are properly aligned and locked in ? 2. Do not return the Mini Food Processor to defeat the cover interlock mechanism. MINI FOOD PROCESSOR SAFETY 8. SAVE THESE INSTRUCTIONS This product is sharp. TROUBLESHOOTING If your Mini Food Processor should malfunction or fail to reduce the risk of the above items, see the "Warranty and service" section...
Owners Manual
Page 5
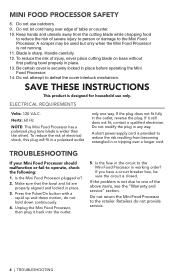
... before processing. Visit KitchenAid.com/Quickstart for additional Instructions with videos, inspiring recipes, and tips on how to use . NOTE: For best results, larger food items should be cut into the bowl before processing. Up to 1.5 cups Up to 1/2 pound (227g) at a single time. Up to 3 cups Puree Puree Chop or Puree Chop BREAD, COOKIES, OR CRACKERS Break bread, crackers, or cookies into pieces...
... before processing. Visit KitchenAid.com/Quickstart for additional Instructions with videos, inspiring recipes, and tips on how to use . NOTE: For best results, larger food items should be cut into the bowl before processing. Up to 1.5 cups Up to 1/2 pound (227g) at a single time. Up to 3 cups Puree Puree Chop or Puree Chop BREAD, COOKIES, OR CRACKERS Break bread, crackers, or cookies into pieces...
Owners Manual
Page 6
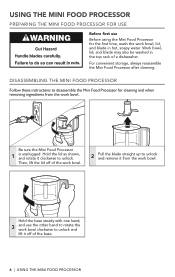
... Mini Food Processor for cleaning and when removing ingredients from the work bowl. Be sure the Mini Food Processor 1 is unplugged. USING THE MINI FOOD PROCESSOR PREPARING THE MINI FOOD PROCESSOR FOR USE Before first use the other hand to rotate the work bowl clockwise to unlock and lift it off of the work bowl. 2 Pull the blade straight up to unlock and remove it clockwise to disassemble the Mini Food Processor for the first time, wash the work bowl, lid, and blade...
... Mini Food Processor for cleaning and when removing ingredients from the work bowl. Be sure the Mini Food Processor 1 is unplugged. USING THE MINI FOOD PROCESSOR PREPARING THE MINI FOOD PROCESSOR FOR USE Before first use the other hand to rotate the work bowl clockwise to unlock and lift it off of the work bowl. 2 Pull the blade straight up to unlock and remove it clockwise to disassemble the Mini Food Processor for the first time, wash the work bowl, lid, and blade...

Owners Manual
Page 7
... handle will face the right side. Place ingredients to lock into 1 inch pieces. IMPORTANT: Do not process coffee beans or hard spices such as nutmeg, which may damage the Mini Food Processor. ENGLISH USING THE MINI FOOD PROCESSOR ASSEMBLING AND RUNNING THE MINI FOOD PROCESSOR 1 Be sure the Mini Food Processor is unplugged. USING THE MINI FOOD PROCESSOR | 7 Start with the work bowl, rotate and press down until it locks into position. Fit the blade over the shaft...
... handle will face the right side. Place ingredients to lock into 1 inch pieces. IMPORTANT: Do not process coffee beans or hard spices such as nutmeg, which may damage the Mini Food Processor. ENGLISH USING THE MINI FOOD PROCESSOR ASSEMBLING AND RUNNING THE MINI FOOD PROCESSOR 1 Be sure the Mini Food Processor is unplugged. USING THE MINI FOOD PROCESSOR | 7 Start with the work bowl, rotate and press down until it locks into position. Fit the blade over the shaft...
Owners Manual
Page 8
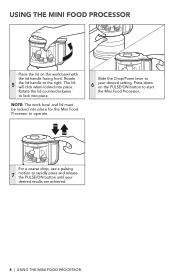
USING THE MINI FOOD PROCESSOR Place the lid on the PULSE/ON button to start the Mini Food Processor. NOTE: The work bowl with the lid handle facing front. Press down on the work bowl and lid must be locked into place. Slide the Chop/Puree lever to 6 your desired results are achieved. 8 | USING THE MINI FOOD PROCESSOR The lid will click when locked into place for the Mini Food Processor to rapidly press and release the PULSE...
USING THE MINI FOOD PROCESSOR Place the lid on the PULSE/ON button to start the Mini Food Processor. NOTE: The work bowl with the lid handle facing front. Press down on the work bowl and lid must be locked into place. Slide the Chop/Puree lever to 6 your desired results are achieved. 8 | USING THE MINI FOOD PROCESSOR The lid will click when locked into place for the Mini Food Processor to rapidly press and release the PULSE...

Owners Manual
Page 9
... complete, remove the lid to use your ingredients moving in the work bowl with videos, inspiring recipes, and tips on how to use the pour spout. FOR DETAILED INFORMATION ON USING THE MINI FOOD PROCESSOR: Visit kitchenaid.com/quickstart for easier serving. ENGLISH USING THE MINI FOOD PROCESSOR USING THE DRIZZLE BASIN AND POUR SPOUT Use the drizzle basin to conveniently add liquid ingredients while processing, to lock into place. USING THE MINI FOOD PROCESSOR...
... complete, remove the lid to use your ingredients moving in the work bowl with videos, inspiring recipes, and tips on how to use the pour spout. FOR DETAILED INFORMATION ON USING THE MINI FOOD PROCESSOR: Visit kitchenaid.com/quickstart for easier serving. ENGLISH USING THE MINI FOOD PROCESSOR USING THE DRIZZLE BASIN AND POUR SPOUT Use the drizzle basin to conveniently add liquid ingredients while processing, to lock into place. USING THE MINI FOOD PROCESSOR...
Owners Manual
Page 10
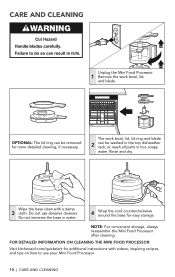
... the Mini Food Processor. 1 Remove the work bowl, lid, lid ring and blade 2 can be washed in the top dishwasher rack; The work bowl, lid, and blade. Do not use your Mini Food Processor. 10 | CARE AND CLEANING or, wash all parts in hot, soapy water. FOR DETAILED INFORMATION ON CLEANING THE MINI FOOD PROCESSOR: Visit kitchenaid.com/quickstart for additional instructions with a damp 3 cloth. OPTIONAL: The lid ring can be removed for easy storage. Wipe the base clean with videos, inspiring recipes...
... the Mini Food Processor. 1 Remove the work bowl, lid, lid ring and blade 2 can be washed in the top dishwasher rack; The work bowl, lid, and blade. Do not use your Mini Food Processor. 10 | CARE AND CLEANING or, wash all parts in hot, soapy water. FOR DETAILED INFORMATION ON CLEANING THE MINI FOOD PROCESSOR: Visit kitchenaid.com/quickstart for additional instructions with a damp 3 cloth. OPTIONAL: The lid ring can be removed for easy storage. Wipe the base clean with videos, inspiring recipes...
Owners Manual
Page 11
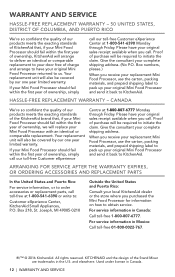
... warranty extends to the purchaser and any succeeding owner for Mini Food Processors operated in materials and workmanship. Hassle-Free Replacement of Columbia, Puerto Rico, and Canada. Damage resulting from state to state or province to an Authorized Service Center. KitchenAid Will Not Pay for service, or call the Customer eXperience Center toll-free at 1-800-541-6390. ANY IMPLIED WARRANTIES THAT...
... warranty extends to the purchaser and any succeeding owner for Mini Food Processors operated in materials and workmanship. Hassle-Free Replacement of Columbia, Puerto Rico, and Canada. Damage resulting from state to state or province to an Authorized Service Center. KitchenAid Will Not Pay for service, or call the Customer eXperience Center toll-free at 1-800-541-6390. ANY IMPLIED WARRANTIES THAT...
Owners Manual
Page 12
... replacement Mini Food Processor, use the carton, packing materials, and prepaid shipping label to pack up your original Mini Food Processor and send it back to obtain service. Box numbers, please.) When you call. Your replacement unit will also be required to : Customer eXperience Center, KitchenAid Small Appliances, P.O. Give the consultant your complete shipping address. (No P.O. ARRANGING FOR SERVICE AFTER THE WARRANTY EXPIRES, OR ORDERING ACCESSORIES AND REPLACEMENT PARTS...
... replacement Mini Food Processor, use the carton, packing materials, and prepaid shipping label to pack up your original Mini Food Processor and send it back to obtain service. Box numbers, please.) When you call. Your replacement unit will also be required to : Customer eXperience Center, KitchenAid Small Appliances, P.O. Give the consultant your complete shipping address. (No P.O. ARRANGING FOR SERVICE AFTER THE WARRANTY EXPIRES, OR ORDERING ACCESSORIES AND REPLACEMENT PARTS...


