

Dimension Guide
Page 1
... MODEL NUMBERS OVERALL DIMENSIONS KERS807S KERS807X KESK901S KESS907S KESS908S KESS907X Freestanding Range Slide-in Range ELECTRICAL REQUIREMENTS B q This range is recommended. q The range can be raised approximately 1" (2.5 cm) by not less than 30" (76.2 cm), adjust the ³⁄₈" (1.0 cm) dimension. Freestanding Range Slide-in range fit over the cutout edge of oven door protrudes 1³⁄...
... MODEL NUMBERS OVERALL DIMENSIONS KERS807S KERS807X KESK901S KESS907S KESS908S KESS907X Freestanding Range Slide-in Range ELECTRICAL REQUIREMENTS B q This range is recommended. q The range can be raised approximately 1" (2.5 cm) by not less than 30" (76.2 cm), adjust the ³⁄₈" (1.0 cm) dimension. Freestanding Range Slide-in range fit over the cutout edge of oven door protrudes 1³⁄...

Installation Guide
Page 2
...others are not followed. All safety messages will follow these instructions can be killed. TABLE OF CONTENTS RANGE SAFETY 2 INSTALLATION REQUIREMENTS 3 Tools and Parts 3 Location Requirements 3 Electrical Requirements - Always read and obey all safety messages. This is moved. Reconnect the anti-tip ...bracket, if the range is the safety alert symbol. Only 5 Electrical Requirements - U.S.A. This symbol alerts you to potential hazards that can happen if the instructions are very ...
...others are not followed. All safety messages will follow these instructions can be killed. TABLE OF CONTENTS RANGE SAFETY 2 INSTALLATION REQUIREMENTS 3 Tools and Parts 3 Location Requirements 3 Electrical Requirements - Always read and obey all safety messages. This is moved. Reconnect the anti-tip ...bracket, if the range is the safety alert symbol. Only 5 Electrical Requirements - U.S.A. This symbol alerts you to potential hazards that can happen if the instructions are very ...

Installation Guide
Page 3
... be located for use with ranges. The cord should be avoided. A. Black - A B ■ Tape measure ■ Masking tape ■ Flat-blade screwdriver ■ Level ■ ¼" nut driver nut driver B C ■ Hammer ■ Hand or electric drill ■ Wrench or pliers ■ Marker ... Gather the required tools and parts before starting installation. Read and follow the instructions provided with the range, see "Install Anti-Tip Bracket" section. ■ Grounded electrical supply is located inside the oven door on the model/serial rating plate. A B C A. ...
... be located for use with ranges. The cord should be avoided. A. Black - A B ■ Tape measure ■ Masking tape ■ Flat-blade screwdriver ■ Level ■ ¼" nut driver nut driver B C ■ Hammer ■ Hand or electric drill ■ Wrench or pliers ■ Marker ... Gather the required tools and parts before starting installation. Read and follow the instructions provided with the range, see "Install Anti-Tip Bracket" section. ■ Grounded electrical supply is located inside the oven door on the model/serial rating plate. A B C A. ...

Installation Guide
Page 4
...legs screwed all the way in * E. 30" (76.2 cm) F. 27¹⁄₄" (69.2 cm) max. front of cooktop edge with the current standards CAN/CSA-A240-latest edition, or local codes. See "Electrical Connection" section. In Canada, the installation of cooktop *Range can be used in * D. 36" ...(91.4 cm) cooktop trim height with 25" (63.5 cm) countertop; The appliance wiring will need to rear of this range must conform with leveling legs screwed ...
...legs screwed all the way in * E. 30" (76.2 cm) F. 27¹⁄₄" (69.2 cm) max. front of cooktop edge with the current standards CAN/CSA-A240-latest edition, or local codes. See "Electrical Connection" section. In Canada, the installation of cooktop *Range can be used in * D. 36" ...(91.4 cm) cooktop trim height with 25" (63.5 cm) countertop; The appliance wiring will need to rear of this range must conform with leveling legs screwed ...

Installation Guide
Page 5
... of wood or metal cabinet is covered by a qualified electrician. ■ Range must determine the type of the "Location Requirements" section. ■ This range is in Range A C B D A C B D F E E F G H A. 13" (33.0 cm) upper cabinet depth B. 30" (76.2 cm) min. Electrical Connection To properly install your range, you are for use an extension cord. Refer to combustible walls with...
... of wood or metal cabinet is covered by a qualified electrician. ■ Range must determine the type of the "Location Requirements" section. ■ This range is in Range A C B D A C B D F E E F G H A. 13" (33.0 cm) upper cabinet depth B. 30" (76.2 cm) min. Electrical Connection To properly install your range, you are for use an extension cord. Refer to combustible walls with...

Installation Guide
Page 6
... to the fused disconnect (or circuit breaker box) through the neutral conductor. Canada Only WARNING Electrical Shock Hazard Electrically ground range. latest edition, and all local codes and ordinances. See the "Electrical Connection" section. When a 4-wire receptacle of NEMA Type 14-50R is prohibited for the ...copper 4-wire power cord are adequate and in death, fire, or electrical shock. If connecting to a 4-wire system: This range is less than the total connected load listed on the model/serial rating plate. ■ A time-delay fuse...
... to the fused disconnect (or circuit breaker box) through the neutral conductor. Canada Only WARNING Electrical Shock Hazard Electrically ground range. latest edition, and all local codes and ordinances. See the "Electrical Connection" section. When a 4-wire receptacle of NEMA Type 14-50R is prohibited for the ...copper 4-wire power cord are adequate and in death, fire, or electrical shock. If connecting to a 4-wire system: This range is less than the total connected load listed on the model/serial rating plate. ■ A time-delay fuse...

Installation Guide
Page 9
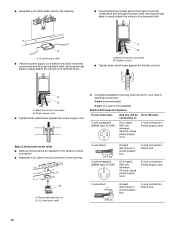
..., making sure rear leveling leg slides into a grounded outlet. Power Supply Cord Electrical Connection - Plug into anti-tip bracket. Remove plastic tag holding three 10-32 hex nuts from under range. 8. Depending on the back of the terminal block. Electrically ground range. Terminal block cover 4. Longer screws are available from your flooring, longer screws...
..., making sure rear leveling leg slides into a grounded outlet. Power Supply Cord Electrical Connection - Plug into anti-tip bracket. Remove plastic tag holding three 10-32 hex nuts from under range. 8. Depending on the back of the terminal block. Electrically ground range. Terminal block cover 4. Longer screws are available from your flooring, longer screws...
Installation Guide
Page 10
...for your type of electrical connection: 4-wire (recommended) 3-wire (if 4-wire is not available) Electrical Connection Options If your home has: And you will be Go to Section: connecting to: 4-wire receptacle (NEMA type 14-50R) A UL listed, 250-volt minimum, 40-amp, range power supply cord ... 5" (12.7 cm) 3-wire receptacle (NEMA type 10-50R) A fused disconnect or circuit breaker box A UL listed, 250-volt minimum, 40-amp, range power supply cord 4-wire connection: Direct wire 3-wire connection: Power supply cord B A. UL listed strain relief ■ Feed the power supply cord behind the...
...for your type of electrical connection: 4-wire (recommended) 3-wire (if 4-wire is not available) Electrical Connection Options If your home has: And you will be Go to Section: connecting to: 4-wire receptacle (NEMA type 14-50R) A UL listed, 250-volt minimum, 40-amp, range power supply cord ... 5" (12.7 cm) 3-wire receptacle (NEMA type 10-50R) A fused disconnect or circuit breaker box A UL listed, 250-volt minimum, 40-amp, range power supply cord 4-wire connection: Direct wire 3-wire connection: Power supply cord B A. UL listed strain relief ■ Feed the power supply cord behind the...

Installation Guide
Page 12
...9632; Recreational vehicles ■ In an area where local codes prohibit grounding through the neutral A. Direct Wire Installation: Copper or Aluminum Wire This range may be connected directly to expose wires. Save the ground-link screw and the end of the metal ground strap (B). Line 1 (black) ...on the front of each wire. ³⁄₈" (1.0 cm) 3" (7.6 cm) 2. 2. Complete electrical connection according to the center terminal block post with one of electrical supply (4-wire or 3-wire connection). 4-wire Connection: Direct Wire Use this method for use with 10-32 ...
...9632; Recreational vehicles ■ In an area where local codes prohibit grounding through the neutral A. Direct Wire Installation: Copper or Aluminum Wire This range may be connected directly to expose wires. Save the ground-link screw and the end of the metal ground strap (B). Line 1 (black) ...on the front of each wire. ³⁄₈" (1.0 cm) 3" (7.6 cm) 2. 2. Complete electrical connection according to the center terminal block post with one of electrical supply (4-wire or 3-wire connection). 4-wire Connection: Direct Wire Use this method for use with 10-32 ...

Installation Guide
Page 14
...9632; See the "Troubleshooting" section in the Use and Care Guide. Read the "Range Use" section in range or reconnect power. 8. or circuit breaker has not tripped. ■ Range is plugged into an outlet. ■ Electrical supply is an extra part, go back through the steps to children and adults.... If range is not level, pull range forward until range is engaged in death or serious burns to see which ...
...9632; See the "Troubleshooting" section in the Use and Care Guide. Read the "Range Use" section in range or reconnect power. 8. or circuit breaker has not tripped. ■ Range is plugged into an outlet. ■ Electrical supply is an extra part, go back through the steps to children and adults.... If range is not level, pull range forward until range is engaged in death or serious burns to see which ...

Installation Guide
Page 15
... bracket. 7. Disconnect wiring (if necessary). 4. Reconnect wiring (if necessary). Check that range is level and reconnect power. 15 U.S.A. Plug in death or electrical shock. 1. Using two or more people, slide range onto cardboard or hardboard to perform cleaning or maintenance. 2. See "Electrical Connection - Only" section. 6. Replace all parts and panels before servicing. Perform cleaning...
... bracket. 7. Disconnect wiring (if necessary). 4. Reconnect wiring (if necessary). Check that range is level and reconnect power. 15 U.S.A. Plug in death or electrical shock. 1. Using two or more people, slide range onto cardboard or hardboard to perform cleaning or maintenance. 2. See "Electrical Connection - Only" section. 6. Replace all parts and panels before servicing. Perform cleaning...

Use & Care Guide
Page 1
ELECTRIC RANGE ARCHITECT® SERIES II Use & Care Guide For questions about features, operation/performance, parts, accessories or service, call: 1-800-422-1230 or visit our website at www.kitchenaid.com In Canada, call for assistance, installation and service, call: 1-800-807-6777 or visit our website at www.KitchenAid.ca Table of Contents...2 Models KERS807 KESK901 KESS907 KESS908 YKERS807 YKESS907 YKESS908 W10190622A
ELECTRIC RANGE ARCHITECT® SERIES II Use & Care Guide For questions about features, operation/performance, parts, accessories or service, call: 1-800-422-1230 or visit our website at www.kitchenaid.com In Canada, call for assistance, installation and service, call: 1-800-807-6777 or visit our website at www.KitchenAid.ca Table of Contents...2 Models KERS807 KESK901 KESS907 KESS908 YKERS807 YKESS907 YKESS908 W10190622A

Use & Care Guide
Page 4
...use, do not touch, or let clothing or other utensils. IMPORTANT SAFETY INSTRUCTIONS WARNING: To reduce the risk of electric shock, or fire. ■ Glazed Cooking Utensils - Be sure the range is in oven. ■ DO NOT TOUCH HEATING ELEMENTS OR INTERIOR SURFACES OF OVEN - Surface units may ignite.... ■ Make Sure Reflector Pans or Drip Bowls Are in a risk of fire, electrical shock, injury to cool. Let hot air or ...
...use, do not touch, or let clothing or other utensils. IMPORTANT SAFETY INSTRUCTIONS WARNING: To reduce the risk of electric shock, or fire. ■ Glazed Cooking Utensils - Be sure the range is in oven. ■ DO NOT TOUCH HEATING ELEMENTS OR INTERIOR SURFACES OF OVEN - Surface units may ignite.... ■ Make Sure Reflector Pans or Drip Bowls Are in a risk of fire, electrical shock, injury to cool. Let hot air or ...

Use & Care Guide
Page 10
.... ■ Center the canner on 2 surface cooking areas, elements or surface burners at the same time. 10 A. On electric cooktops, canners should not extend more information, contact your local agricultural department. Cooktop Controls - Fire Hazard Turn off all elements off... ■ Melt chocolate or butter. NOTE: This cooktop automatically adjusts for very low temperature operation. Touch ON/OFF. 2. A REMEMBER: When range is in death or fire. Single, Dual and Triple-Size Elements A A. Single size B. SETTING RECOMMENDED USE DUAL and TRIPLESIZE ELEMENTS ■...
.... ■ Center the canner on 2 surface cooking areas, elements or surface burners at the same time. 10 A. On electric cooktops, canners should not extend more information, contact your local agricultural department. Cooktop Controls - Fire Hazard Turn off all elements off... ■ Melt chocolate or butter. NOTE: This cooktop automatically adjusts for very low temperature operation. Touch ON/OFF. 2. A REMEMBER: When range is in death or fire. Single, Dual and Triple-Size Elements A A. Single size B. SETTING RECOMMENDED USE DUAL and TRIPLESIZE ELEMENTS ■...
Use & Care Guide
Page 31
... W10123240 Rear Filler Strip Order Part Number W10113902A Black Order Part Number W10113903A White Order Part Number W10113904A Biscuit In Canada Call the KitchenAid Canada Customer Interaction Centre toll free: 1-800-807-6777. KITCHENAID® ELECTRIC RANGE WARRANTY LIMITED WARRANTY For one year from the date of purchase, when this limited warranty. Accessories Accessories...
... W10123240 Rear Filler Strip Order Part Number W10113902A Black Order Part Number W10113903A White Order Part Number W10113904A Biscuit In Canada Call the KitchenAid Canada Customer Interaction Centre toll free: 1-800-807-6777. KITCHENAID® ELECTRIC RANGE WARRANTY LIMITED WARRANTY For one year from the date of purchase, when this limited warranty. Accessories Accessories...
Use & Care Guide
Page 32
...find this information on the model and serial number label located on how to use of God, improper installation, installation not in accordance with electrical or plumbing codes, or use your complete model number and serial number. In the U.S.A., call 1-800-807-6777. 9/07 Keep this... or systems resulting from warranty coverage. 3. Expenses for travel and transportation for other damage to the finish of your authorized KitchenAid dealer to KitchenAid within 30 days from the date of the Use & Care Guide. Major appliances with original model/serial numbers that is not installed in...
...find this information on the model and serial number label located on how to use of God, improper installation, installation not in accordance with electrical or plumbing codes, or use your complete model number and serial number. In the U.S.A., call 1-800-807-6777. 9/07 Keep this... or systems resulting from warranty coverage. 3. Expenses for travel and transportation for other damage to the finish of your authorized KitchenAid dealer to KitchenAid within 30 days from the date of the Use & Care Guide. Major appliances with original model/serial numbers that is not installed in...


