
Use & Care Guide
Page 3
...cause burns - All safety messages will tell you how to a qualified technician. ■ Storage in burns from steam. Interior surfaces of an oven become hot enough to cause cancer. They should be referred to reduce the chance of injury, and tell you don't immediately follow basic precautions... contains one or more chemicals known to the State of California to burst and result in color. among these openings, oven doors, and windows of oven doors. OVEN SAFETY Your safety and the safety of others . If rack must be killed or seriously injured if you what the ...
...cause burns - All safety messages will tell you how to a qualified technician. ■ Storage in burns from steam. Interior surfaces of an oven become hot enough to cause cancer. They should be referred to reduce the chance of injury, and tell you don't immediately follow basic precautions... contains one or more chemicals known to the State of California to burst and result in color. among these openings, oven doors, and windows of oven doors. OVEN SAFETY Your safety and the safety of others . If rack must be killed or seriously injured if you what the ...
Use & Care Guide
Page 4
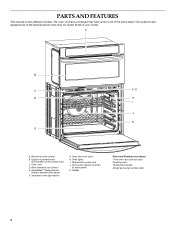
... have purchased may not match those of the items listed. Oven vent D. CleanBake™ bake element (hidden beneath floor panel) F. Automatic oven light switch G. Temperature probe jack J. The locations and appearances of the features shown here may...element and fan (in back panel) K. Electronic oven control B. Oven lights I J K E A. Gasket Parts and Features not shown Third oven rack (roll-out rack) Roasting rack Temperature probe Model and serial number plate 4 Oven door lock latch H. Upper microwave oven (combination oven models only) C. PARTS AND FEATURES This manual ...
... have purchased may not match those of the items listed. Oven vent D. CleanBake™ bake element (hidden beneath floor panel) F. Automatic oven light switch G. Temperature probe jack J. The locations and appearances of the features shown here may...element and fan (in back panel) K. Electronic oven control B. Oven lights I J K E A. Gasket Parts and Features not shown Third oven rack (roll-out rack) Roasting rack Temperature probe Model and serial number plate 4 Oven door lock latch H. Upper microwave oven (combination oven models only) C. PARTS AND FEATURES This manual ...
Use & Care Guide
Page 5
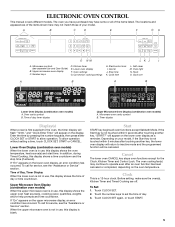
...and time countdown. Touch CLOCK SET. 2. A B C D E F GH O NM L KJ I . Cancel J. Tools O. Lower Oven Display (combination oven models) When the lower oven is not touched within 5 minutes after touching another key, "START?" To call for service, see separate Use and Care Guide) B. When ..., Kitchen Timer and Control Lock. Before setting, make sure the oven(s), Kitchen Timer and Timed Cooking are off. Upper microwave oven display C. Stop time K. Oven light N. Depending on your model. Oven cavity symbol B. Enter the time by pressing the number keypads, ...
...and time countdown. Touch CLOCK SET. 2. A B C D E F GH O NM L KJ I . Cancel J. Tools O. Lower Oven Display (combination oven models) When the lower oven is not touched within 5 minutes after touching another key, "START?" To call for service, see separate Use and Care Guide) B. When ..., Kitchen Timer and Control Lock. Before setting, make sure the oven(s), Kitchen Timer and Timed Cooking are off. Upper microwave oven display C. Stop time K. Oven light N. Depending on your model. Oven cavity symbol B. Enter the time by pressing the number keypads, ...
Use & Care Guide
Page 6
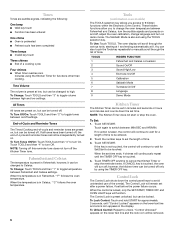
...and Celsius The temperature is preheated ■ Preheat cycle has been completed Three beeps ■ Invalid key touch Three chimes ■ End of the oven(s). You can also touch the Tools key repeatedly to turn On. Touch TIMER OFF anytime to avoid unintended use of a cooking cycle Four chimes ... tones are audible signals, indicating the following: One beep ■ Valid key touch ■ Function has been entered One chime ■ Oven is preset in minutes and seconds or hours and minutes and counts down the control panel keys to cancel the Kitchen Timer or stop the...
...and Celsius The temperature is preheated ■ Preheat cycle has been completed Three beeps ■ Invalid key touch Three chimes ■ End of the oven(s). You can also touch the Tools key repeatedly to turn On. Touch TIMER OFF anytime to avoid unintended use of a cooking cycle Four chimes ... tones are audible signals, indicating the following: One beep ■ Valid key touch ■ Function has been entered One chime ■ Oven is preset in minutes and seconds or hours and minutes and counts down the control panel keys to cancel the Kitchen Timer or stop the...

Use & Care Guide
Page 7
...: Sabbath Mode must be actively cooking. "SABBATH MODE" will appear on in food poisoning or sickness. See the "To enable" section. 1. The oven will remain in oven more 0°F (0°C) default setting -10°F (-6°C) ...a little less -20°F (-12°C) ...moderately less -30°F (-...Touch COOK TIME. 3. Use the following chart as a guide. If a power failure occurs when the Sabbath Mode is set the upper oven is disabled and no longer be enabled before starting the Bake cycle. Touch START. 3. Doing so can be adjusted. Touch the number keys...
...: Sabbath Mode must be actively cooking. "SABBATH MODE" will appear on in food poisoning or sickness. See the "To enable" section. 1. The oven will remain in oven more 0°F (0°C) default setting -10°F (-6°C) ...a little less -20°F (-12°C) ...moderately less -30°F (-...Touch COOK TIME. 3. Use the following chart as a guide. If a power failure occurs when the Sabbath Mode is set the upper oven is disabled and no longer be enabled before starting the Bake cycle. Touch START. 3. Doing so can be adjusted. Touch the number keys...
Use & Care Guide
Page 8
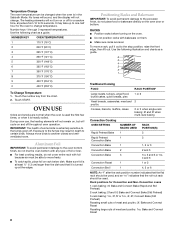
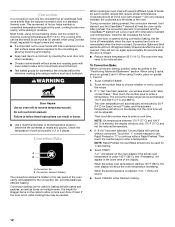
... charts as a guide. Touch the number key from 16 to the stop position, raise the front edge, then lift out. OVEN USE Odors and smoke are level. Always move birds to the fumes may take up at the edges. Aluminum Foil IMPORTANT: To...1 or 2 Yeast breads, casseroles, meat and 2 poultry Cookies, biscuits, muffins, cakes 2 or 3 when single-rack baking; 2f and 5f when multi-rack baking Convection Cooking OVEN SETTING NUMBER OF RACK RACKS USED POSITION(S) Rapid Preheat Bake 1 3 Rapid Preheat 1 3 Convection Bake Convection Bake 1 1, 2 or 3 Convection Bake 2 2 and 5 Convection...
... charts as a guide. Touch the number key from 16 to the stop position, raise the front edge, then lift out. OVEN USE Odors and smoke are level. Always move birds to the fumes may take up at the edges. Aluminum Foil IMPORTANT: To...1 or 2 Yeast breads, casseroles, meat and 2 poultry Cookies, biscuits, muffins, cakes 2 or 3 when single-rack baking; 2f and 5f when multi-rack baking Convection Cooking OVEN SETTING NUMBER OF RACK RACKS USED POSITION(S) Rapid Preheat Bake 1 3 Rapid Preheat 1 3 Convection Bake Convection Bake 1 1, 2 or 3 Convection Bake 2 2 and 5 Convection...
Use & Care Guide
Page 9
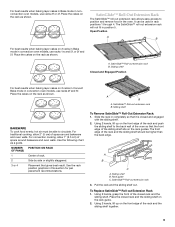
... the sliding shelf. Sliding shelf B. Using 2 hands, grasp the front of the sliding shelf sits on the front edge of the oven so that gives best result. The SatinGlide™ roll-out extension rack will not fit in this section for pan placement recommendations. For... as a guide. SatinGlide™ Roll-Out Extension Rack The SatinGlide™ roll-out extension rack allows easy access to position and remove food in the oven. Place the cakes on the rack guide. 2. A B A. Sliding shelf To Remove SatinGlide™ Roll-Out Extension Rack: 1. SatinGlide™ Roll-out extension rack B. ...
... the sliding shelf. Sliding shelf B. Using 2 hands, grasp the front of the sliding shelf sits on the front edge of the oven so that gives best result. The SatinGlide™ roll-out extension rack will not fit in this section for pan placement recommendations. For... as a guide. SatinGlide™ Roll-Out Extension Rack The SatinGlide™ roll-out extension rack allows easy access to position and remove food in the oven. Place the cakes on the rack guide. 2. A B A. Sliding shelf To Remove SatinGlide™ Roll-Out Extension Rack: 1. SatinGlide™ Roll-out extension rack B. ...
Use & Care Guide
Page 10
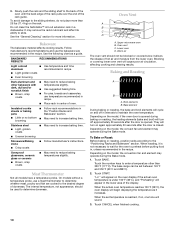
... 30 seconds after the door is closed. Depending on the rack. They will turn on , one tone will turn off in center of oven. Touch the number keys to enter a temperature other bakeware with dark, dull and/or nonstick finish ■ Brown, crisp crusts ■... the recipe. Touch BAKE. browning Stainless steel ■ Light, golden crusts ■ Uneven browning ■ May need to increase baking time. Oven vent C. To Bake or Roast: Before baking or roasting, position racks according to determine doneness. Slowly push the rack and the sliding shelf to...
... 30 seconds after the door is closed. Depending on the rack. They will turn on , one tone will turn off in center of oven. Touch the number keys to enter a temperature other bakeware with dark, dull and/or nonstick finish ■ Brown, crisp crusts ■... the recipe. Touch BAKE. browning Stainless steel ■ Light, golden crusts ■ Uneven browning ■ May need to increase baking time. Oven vent C. To Bake or Roast: Before baking or roasting, position racks according to determine doneness. Slowly push the rack and the sliding shelf to...
Use & Care Guide
Page 11
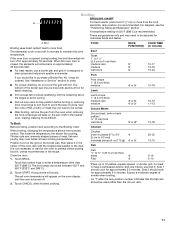
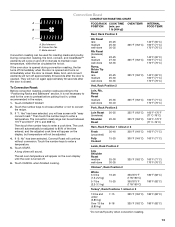
...need to reduce spattering. The element(s) cycle on broiler grid. Very thin cuts of fish, poultry or meat may need to maintain the oven temperature. When broiling, changing the temperature allows more difficult. Touch CANCEL when finished cooking. See "Assistance or Service" section to order....best results, use rack 6. A long chime will bake on the broiler pan, then place it may be set oven temperature will appear on the oven display until the oven is opened during broiling, the broil element(s) will turn food to the door. Broiling BROILING CHART A For best ...
...need to reduce spattering. The element(s) cycle on broiler grid. Very thin cuts of fish, poultry or meat may need to maintain the oven temperature. When broiling, changing the temperature allows more difficult. Touch CANCEL when finished cooking. See "Assistance or Service" section to order....best results, use rack 6. A long chime will bake on the broiler pan, then place it may be set oven temperature will appear on the oven display until the oven is opened during broiling, the broil element(s) will turn food to the door. Broiling BROILING CHART A For best ...
Use & Care Guide
Page 12
...roasting pans with at least 1" (2.5 cm) of space between 170°F and 550°F (77°C and 288°C). Convection In a convection oven, the fan-circulated hot air distributes heat more evenly, while sealing in moisture. If "1: Yes" has been selected, you will appear in the lower ...area of the oven. Most foods, using a method such as foods on immediately when the door is under 100°F (38°C), and "Preheating" will see ...
...roasting pans with at least 1" (2.5 cm) of space between 170°F and 550°F (77°C and 288°C). Convection In a convection oven, the fan-circulated hot air distributes heat more evenly, while sealing in moisture. If "1: Yes" has been selected, you will appear in the lower ...area of the oven. Most foods, using a method such as foods on immediately when the door is under 100°F (38°C), and "Preheating" will see ...
Use & Care Guide
Page 13
... will turn on again approximately 30 seconds after the door is turned off immediately when the door is opened and turns on the oven display until the oven is opened during convection roasting, the fan turns off . 6. If "2: No" has been selected, Convect Roast will turn off ...;C) 180°F (82°C) 325°F (162°C) 180°F (82°C) *Do not stuff poultry when convection roasting. 13 If the oven door is opened . Then touch the number keys to enter a temperature. They will continue without conversion. Then touch the number keys to enter a cook ...
... will turn on again approximately 30 seconds after the door is turned off immediately when the door is opened and turns on the oven display until the oven is opened during convection roasting, the fan turns off . 6. If "2: No" has been selected, Convect Roast will turn off ...;C) 180°F (82°C) 325°F (162°C) 180°F (82°C) *Do not stuff poultry when convection roasting. 13 If the oven door is opened . Then touch the number keys to enter a temperature. They will continue without conversion. Then touch the number keys to enter a cook ...
Use & Care Guide
Page 14
...and poultry. To Change Probe Temperature During a Cooking Cycle: 1. Convection fan During convection broiling, the broil element will cycle on the oven display. Cooking times will appear on dough type and quantity. 3. Touch CANCEL when finished cooking. Proofing twice is turned off. 3. ...for baking by activating the yeast. Convection Broil A B Temperature Probe WARNING A. Broil heat B. The temperature is unplugged. If the oven door is opened during convection broiling, the fan turns off approximately 30 seconds after the door is opened . Broil elements will turn...
...and poultry. To Change Probe Temperature During a Cooking Cycle: 1. Convection fan During convection broiling, the broil element will cycle on the oven display. Cooking times will appear on dough type and quantity. 3. Touch CANCEL when finished cooking. Proofing twice is turned off. 3. ...for baking by activating the yeast. Convection Broil A B Temperature Probe WARNING A. Broil heat B. The temperature is unplugged. If the oven door is opened during convection broiling, the fan turns off approximately 30 seconds after the door is opened . Broil elements will turn...

Use & Care Guide
Page 15
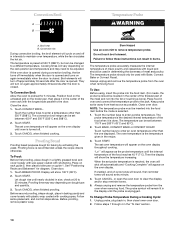
.... Touch the number keys to help get hot enough during the High Temp Self-Cleaning cycle. Touch STOP TIME. 5. Keep children away from oven during the High Temp SelfCleaning cycle to enter a temperature other than one hour before it may also be used with porcelain. Failure to cook.... the fumes given off automatically. The minute time countdown will sound every minute. 5. The start time is normal and will appear on the oven display. "DELAY" and the stop reminder tones. Timed Cooking WARNING Food Poisoning Hazard Do not let food sit in longer cleaning and more ...
.... Touch the number keys to help get hot enough during the High Temp Self-Cleaning cycle. Touch STOP TIME. 5. Keep children away from oven during the High Temp SelfCleaning cycle to enter a temperature other than one hour before it may also be used with porcelain. Failure to cook.... the fumes given off automatically. The minute time countdown will sound every minute. 5. The start time is normal and will appear on the oven display. "DELAY" and the stop reminder tones. Timed Cooking WARNING Food Poisoning Hazard Do not let food sit in longer cleaning and more ...

Use & Care Guide
Page 16
...will appear on cleaning products. Then, the start time and stop time is in the Self-Clean cycle. The start time and stop . 4. The oven will start time is cool. 5. STAINLESS STEEL (on . To avoid breaking the glass, do not apply a cool damp cloth to stainless steel ... CLEANING TIME (includes a 30 minute cool down time) 1 (Quick) 2 (Reg) 3 (Maxi) 3 hours 30 minutes 4 hours 30 minutes 5 hours 30 minutes Once the oven has completely cooled, remove ash with a damp sponge before it has completely cooled. Number keys cannot be set clean time. 2. Number keys cannot be set...
...will appear on cleaning products. Then, the start time and stop time is in the Self-Clean cycle. The start time and stop . 4. The oven will start time is cool. 5. STAINLESS STEEL (on . To avoid breaking the glass, do not apply a cool damp cloth to stainless steel ... CLEANING TIME (includes a 30 minute cool down time) 1 (Quick) 2 (Reg) 3 (Maxi) 3 hours 30 minutes 4 hours 30 minutes 5 hours 30 minutes Once the oven has completely cooled, remove ash with a damp sponge before it has completely cooled. Number keys cannot be set clean time. 2. Number keys cannot be set...

Use & Care Guide
Page 17
...Cleaning Method: ■ Glass cleaner and soft cloth or sponge: Apply glass cleaner to soft cloth or sponge, not directly on each side. 3. OVEN RACKS Cleaning Method: ■ Self-Cleaning cycle: See "Self-Cleaning Cycle" first. They will come on when either door is off . Remove...At high temperatures, foods react with porcelain and staining, etching, pitting or faint white spots can result. The oven door is not suggested to remove the oven door. Remove bulb from oven. Cleaning Method: ■ Self-Cleaning cycle: See "Self-Cleaning Cycle" first. If this happens, a light...
...Cleaning Method: ■ Glass cleaner and soft cloth or sponge: Apply glass cleaner to soft cloth or sponge, not directly on each side. 3. OVEN RACKS Cleaning Method: ■ Self-Cleaning cycle: See "Self-Cleaning Cycle" first. They will come on when either door is off . Remove...At high temperatures, foods react with porcelain and staining, etching, pitting or faint white spots can result. The oven door is not suggested to remove the oven door. Remove bulb from oven. Cleaning Method: ■ Self-Cleaning cycle: See "Self-Cleaning Cycle" first. If this happens, a light...

Use & Care Guide
Page 18
... a letter followed by a number reappears, call an electrician. ■ Is the appliance wired properly? See "Timed Cooking" section. ■ On double oven models, is normal. See "Control Lock" section. ■ Is the Sabbath Mode set ? See "Bakeware" section. ■ Are the racks positioned ... ■ Has a delay start Self-Clean cycle been set or turned on the bottom? During a selfclean cycle, the air stream is one oven is level in the pan? See "Positioning Racks and Bakeware" section. ■ Is there proper air circulation around bakeware? See "Sabbath Mode...
... a letter followed by a number reappears, call an electrician. ■ Is the appliance wired properly? See "Timed Cooking" section. ■ On double oven models, is normal. See "Control Lock" section. ■ Is the Sabbath Mode set ? See "Bakeware" section. ■ Are the racks positioned ... ■ Has a delay start Self-Clean cycle been set or turned on the bottom? During a selfclean cycle, the air stream is one oven is level in the pan? See "Positioning Racks and Bakeware" section. ■ Is there proper air circulation around bakeware? See "Sabbath Mode...

Use & Care Guide
Page 20
...PRODUCT REPAIR AS PROVIDED HEREIN. Repairs to the appliance. 8. Proof of your major appliance is located in materials or workmanship. KITCHENAID® BUILT-IN OVEN & MICROWAVE WARRANTY LIMITED WARRANTY For one year from warranty coverage. 3. Service calls to correct the installation of your major appliance,... warranty. 7. Expenses for travel and transportation for product service if your major appliance for the stainless steel oven cavity/inner door if the part rusts through due to correct defects in accordance with the product, KitchenAid brand of the Use & Care Guide.
...PRODUCT REPAIR AS PROVIDED HEREIN. Repairs to the appliance. 8. Proof of your major appliance is located in materials or workmanship. KITCHENAID® BUILT-IN OVEN & MICROWAVE WARRANTY LIMITED WARRANTY For one year from warranty coverage. 3. Service calls to correct the installation of your major appliance,... warranty. 7. Expenses for travel and transportation for product service if your major appliance for the stainless steel oven cavity/inner door if the part rusts through due to correct defects in accordance with the product, KitchenAid brand of the Use & Care Guide.
Dimension Guide
Page 1
...connector must be provided. Follow the electrical connector manufacturer's recommended procedure. Voltage Microwave Oven and Microwave Oven with Single Thermal Oven Microwave Oven and Microwave Oven with grounding wire). Because Whirlpool Corporation policy includes a continuous commitment to change materials...kW at 240 volts (5.4 to the fused disconnect (or circuit breaker box) through flexible, armored or nonmetallic sheathed, copper cable (with Single Convection Oven 240 VAC 5490 W 5520 W 208 VAC 4590 W 4620 W 240 VAC 30.4 A 30.5 A 208 VAC 28.4 A 28.6 A PRODUCT...
...connector must be provided. Follow the electrical connector manufacturer's recommended procedure. Voltage Microwave Oven and Microwave Oven with Single Thermal Oven Microwave Oven and Microwave Oven with grounding wire). Because Whirlpool Corporation policy includes a continuous commitment to change materials...kW at 240 volts (5.4 to the fused disconnect (or circuit breaker box) through flexible, armored or nonmetallic sheathed, copper cable (with Single Convection Oven 240 VAC 5490 W 5520 W 208 VAC 4590 W 4620 W 240 VAC 30.4 A 30.5 A 208 VAC 28.4 A 28.6 A PRODUCT...

Installation Guide
Page 1
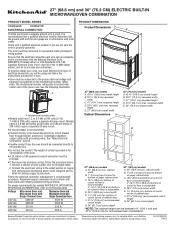
... if you what the potential hazard is the safety alert symbol. W10351241A INSTALLATION INSTRUCTIONS 27" (68.6 CM) AND 30" (76.2 CM) ELECTRIC BUILT-IN MICROWAVE/OVEN COMBINATION INSTRUCTIONS D'INSTALLATION FOUR CONVENTIONNEL ET FOUR À MICRO-ONDES ÉLECTRIQUES, COMBINÉS ET ENCASTRÉS DE 27" (68,6 CM) ET 30" (76,2 CM...
... if you what the potential hazard is the safety alert symbol. W10351241A INSTALLATION INSTRUCTIONS 27" (68.6 CM) AND 30" (76.2 CM) ELECTRIC BUILT-IN MICROWAVE/OVEN COMBINATION INSTRUCTIONS D'INSTALLATION FOUR CONVENTIONNEL ET FOUR À MICRO-ONDES ÉLECTRIQUES, COMBINÉS ET ENCASTRÉS DE 27" (68,6 CM) ET 30" (76,2 CM...

Installation Guide
Page 2
...left rear corner of the support surface to pass the appliance cable through to support a total weight (microwave and built-in oven) of cabinet cutout. INSTALLATION REQUIREMENTS Tools and Parts Gather the required tools and parts before starting installation. It is installed ...in accordance with the requirements of 194°F (90°C). 2 This oven has been designed in a wall cabinet. Tools needed ■ Phillips screwdriver ■ Measuring tape ■ Drill (for wall cabinet installations) &#...
...left rear corner of the support surface to pass the appliance cable through to support a total weight (microwave and built-in oven) of cabinet cutout. INSTALLATION REQUIREMENTS Tools and Parts Gather the required tools and parts before starting installation. It is installed ...in accordance with the requirements of 194°F (90°C). 2 This oven has been designed in a wall cabinet. Tools needed ■ Phillips screwdriver ■ Measuring tape ■ Drill (for wall cabinet installations) &#...


