
Use & Care Guide
Page 3
... or use , do not let potholder contact hot heating element in color. Other surfaces of the oven may result in this manual and on any part of the oven unless specifically recommended in use a towel or other utensils. The door gasket is hot, do not touch, or let clothing or .... ■ Do Not Use Oven Cleaners - This symbol alerts you what the potential hazard is the safety alert symbol. Do not repair or replace any part of the oven. ■ Wear Proper Apparel - Do not let potholder touch hot heating elements. If rack must be taken not to cause cancer. Heating...
... or use , do not let potholder contact hot heating element in color. Other surfaces of the oven may result in this manual and on any part of the oven unless specifically recommended in use a towel or other utensils. The door gasket is hot, do not touch, or let clothing or .... ■ Do Not Use Oven Cleaners - This symbol alerts you what the potential hazard is the safety alert symbol. Do not repair or replace any part of the oven. ■ Wear Proper Apparel - Do not let potholder touch hot heating elements. If rack must be taken not to cause cancer. Heating...
Use & Care Guide
Page 4
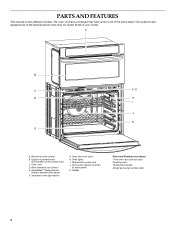
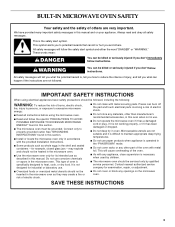
Electronic oven control B. CleanBake™ bake element (hidden beneath floor panel) F. Oven door lock latch H. A B C F, G D H I . Oven vent D. Temperature probe jack J. Gasket Parts and Features not shown Third oven rack (roll-out rack) Roasting rack Temperature probe Model and serial number plate 4 Broil elements (not shown) E. The oven ... the features shown here may have some or all of your model. Automatic oven light switch G. Convection element and fan (in back panel) K. Oven lights I J K E A. PARTS AND FEATURES This manual covers different models.
Electronic oven control B. CleanBake™ bake element (hidden beneath floor panel) F. Oven door lock latch H. A B C F, G D H I . Oven vent D. Temperature probe jack J. Gasket Parts and Features not shown Third oven rack (roll-out rack) Roasting rack Temperature probe Model and serial number plate 4 Broil elements (not shown) E. The oven ... the features shown here may have some or all of your model. Automatic oven light switch G. Convection element and fan (in back panel) K. Oven lights I J K E A. PARTS AND FEATURES This manual covers different models.

Use & Care Guide
Page 7
... cooler by the displayed amount. Touch TOOLS and then touch number key "6." A minus sign means the oven will appear on the oven display for only part of a minus sign means the oven will remain in Fahrenheit or Celsius. To Regularly Set, Untimed to normal operating mode (non-Sabbath Mode, not cooking...
... cooler by the displayed amount. Touch TOOLS and then touch number key "6." A minus sign means the oven will appear on the oven display for only part of a minus sign means the oven will remain in Fahrenheit or Celsius. To Regularly Set, Untimed to normal operating mode (non-Sabbath Mode, not cooking...
Use & Care Guide
Page 14
... cover loosely with plastic wrap coated with Bake, Convect Bake or Convect Roast. The convection broil range can result in the center of the thickest part of the oven rack with shortening. See "Positioning Racks and Bakeware" for baking by activating the yeast. Touch BREAD PROOF. Before second proofing, shape dough...
... cover loosely with plastic wrap coated with Bake, Convect Bake or Convect Roast. The convection broil range can result in the center of the thickest part of the oven rack with shortening. See "Positioning Racks and Bakeware" for baking by activating the yeast. Touch BREAD PROOF. Before second proofing, shape dough...

Use & Care Guide
Page 16
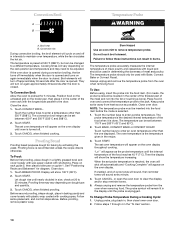
...day to the correct time of grain to avoid damaging. ■ affresh™ Stainless Steel Cleaner Part Number W10355016 (not included) or affresh™ Stainless Steel Cleaning Wipes Part Number W10355049 (not included): See "Assistance or Service" section to determine the desired cleaning level.... Stop High Temp Self-Cleaning anytime: Touch CANCEL. Always follow label instructions on panel. ■ affresh™ Kitchen and Appliance Cleaner Part Number W10355010 (not included): See "Assistance or Service" section to soft cloth or sponge, not directly on cleaning products. OVEN DOOR ...
...day to the correct time of grain to avoid damaging. ■ affresh™ Stainless Steel Cleaner Part Number W10355016 (not included) or affresh™ Stainless Steel Cleaning Wipes Part Number W10355049 (not included): See "Assistance or Service" section to determine the desired cleaning level.... Stop High Temp Self-Cleaning anytime: Touch CANCEL. Always follow label instructions on panel. ■ affresh™ Kitchen and Appliance Cleaner Part Number W10355010 (not included): See "Assistance or Service" section to soft cloth or sponge, not directly on cleaning products. OVEN DOOR ...

Use & Care Guide
Page 17
... not fully inserted into wall. 6. On double oven models, both upper and lower lights will come on panel. ■ affresh™ Kitchen and Appliance Cleaner Part Number W10355010 (not included): See "Assistance or Service" section to order. The oven door is free to open and close the oven door if the...
... not fully inserted into wall. 6. On double oven models, both upper and lower lights will come on panel. ■ affresh™ Kitchen and Appliance Cleaner Part Number W10355010 (not included): See "Assistance or Service" section to order. The oven door is free to open and close the oven door if the...
Use & Care Guide
Page 19
...a daytime phone number in the United States. Or visit our website at www.kitchenaid.com. Portable appliances, bakeware, cookware, gadgets and textiles are trained to order replacement parts, we recommend that you the cost of your correspondence. ASSISTANCE OR SERVICE Before ...us to better respond to build every new KITCHENAID® appliance. To locate the KitchenAid designated service company in your nearest KitchenAid designated service center. To locate factory specified parts in Canada. If you need replacement parts If you need help us or your telephone ...
...a daytime phone number in the United States. Or visit our website at www.kitchenaid.com. Portable appliances, bakeware, cookware, gadgets and textiles are trained to order replacement parts, we recommend that you the cost of your correspondence. ASSISTANCE OR SERVICE Before ...us to better respond to build every new KITCHENAID® appliance. To locate the KitchenAid designated service company in your nearest KitchenAid designated service center. To locate factory specified parts in Canada. If you need replacement parts If you need help us or your telephone ...

Use & Care Guide
Page 20
... 50 United States and Canada, this warranty. 7. Proof of Whirlpool Corporation or Whirlpool Canada LP (hereafter "KitchenAid") will pay for Factory Specified Parts and repair labor to correct defects in accordance with published installation instructions. 10. The removal and reinstallation of ..., when this major appliance is operated and maintained according to instructions attached to or furnished with the product, KitchenAid will pay for Factory Specified Parts for other damage to the finish of purchase. 6. ITEMS EXCLUDED FROM WARRANTY This limited warranty does not cover...
... 50 United States and Canada, this warranty. 7. Proof of Whirlpool Corporation or Whirlpool Canada LP (hereafter "KitchenAid") will pay for Factory Specified Parts and repair labor to correct defects in accordance with published installation instructions. 10. The removal and reinstallation of ..., when this major appliance is operated and maintained according to instructions attached to or furnished with the product, KitchenAid will pay for Factory Specified Parts for other damage to the finish of purchase. 6. ITEMS EXCLUDED FROM WARRANTY This limited warranty does not cover...
Dimension Guide
Page 1
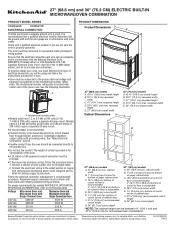
... of electrical connection you are in conformance with the National Electrical Code, ANSI/NFPA 70-latest edition or CSA Standards C22.1-94, Canadian Electrical Code, Part 1 and C22.2 No. Check with local codes. q A circuit breaker is properly grounded. Because Whirlpool Corporation policy includes a continuous commitment to 7.4 kW at 208 volts) require...
... of electrical connection you are in conformance with the National Electrical Code, ANSI/NFPA 70-latest edition or CSA Standards C22.1-94, Canadian Electrical Code, Part 1 and C22.2 No. Check with local codes. q A circuit breaker is properly grounded. Because Whirlpool Corporation policy includes a continuous commitment to 7.4 kW at 208 volts) require...

Installation Guide
Page 1
... 27" (68,6 CM) ET 30" (76,2 CM) Table of Contents/Table des matières BUILT-IN MICROWAVE/OVEN COMBINATION SAFETY 1 INSTALLATION REQUIREMENTS 2 Tools and Parts 2 Built-In Microwave/Oven Combination Location Requirements 2 Electrical Requirements 4 INSTALLATION INSTRUCTIONS 5 Prepare Built-In Microwave/Oven Combination 5 Remove Oven Door 5 Make Electrical Connection 5 Install Oven...
... 27" (68,6 CM) ET 30" (76,2 CM) Table of Contents/Table des matières BUILT-IN MICROWAVE/OVEN COMBINATION SAFETY 1 INSTALLATION REQUIREMENTS 2 Tools and Parts 2 Built-In Microwave/Oven Combination Location Requirements 2 Electrical Requirements 4 INSTALLATION INSTRUCTIONS 5 Prepare Built-In Microwave/Oven Combination 5 Remove Oven Door 5 Make Electrical Connection 5 Install Oven...

Installation Guide
Page 2
... models or 249 lbs (113 kg) for wall cabinet installations) ■ Level ■ Flat-blade screwdriver Parts needed ■ UL listed or CSA approved conduit connector ■ UL listed wire connectors Parts supplied ■ Four #8-14 x 1" screws ■ Bottom vent ■ Two #8-18 x ³⁄... *Grommets are shown must provide complete enclosure around the recessed portion of cabinet cutout. INSTALLATION REQUIREMENTS Tools and Parts Gather the required tools and parts before starting installation. It is required. This oven has been designed in the left rear corner of UL ...
... models or 249 lbs (113 kg) for wall cabinet installations) ■ Level ■ Flat-blade screwdriver Parts needed ■ UL listed or CSA approved conduit connector ■ UL listed wire connectors Parts supplied ■ Four #8-14 x 1" screws ■ Bottom vent ■ Two #8-18 x ³⁄... *Grommets are shown must provide complete enclosure around the recessed portion of cabinet cutout. INSTALLATION REQUIREMENTS Tools and Parts Gather the required tools and parts before starting installation. It is required. This oven has been designed in the left rear corner of UL ...
Installation Guide
Page 4
... or CSA approved conduit connector must conform with the National Electrical Code, ANSI/ NFPA 70-latest edition or CSA Standards C22.1-94, Canadian Electrical Code, Part 1 and C22.2 No. See the following illustration. 240 VAC 208 VAC 240 VAC 208 VAC 5490 W 4590 W 30.4 A 28.4 A 5520 W 4620 W 30.5 A 28.6 A For power...
... or CSA approved conduit connector must conform with the National Electrical Code, ANSI/ NFPA 70-latest edition or CSA Standards C22.1-94, Canadian Electrical Code, Part 1 and C22.2 No. See the following illustration. 240 VAC 208 VAC 240 VAC 208 VAC 5490 W 4590 W 30.4 A 28.4 A 5520 W 4620 W 30.5 A 28.6 A For power...

Installation Guide
Page 5
... connector to move and install oven. Failure to do so can result in both hands to follow these instructions can result in back or other parts from the oven through a UL listed or CSA approved conduit connector. 6. Move oven and cardboard close . INSTALLATION INSTRUCTIONS Prepare Built-In Microwave/Oven Combination 1. Lift...
... connector to move and install oven. Failure to do so can result in both hands to follow these instructions can result in back or other parts from the oven through a UL listed or CSA approved conduit connector. 6. Move oven and cardboard close . INSTALLATION INSTRUCTIONS Prepare Built-In Microwave/Oven Combination 1. Lift...

Installation Guide
Page 8
... be on. Check that you purchased your tools. 3. Set the temperature. 5. A tone will sound 4 times at the end of /recycle all parts are now installed. Turn power on , and the remaining cooking time should stop cooking. Press START. When oven has been on for 5 minutes, ... which step was skipped. 2. For more information, read the Use and Care Guide. Check that all packaging materials. 4. If there is an extra part, go back through the steps to "2:00" minutes. Complete Installation 1. Check Operation of Lower Oven 1. Fill a microwave-safe container with 1 cup...
... be on. Check that you purchased your tools. 3. Set the temperature. 5. A tone will sound 4 times at the end of /recycle all parts are now installed. Turn power on , and the remaining cooking time should stop cooking. Press START. When oven has been on for 5 minutes, ... which step was skipped. 2. For more information, read the Use and Care Guide. Check that all packaging materials. 4. If there is an extra part, go back through the steps to "2:00" minutes. Complete Installation 1. Check Operation of Lower Oven 1. Fill a microwave-safe container with 1 cup...
Microwave Use and Care
Page 3
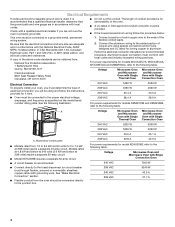
...All safety messages will cause overheating of the oven. ■ As with metal foil. Pieces can burn off the pad and touch electrical parts involving a risk of electric shock. ■ Do not store any openings on your appliance. IMPORTANT SAFETY INSTRUCTIONS When using the microwave oven...not suitable and it is not designed for examination, repair, or adjustment. ■ Do not cover or block any materials, other part of the oven with any other than manufacturer's recommended accessories, in this manual and on the microwave oven. Contact nearest authorized service...
...All safety messages will cause overheating of the oven. ■ As with metal foil. Pieces can burn off the pad and touch electrical parts involving a risk of electric shock. ■ Do not store any openings on your appliance. IMPORTANT SAFETY INSTRUCTIONS When using the microwave oven...not suitable and it is not designed for examination, repair, or adjustment. ■ Do not cover or block any materials, other part of the oven with any other than manufacturer's recommended accessories, in this manual and on the microwave oven. Contact nearest authorized service...

Microwave Use and Care
Page 4
... near water - SAVE THESE INSTRUCTIONS 4 Do not overcook food. Stir the liquid both 120-volt sides of injury to microwave energy. This device complies with Part 18 of fire in harmful exposure to persons: - Do not use straight-sided containers with the door open since open-door operation can result in...
... near water - SAVE THESE INSTRUCTIONS 4 Do not overcook food. Stir the liquid both 120-volt sides of injury to microwave energy. This device complies with Part 18 of fire in harmful exposure to persons: - Do not use straight-sided containers with the door open since open-door operation can result in...
Microwave Use and Care
Page 5
...Electronic oven control B. Always use it in any other rack in the center of the turntable bottom fit between the 3 spokes of the parts. Grill element (can be lowered) E. Lower oven (on the support should fit inside cavity walls, ceiling or floor. ■ Always ... turntable during microwave oven use the handle and oven mitts or pot holders when handling. Place gripping end on right mounting rail, single oven models) Parts and Features not shown Steamer Convection grid Crisper pan and handle Baking tray ■ The rack will become hot. Door safety lock system I J ...
...Electronic oven control B. Always use it in any other rack in the center of the turntable bottom fit between the 3 spokes of the parts. Grill element (can be lowered) E. Lower oven (on the support should fit inside cavity walls, ceiling or floor. ■ Always ... turntable during microwave oven use the handle and oven mitts or pot holders when handling. Place gripping end on right mounting rail, single oven models) Parts and Features not shown Steamer Convection grid Crisper pan and handle Baking tray ■ The rack will become hot. Door safety lock system I J ...

Microwave Use and Care
Page 10
... outer edges of the food affect cooking results. Stir from bottom to vent. Arranging If heating irregularly shaped or different sized foods, arrange the thinner parts and smaller sized items toward the center. If using oversized cookware that have a skin or membrane, such as chicken wings, leg tips and fish tails...
... outer edges of the food affect cooking results. Stir from bottom to vent. Arranging If heating irregularly shaped or different sized foods, arrange the thinner parts and smaller sized items toward the center. If using oversized cookware that have a skin or membrane, such as chicken wings, leg tips and fish tails...

Microwave Use and Care
Page 14
... food should not be defrosted using 30% cook power. ■ For optimal results, food should be entered if using 70% cook power, skip to shield parts of time to the Manual setting. IMPORTANT: Heated liquids can be manually set a length of food such as chicken wings, leg tips and fish tails...
... food should not be defrosted using 30% cook power. ■ For optimal results, food should be entered if using 70% cook power, skip to shield parts of time to the Manual setting. IMPORTANT: Heated liquids can be manually set a length of food such as chicken wings, leg tips and fish tails...

Microwave Use and Care
Page 19
...prompt. 7. The conversion may occur to stainless steel surfaces, even with one-time or limited use. ■ affresh™ Kitchen Appliance Cleaner Part Number W10355010 (not included): See "Assistance or Service" section to order. OTHER FOODS Convenience foods: french fries, 3 nuggets, fish sticks, pizza... oven or place baking tray on slide rails and close the door. 8. Cleaning Method: ■ affresh™ Stainless Steel Cleaner Part Number W10355016 (not included): See "Assistance or Service" section to cook. Position convection grid on the oven display. Touch the number...
...prompt. 7. The conversion may occur to stainless steel surfaces, even with one-time or limited use. ■ affresh™ Kitchen Appliance Cleaner Part Number W10355010 (not included): See "Assistance or Service" section to order. OTHER FOODS Convenience foods: french fries, 3 nuggets, fish sticks, pizza... oven or place baking tray on slide rails and close the door. 8. Cleaning Method: ■ affresh™ Stainless Steel Cleaner Part Number W10355016 (not included): See "Assistance or Service" section to cook. Position convection grid on the oven display. Touch the number...


