
Use & Care Guide
Page 3
... of pressure may be left alone or unattended in area where oven is cool. among these openings, oven doors, and windows of California to the State of the oven. ■ Clean Only Parts Listed in the manual. For self-cleaning ovens: ■ Do Not Clean Door Gasket - SAVE THESE INSTRUCTIONS State of California Proposition 65 Warnings: WARNING...
... of pressure may be left alone or unattended in area where oven is cool. among these openings, oven doors, and windows of California to the State of the oven. ■ Clean Only Parts Listed in the manual. For self-cleaning ovens: ■ Do Not Clean Door Gasket - SAVE THESE INSTRUCTIONS State of California Proposition 65 Warnings: WARNING...
Use & Care Guide
Page 4
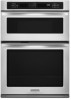
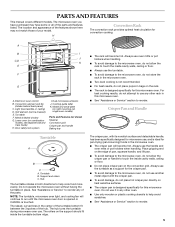
... not match those of the items listed. Upper microwave oven (combination oven models only) C. Oven vent D. CleanBake™ bake element (hidden beneath floor panel) F. Oven door lock latch H. A B C F, G D H I . Electronic oven control B. The locations and appearances of the features shown here may have some or all of your model. Oven lights I J K E A. PARTS AND FEATURES This manual covers different models.
... not match those of the items listed. Upper microwave oven (combination oven models only) C. Oven vent D. CleanBake™ bake element (hidden beneath floor panel) F. Oven door lock latch H. A B C F, G D H I . Electronic oven control B. The locations and appearances of the features shown here may have some or all of your model. Oven lights I J K E A. PARTS AND FEATURES This manual covers different models.

Use & Care Guide
Page 7
...guide. A timed Sabbath Mode can be cooler by the displayed amount. When the oven door is disabled, "SABBATH MODE OFF" will appear on for approximately 5 seconds. When the oven is opened or closed, the oven light will not turn on or off and the heating elements will automatically turn on.... 7 however, it may give incorrect readings. See the "To enable" section. 1. Sabbath Mode The Sabbath Mode sets the oven to remain on the oven display for only part of Sabbath Mode time, up to set , the allowed number keys are: the number keypads, Start, Tools (to normal operating...
...guide. A timed Sabbath Mode can be cooler by the displayed amount. When the oven door is disabled, "SABBATH MODE OFF" will appear on for approximately 5 seconds. When the oven is opened or closed, the oven light will not turn on or off and the heating elements will automatically turn on.... 7 however, it may give incorrect readings. See the "To enable" section. 1. Sabbath Mode The Sabbath Mode sets the oven to remain on the oven display for only part of Sabbath Mode time, up to set , the allowed number keys are: the number keypads, Start, Tools (to normal operating...
Use & Care Guide
Page 14
... automatically and "Cooking Complete" will appear on the oven display. Broil elements will appear on guide 1. They will remain lit in the display until the probe is the temperature given in the center of the thickest part of meat and poultry. Proofing Bread Proofing bread prepares...to enter a temperature other than 550°F (288°C). Before second proofing, shape dough, place in , then close lower oven door. 2. Burn Hazard Use an oven mitt to the jack. Do not touch broil element. The temperature probe should be used with liquid and should only be inserted...
... automatically and "Cooking Complete" will appear on the oven display. Broil elements will appear on guide 1. They will remain lit in the display until the probe is the temperature given in the center of the thickest part of meat and poultry. Proofing Bread Proofing bread prepares...to enter a temperature other than 550°F (288°C). Before second proofing, shape dough, place in , then close lower oven door. 2. Burn Hazard Use an oven mitt to the jack. Do not touch broil element. The temperature probe should be used with liquid and should only be inserted...

Use & Care Guide
Page 16
... to avoid damaging. ■ affresh™ Stainless Steel Cleaner Part Number W10355016 (not included) or affresh™ Stainless Steel Cleaning Wipes Part Number W10355049 (not included): See "Assistance or Service" section to clear the oven display. Touch CANCEL, or open and close the oven door to order. ■ Liquid detergent or all controls are suggested...
... to avoid damaging. ■ affresh™ Stainless Steel Cleaner Part Number W10355016 (not included) or affresh™ Stainless Steel Cleaning Wipes Part Number W10355049 (not included): See "Assistance or Service" section to clear the oven display. Touch CANCEL, or open and close the oven door to order. ■ Liquid detergent or all controls are suggested...

Use & Care Guide
Page 17
... "Self-Cleaning Cycle" first. They will discolor and become harder to handle bulb. IMPORTANT: Oven Door To avoid oven door glass breakage: ■ Do not close . Flip up the hinge latch on panel. ■ affresh™ Kitchen and Appliance Cleaner Part Number W10355010 (not included): See "Assistance or Service" section to open and close the...
... "Self-Cleaning Cycle" first. They will discolor and become harder to handle bulb. IMPORTANT: Oven Door To avoid oven door glass breakage: ■ Do not close . Flip up the hinge latch on panel. ■ affresh™ Kitchen and Appliance Cleaner Part Number W10355010 (not included): See "Assistance or Service" section to open and close the...

Use & Care Guide
Page 20
... is operated and maintained according to instructions attached to or furnished with the product, KitchenAid brand of Whirlpool Corporation or Whirlpool Canada LP (hereafter "KitchenAid") will pay for Factory Specified Parts for the stainless steel oven cavity/inner door if the part rusts through tenth years from date of purchase, when this major appliance is operated...
... is operated and maintained according to instructions attached to or furnished with the product, KitchenAid brand of Whirlpool Corporation or Whirlpool Canada LP (hereafter "KitchenAid") will pay for Factory Specified Parts for the stainless steel oven cavity/inner door if the part rusts through tenth years from date of purchase, when this major appliance is operated...
Dimension Guide
Page 1
... with the National Electrical Code, ANSI/NFPA 70-latest edition or CSA Standards C22.1-94, Canadian Electrical Code, Part 1 and C22.2 No. Model/serial number plate q Models rated from the oven should be between 41" (104.1 cm) and 41½" (105.6 cm) for planning purposes only. ...the instructions provided for serviceability of cutout to floor is acceptable. cabinet width B. 1" (2.5 cm) top of cutout to bottom of upper cabinet door C. 19¹⁄₄" (48.9 cm) bottom of cutout to floor is for it is recommended that a qualified electrical installer determine that ...
... with the National Electrical Code, ANSI/NFPA 70-latest edition or CSA Standards C22.1-94, Canadian Electrical Code, Part 1 and C22.2 No. Model/serial number plate q Models rated from the oven should be between 41" (104.1 cm) and 41½" (105.6 cm) for planning purposes only. ...the instructions provided for serviceability of cutout to floor is acceptable. cabinet width B. 1" (2.5 cm) top of cutout to bottom of upper cabinet door C. 19¹⁄₄" (48.9 cm) bottom of cutout to floor is for it is recommended that a qualified electrical installer determine that ...

Installation Guide
Page 1
...matières BUILT-IN MICROWAVE/OVEN COMBINATION SAFETY 1 INSTALLATION REQUIREMENTS 2 Tools and Parts 2 Built-In Microwave/Oven Combination Location Requirements 2 Electrical Requirements 4 INSTALLATION INSTRUCTIONS 5 Prepare Built-In Microwave/Oven Combination 5 Remove Oven Door 5 Make Electrical Connection 5 Install Oven 7 Complete Installation 8 SÉCURIT...du four 13 Raccordement électrique 13 Installation du four 15 Achever l'installation 16 BUILT-IN MICROWAVE/OVEN COMBINATION SAFETY Your safety and the safety of injury, and tell you what the potential hazard is...
...matières BUILT-IN MICROWAVE/OVEN COMBINATION SAFETY 1 INSTALLATION REQUIREMENTS 2 Tools and Parts 2 Built-In Microwave/Oven Combination Location Requirements 2 Electrical Requirements 4 INSTALLATION INSTRUCTIONS 5 Prepare Built-In Microwave/Oven Combination 5 Remove Oven Door 5 Make Electrical Connection 5 Install Oven 7 Complete Installation 8 SÉCURIT...du four 13 Raccordement électrique 13 Installation du four 15 Achever l'installation 16 BUILT-IN MICROWAVE/OVEN COMBINATION SAFETY Your safety and the safety of injury, and tell you what the potential hazard is...

Installation Guide
Page 5
...racks and other injury. 2. Remove and set the oven onto cardboard prior to the oven's final location. Open the oven door. 2. WARNING Electrical Shock Hazard Disconnect power before servicing. Lift and pull oven door toward you must use handle or any portion of ... for lifting. 3. Failure to follow these instructions can result in back or other parts from the oven. 4. INSTALLATION INSTRUCTIONS Prepare Built-In Microwave/Oven Combination 1. Locate existing wiring to remove oven door(s). 1. Failure to follow these instructions can result in death, fire, or electrical...
...racks and other injury. 2. Remove and set the oven onto cardboard prior to the oven's final location. Open the oven door. 2. WARNING Electrical Shock Hazard Disconnect power before servicing. Lift and pull oven door toward you must use handle or any portion of ... for lifting. 3. Failure to follow these instructions can result in back or other parts from the oven. 4. INSTALLATION INSTRUCTIONS Prepare Built-In Microwave/Oven Combination 1. Locate existing wiring to remove oven door(s). 1. Failure to follow these instructions can result in death, fire, or electrical...

Installation Guide
Page 8
... oven door and slowly remove container. Dispose of Lower Oven 1. Press COOK and set up the clock and any other preferences, if available. or circuit breaker has not tripped. ■ Electrical supply is intact and tight; If you purchased your tools. 3. Let microwave oven complete cooking time. Complete Installation 1. If there is an extra part...
... oven door and slowly remove container. Dispose of Lower Oven 1. Press COOK and set up the clock and any other preferences, if available. or circuit breaker has not tripped. ■ Electrical supply is intact and tight; If you purchased your tools. 3. Let microwave oven complete cooking time. Complete Installation 1. If there is an extra part...

Microwave Use and Care
Page 4
.... (b) Do not place any object between the oven front face and the door or allow the container to facilitate cooking. - This device complies with Part 18 of fire in use this oven with the door open since open-door operation can result in oven. - IMPORTANT SAFETY INSTRUCTIONS ■ Liquids, such... as water, coffee, or tea are placed inside the oven should be run with the circuit conductors...
.... (b) Do not place any object between the oven front face and the door or allow the container to facilitate cooking. - This device complies with Part 18 of fire in use this oven with the door open since open-door operation can result in oven. - IMPORTANT SAFETY INSTRUCTIONS ■ Liquids, such... as water, coffee, or tea are placed inside the oven should be run with the circuit conductors...
Microwave Use and Care
Page 5
... The location and appearance of the features shown here may have some or all of the parts. H Convection Rack The convection rack provides optimal heat circulation for pan-frying (pan-browning) foods in the microwave oven. ■ The crisper pan will become hot. Turntable F. Crisper Pan and Handle Turntable ...handle to help avoid scratches. ■ See "Assistance or Service" section to run until the microwave oven door is opened or CANCEL is ideal for convection cooking. The microwave oven you have purchased may not match those of pan, squeeze handle, and lift pan. ■ ...
... The location and appearance of the features shown here may have some or all of the parts. H Convection Rack The convection rack provides optimal heat circulation for pan-frying (pan-browning) foods in the microwave oven. ■ The crisper pan will become hot. Turntable F. Crisper Pan and Handle Turntable ...handle to help avoid scratches. ■ See "Assistance or Service" section to run until the microwave oven door is opened or CANCEL is ideal for convection cooking. The microwave oven you have purchased may not match those of pan, squeeze handle, and lift pan. ■ ...

Microwave Use and Care
Page 10
...the turntable off, food should be in place and correct side up when microwave oven is normal during microwave cooking. Arranging If heating irregularly shaped or different sized foods, arrange the thinner parts and smaller sized items toward the center. Piercing Before heating, use if turntable... increments of the food. Plastic wrap should not be turned back at once, the longer the cook time needed. Condensation on the microwave oven door. ■ To avoid damage to burst. If using oversized cookware that have a skin or membrane, such as cake. 10 See "Aluminum...
...the turntable off, food should be in place and correct side up when microwave oven is normal during microwave cooking. Arranging If heating irregularly shaped or different sized foods, arrange the thinner parts and smaller sized items toward the center. Piercing Before heating, use if turntable... increments of the food. Plastic wrap should not be turned back at once, the longer the cook time needed. Condensation on the microwave oven door. ■ To avoid damage to burst. If using oversized cookware that have a skin or membrane, such as cake. 10 See "Aluminum...

Microwave Use and Care
Page 14
... function not active for manual reheating. 6. When the stop time is reached, the oven will shut off automatically and "Reheat Complete" will sound every minute. 4. Touch CANCEL or open the door to shield parts of food such as possible during or at the end of the cycle for more ...even defrosting. ■ Foods left outside the freezer for defrosting a number of Normal, More, or Less. 3. The upper oven display will count down the reheat...
... function not active for manual reheating. 6. When the stop time is reached, the oven will shut off automatically and "Reheat Complete" will sound every minute. 4. Touch CANCEL or open the door to shield parts of food such as possible during or at the end of the cycle for more ...even defrosting. ■ Foods left outside the freezer for defrosting a number of Normal, More, or Less. 3. The upper oven display will count down the reheat...

Microwave Use and Care
Page 19
... Convection Chart OR Touch EASYCONVECT™ repeatedly to stainless steel surfaces, do not use . ■ affresh™ Kitchen Appliance Cleaner Part Number W10355010 (not included): See "Assistance or Service" section to 11 hours and 59 minutes. Touch the number keypads to set temperature... and dry with one-time or limited use soapfilled scouring pads, abrasive cleaners, steel-wool pads, gritty washcloths or some models) MICROWAVE OVEN DOOR EXTERIOR Cleaning Method: ■ Glass cleaner and a soft cloth or sponge: Apply glass cleaner to stainless steel surfaces, even with soft...
... Convection Chart OR Touch EASYCONVECT™ repeatedly to stainless steel surfaces, do not use . ■ affresh™ Kitchen Appliance Cleaner Part Number W10355010 (not included): See "Assistance or Service" section to 11 hours and 59 minutes. Touch the number keypads to set temperature... and dry with one-time or limited use soapfilled scouring pads, abrasive cleaners, steel-wool pads, gritty washcloths or some models) MICROWAVE OVEN DOOR EXTERIOR Cleaning Method: ■ Glass cleaner and a soft cloth or sponge: Apply glass cleaner to stainless steel surfaces, even with soft...
Microwave Use and Care
Page 23
...; Electric element ■ Solid state touch control system parts SECOND THROUGH TENTH YEAR LIMITED WARRANTY On microwave ovens only, in the second through due to defects in accordance with the product, KitchenAid will pay for Factory Specified Parts for the stainless steel oven cavity/inner door if the part rusts through tenth years from date of purchase...
...; Electric element ■ Solid state touch control system parts SECOND THROUGH TENTH YEAR LIMITED WARRANTY On microwave ovens only, in the second through due to defects in accordance with the product, KitchenAid will pay for Factory Specified Parts for the stainless steel oven cavity/inner door if the part rusts through tenth years from date of purchase...


