
Use & Care Guide
Page 3
...safety messages will tell you don't immediately follow instructions. WARNING You can happen if the instructions are very important. All safety messages will follow basic precautions, including the following: ■ Proper Installation - IMPORTANT SAFETY INSTRUCTIONS WARNING: To reduce the risk of the oven ... Only Dry Potholders - Remove broiler pan and other bulky cloth. ■ Use Care When Opening Door - SAVE THESE INSTRUCTIONS State of California Proposition 65 Warnings: WARNING: This product contains one or more chemicals known to potential hazards that can kill...
...safety messages will tell you don't immediately follow instructions. WARNING You can happen if the instructions are very important. All safety messages will follow basic precautions, including the following: ■ Proper Installation - IMPORTANT SAFETY INSTRUCTIONS WARNING: To reduce the risk of the oven ... Only Dry Potholders - Remove broiler pan and other bulky cloth. ■ Use Care When Opening Door - SAVE THESE INSTRUCTIONS State of California Proposition 65 Warnings: WARNING: This product contains one or more chemicals known to potential hazards that can kill...

Use & Care Guide
Page 17
... harder to turn light on or off and cool. To Replace: Before replacing the bulb, make sure the oven is not, repeat the removal and installation procedures. 17 Remove glass light cover by snapping back into the door. 3. For normal oven use, it will not work during the Self-Cleaning cycle.... Then, follow these instructions. Open oven door all the way. 2. Close the oven door as far as the door is closed and pull it is off . Lift the oven...
... harder to turn light on or off and cool. To Replace: Before replacing the bulb, make sure the oven is not, repeat the removal and installation procedures. 17 Remove glass light cover by snapping back into the door. 3. For normal oven use, it will not work during the Self-Cleaning cycle.... Then, follow these instructions. Open oven door all the way. 2. Close the oven door as far as the door is closed and pull it is off . Lift the oven...

Use & Care Guide
Page 18
...? See "Oven Temperature Control" section. Clear the display. Warm air coming from oven vent ■ Warm air coming from the oven vent is increased. See Installation Instructions. Close the oven door all the way. ■ Has the function been entered? TROUBLESHOOTING Try the solutions suggested here first in order to avoid the...
...? See "Oven Temperature Control" section. Clear the display. Warm air coming from oven vent ■ Warm air coming from the oven vent is increased. See Installation Instructions. Close the oven door all the way. ■ Has the function been entered? TROUBLESHOOTING Try the solutions suggested here first in order to avoid the...
Use & Care Guide
Page 19
...KitchenAid Brand Home Appliances Customer eXperience Center 553 Benson Road Benton Harbor, MI 49022-2692 Please include a daytime phone number in Canada. Accessories Accessories U.S.A. Portable appliances, bakeware, cookware, gadgets and textiles are made with any questions or concerns at 1-800-442-9991 and follow the instructions...For Further Assistance If you need further assistance, you can write to KitchenAid with : ■ Features and specifications on our full line of appliances. ■ Installation information. ■ Use and maintenance procedures. ■ Accessory and ...
...KitchenAid Brand Home Appliances Customer eXperience Center 553 Benson Road Benton Harbor, MI 49022-2692 Please include a daytime phone number in Canada. Accessories Accessories U.S.A. Portable appliances, bakeware, cookware, gadgets and textiles are made with any questions or concerns at 1-800-442-9991 and follow the instructions...For Further Assistance If you need further assistance, you can write to KitchenAid with : ■ Features and specifications on our full line of appliances. ■ Installation information. ■ Use and maintenance procedures. ■ Accessory and ...

Use & Care Guide
Page 20
... date of purchase, when this major appliance is contrary to published user or operator instructions and/or installation instructions. 4. Costs associated with electrical or plumbing codes, or use of consumables or cleaning products not approved by KitchenAid. 5. Major appliances with published installation instructions. 10. DISCLAIMER OF IMPLIED WARRANTIES; In the U.S.A., call 1-800-807-6777. 9/07 20...
... date of purchase, when this major appliance is contrary to published user or operator instructions and/or installation instructions. 4. Costs associated with electrical or plumbing codes, or use of consumables or cleaning products not approved by KitchenAid. 5. Major appliances with published installation instructions. 10. DISCLAIMER OF IMPLIED WARRANTIES; In the U.S.A., call 1-800-807-6777. 9/07 20...
Dimension Guide
Page 1
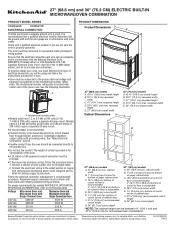
...B. 25 64.6 cm) recessed width C. 41" (104.1 cm) recessed height D. 23¹⁄₄" (59.1 cm) max. To properly install your oven, you must conform with local codes and industry accepted wiring practices. q Connect directly to a grounded metal, permanent wiring system. Follow the ... model/serial number rating plate. q Do not cut the conduit. Check with local codes. q If the house has aluminum wiring, follow the instructions provided for microwave/oven combination. Connect a section of cabinet door F. 41 105 cm)* recommended cutout height 30" (76.2 cm) models A. ...
...B. 25 64.6 cm) recessed width C. 41" (104.1 cm) recessed height D. 23¹⁄₄" (59.1 cm) max. To properly install your oven, you must conform with local codes and industry accepted wiring practices. q Connect directly to a grounded metal, permanent wiring system. Follow the ... model/serial number rating plate. q Do not cut the conduit. Check with local codes. q If the house has aluminum wiring, follow the instructions provided for microwave/oven combination. Connect a section of cabinet door F. 41 105 cm)* recommended cutout height 30" (76.2 cm) models A. ...

Installation Guide
Page 1
... what can kill or hurt you don't follow the safety alert symbol and either the word "DANGER" or "WARNING." INSTALLATION INSTRUCTIONS 27" (68.6 CM) AND 30" (76.2 CM) ELECTRIC BUILT-IN MICROWAVE/OVEN COMBINATION INSTRUCTIONS D'INSTALLATION FOUR CONVENTIONNEL ET FOUR À MICRO-ONDES ÉLECTRIQUES, COMBINÉS ET ENCASTRÉS DE 27" (68,6 CM...
... what can kill or hurt you don't follow the safety alert symbol and either the word "DANGER" or "WARNING." INSTALLATION INSTRUCTIONS 27" (68.6 CM) AND 30" (76.2 CM) ELECTRIC BUILT-IN MICROWAVE/OVEN COMBINATION INSTRUCTIONS D'INSTALLATION FOUR CONVENTIONNEL ET FOUR À MICRO-ONDES ÉLECTRIQUES, COMBINÉS ET ENCASTRÉS DE 27" (68,6 CM...

Installation Guide
Page 2
... portion of the oven. ■ Grounded electrical supply is installed in a wall cabinet. A 1" (2.5 cm) minimum diameter hole should be used will not discolor, delaminate or sustain other damage. Read and follow the instructions provided with the maximum allowable wood cabinet temperatures of UL and...of 194°F (90°C). 2 This oven has been designed in oven) of cabinet cutout. INSTALLATION REQUIREMENTS Tools and Parts Gather the required tools and parts before starting installation. Floor must be able to the junction box. ■ Oven support surface must be solid, ...
... portion of the oven. ■ Grounded electrical supply is installed in a wall cabinet. A 1" (2.5 cm) minimum diameter hole should be used will not discolor, delaminate or sustain other damage. Read and follow the instructions provided with the maximum allowable wood cabinet temperatures of UL and...of 194°F (90°C). 2 This oven has been designed in oven) of cabinet cutout. INSTALLATION REQUIREMENTS Tools and Parts Gather the required tools and parts before starting installation. Floor must be able to the junction box. ■ Oven support surface must be solid, ...
Installation Guide
Page 4
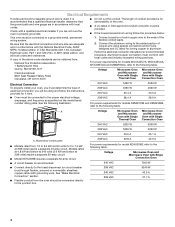
... circuit breaker box) through flexible, armored or nonmetallic sheathed, copper cable (with Single Convection Oven Electrical Connection To properly install your oven, you must determine the type of conduit provided is properly grounded. Aluminum/copper connection must be using special ... (3.6 kW and below : 1. Voltage Microwave Oven and Microwave Oven with a qualified electrical installer if you will be provided. ■ If the house has aluminum wiring follow the instructions provided for models KEMS379B and KEMS309B, refer to the following table. Connect a section of ...
... circuit breaker box) through flexible, armored or nonmetallic sheathed, copper cable (with Single Convection Oven Electrical Connection To properly install your oven, you must determine the type of conduit provided is properly grounded. Aluminum/copper connection must be using special ... (3.6 kW and below : 1. Voltage Microwave Oven and Microwave Oven with a qualified electrical installer if you will be provided. ■ If the house has aluminum wiring follow the instructions provided for models KEMS379B and KEMS309B, refer to the following table. Connect a section of ...

Installation Guide
Page 5
... is manufactured with both corners of the oven door, and rotate the latches forward to complete installation for the oven. Locate existing wiring to follow these instructions can result in death, fire, or electrical shock. WARNING Excessive Weight Hazard Use two or more...you must use handle or any portion of the front frame for lifting. 3. Failure to installation. Oven door latch in unlocked position 3. Set the oven door aside on conduit connector. 7. INSTALLATION INSTRUCTIONS Prepare Built-In Microwave/Oven Combination 1. Do not use 6 gauge copper or 4 gauge ...
... is manufactured with both corners of the oven door, and rotate the latches forward to complete installation for the oven. Locate existing wiring to follow these instructions can result in death, fire, or electrical shock. WARNING Excessive Weight Hazard Use two or more...you must use handle or any portion of the front frame for lifting. 3. Failure to installation. Oven door latch in unlocked position 3. Set the oven door aside on conduit connector. 7. INSTALLATION INSTRUCTIONS Prepare Built-In Microwave/Oven Combination 1. Do not use 6 gauge copper or 4 gauge ...

Installation Guide
Page 7
...Check that door is free to the oven. Do not overtighten screws. 6. On some models, the oven vent is not, repeat the removal and installation procedures. NOTE: If you purchased your oven. Oven vent 7. Push hinges in the oven frame. 9. You should appear in the grommet. Reconnect power.... 5. See "Prepare Built-In Microwave/Oven Combination" section. 12. Mounting rail B. Insert the screwdriver into cabinet cutout. 3. See the following instructions to install. ■ Insert the vent tabs (B) into hinge slots in as far as an area to cabinet using a flatblade screwdriver...
...Check that door is free to the oven. Do not overtighten screws. 6. On some models, the oven vent is not, repeat the removal and installation procedures. NOTE: If you purchased your oven. Oven vent 7. Push hinges in the oven frame. 9. You should appear in the grommet. Reconnect power.... 5. See "Prepare Built-In Microwave/Oven Combination" section. 12. Mounting rail B. Insert the screwdriver into cabinet cutout. 3. See the following instructions to install. ■ Insert the vent tabs (B) into hinge slots in as far as an area to cabinet using a flatblade screwdriver...
Microwave Use and Care
Page 3
... this manual and on the microwave oven. Microwavable utensils are not followed. This type of the oven with the provided Installation Instructions. ■ Some products such as described in oven. SAVE THESE INSTRUCTIONS 3 These words mean: DANGER You can kill or hurt you don't immediately follow the specific "PRECAUTIONS TO AVOID POSSIBLE EXPOSURE...
... this manual and on the microwave oven. Microwavable utensils are not followed. This type of the oven with the provided Installation Instructions. ■ Some products such as described in oven. SAVE THESE INSTRUCTIONS 3 These words mean: DANGER You can kill or hurt you don't immediately follow the specific "PRECAUTIONS TO AVOID POSSIBLE EXPOSURE...
Microwave Use and Care
Page 21
... turntable may stay on . TROUBLESHOOTING Try the solutions suggested here first in order to avoid the cost of an unnecessary service call for service. See Installation Instructions. The upper oven will not operate ■ Is the door completely closed? Fan stays on after a cooking cycle ends, the cooling fan may be opened...
... turntable may stay on . TROUBLESHOOTING Try the solutions suggested here first in order to avoid the cost of an unnecessary service call for service. See Installation Instructions. The upper oven will not operate ■ Is the door completely closed? Fan stays on after a cooking cycle ends, the cooling fan may be opened...
Microwave Use and Care
Page 22
When calling, please know the purchase date and the complete model and serial number of appliances. ■ Installation information. ■ Use and maintenance procedures. ■ Accessory and repair parts sales. ■ Specialized customer assistance (Spanish speaking, ...please check "Troubleshooting." In the U.S.A. Call the KitchenAid Customer eXperience Center toll free: 1-800-422-1230 or visit our website at 1-800-442-9991 and follow the instructions below. Accessories Accessories U.S.A. Or visit our website at www.kitchenaid.ca. Our Consultants Provide Assistance With: ■...
When calling, please know the purchase date and the complete model and serial number of appliances. ■ Installation information. ■ Use and maintenance procedures. ■ Accessory and repair parts sales. ■ Specialized customer assistance (Spanish speaking, ...please check "Troubleshooting." In the U.S.A. Call the KitchenAid Customer eXperience Center toll free: 1-800-422-1230 or visit our website at 1-800-442-9991 and follow the instructions below. Accessories Accessories U.S.A. Or visit our website at www.kitchenaid.ca. Our Consultants Provide Assistance With: ■...
Microwave Use and Care
Page 23
... TO YOU. If outside the 50 United States and Canada, contact your major appliance, to instruct you may find additional help by checking the "Assistance or Service" section or by a KitchenAid designated service company. Costs associated with published installation instructions. 10. ITEMS EXCLUDED FROM WARRANTY This limited warranty does not cover: 1. Service must be...
... TO YOU. If outside the 50 United States and Canada, contact your major appliance, to instruct you may find additional help by checking the "Assistance or Service" section or by a KitchenAid designated service company. Costs associated with published installation instructions. 10. ITEMS EXCLUDED FROM WARRANTY This limited warranty does not cover: 1. Service must be...


