
Use & Care Guide
Page 17
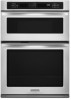
... grasping the front edge and pulling away from socket. 4. Check that the door is opened . If it is not, repeat the removal and installation procedures. 17 CONTROL PANEL To avoid damage to the control panel, do not touch bulb with porcelain and staining, etching, pitting or faint white...close . Then, follow these instructions. To Remove: 1. Flip up the hinge latch on the glass surface of vegetable oil applied to the rack guides will discolor and become harder to slide. Lift the oven door while holding both hanger arms into wall. 6. Move the hinge levers back to ...
... grasping the front edge and pulling away from socket. 4. Check that the door is opened . If it is not, repeat the removal and installation procedures. 17 CONTROL PANEL To avoid damage to the control panel, do not touch bulb with porcelain and staining, etching, pitting or faint white...close . Then, follow these instructions. To Remove: 1. Flip up the hinge latch on the glass surface of vegetable oil applied to the rack guides will discolor and become harder to slide. Lift the oven door while holding both hanger arms into wall. 6. Move the hinge levers back to ...

Use & Care Guide
Page 20
... 1. Service calls to obtain service under these excluded circumstances shall be provided by calling KitchenAid. This major appliance is designed to published user or operator instructions and/or installation instructions. 4. DISCLAIMER OF IMPLIED WARRANTIES; LIMITATION OF REMEDIES CUSTOMER'S SOLE AND EXCLUSIVE REMEDY... apply. Cosmetic damage, including scratches, dents, chips or other than normal, single-family household use of the Use & Care Guide. Repairs to correct house wiring or plumbing. 2. SOME STATES AND PROVINCES DO NOT ALLOW THE EXCLUSION OR LIMITATION OF INCIDENTAL OR...
... 1. Service calls to obtain service under these excluded circumstances shall be provided by calling KitchenAid. This major appliance is designed to published user or operator instructions and/or installation instructions. 4. DISCLAIMER OF IMPLIED WARRANTIES; LIMITATION OF REMEDIES CUSTOMER'S SOLE AND EXCLUSIVE REMEDY... apply. Cosmetic damage, including scratches, dents, chips or other than normal, single-family household use of the Use & Care Guide. Repairs to correct house wiring or plumbing. 2. SOME STATES AND PROVINCES DO NOT ALLOW THE EXCLUSION OR LIMITATION OF INCIDENTAL OR...

Installation Guide
Page 7
... #8-18 x ³⁄₈" screw D. See "Prepare Built-In Microwave/Oven Combination" section. 12. Mounting rail B. Rotate both hinge latches back to install. ■ Insert the vent tabs (B) into hinge slots in the oven frame. ■ With one #8-18 x ³⁄₈" screw (C) for each... side of the Use and Care Guide or contact the dealer from whom you have model KEMS308S, KEHU309S or KEMS378S, proceed to cabinet using a flatblade screwdriver. NOTE: Push against ...
... #8-18 x ³⁄₈" screw D. See "Prepare Built-In Microwave/Oven Combination" section. 12. Mounting rail B. Rotate both hinge latches back to install. ■ Insert the vent tabs (B) into hinge slots in the oven frame. ■ With one #8-18 x ³⁄₈" screw (C) for each... side of the Use and Care Guide or contact the dealer from whom you have model KEMS308S, KEHU309S or KEMS378S, proceed to cabinet using a flatblade screwdriver. NOTE: Push against ...

Installation Guide
Page 8
... Assistance or Service: Please reference the "Assistance or Service" section of the Use and Care Guide or contact the dealer from whom you have all of /recycle all parts are now installed. Check that you purchased your tools. 3. Fill a microwave-safe container with 1 cup (...00" minutes. At first use and cleaning, read the Use and Care Guide. 3. The microwave should turn off . 4. Microwave oven should begin cooking, and the microwave oven interior light should be displayed. Complete Installation 1. Check that all packaging materials. 4. For oven use , set microwave ...
... Assistance or Service: Please reference the "Assistance or Service" section of the Use and Care Guide or contact the dealer from whom you have all of /recycle all parts are now installed. Check that you purchased your tools. 3. Fill a microwave-safe container with 1 cup (...00" minutes. At first use and cleaning, read the Use and Care Guide. 3. The microwave should turn off . 4. Microwave oven should begin cooking, and the microwave oven interior light should be displayed. Complete Installation 1. Check that all packaging materials. 4. For oven use , set microwave ...
Microwave Use and Care
Page 23
... is used in accordance with the removal from the date of the Use & Care Guide. Major appliances with published installation instructions. 10. Outside the 50 United States and Canada, this warranty. 7. Repairs to or furnished with the product, KitchenAid will pay for the stainless steel oven cavity/inner door if the part rusts...
... is used in accordance with the removal from the date of the Use & Care Guide. Major appliances with published installation instructions. 10. Outside the 50 United States and Canada, this warranty. 7. Repairs to or furnished with the product, KitchenAid will pay for the stainless steel oven cavity/inner door if the part rusts...


