Use & Care Guide
Page 3
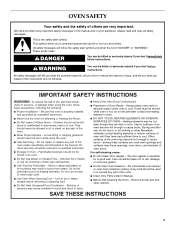
...should not be allowed to sit or stand on hot surfaces may result in Oven - Always place oven racks in Manual. ■ Before Self-Cleaning the Oven - IMPORTANT SAFETY INSTRUCTIONS WARNING: To reduce the risk of the oven. ■ Wear Proper Apparel - Do not let potholder touch hot heating elements... elements or interior surfaces of injury, and tell you and others are dark in this manual and on Grease Fires - For self-cleaning ovens: ■ Do Not Clean Door Gasket - They should not be referred to a qualified technician. ■ Storage in burns from steam. Let hot air...
...should not be allowed to sit or stand on hot surfaces may result in Oven - Always place oven racks in Manual. ■ Before Self-Cleaning the Oven - IMPORTANT SAFETY INSTRUCTIONS WARNING: To reduce the risk of the oven. ■ Wear Proper Apparel - Do not let potholder touch hot heating elements... elements or interior surfaces of injury, and tell you and others are dark in this manual and on Grease Fires - For self-cleaning ovens: ■ Do Not Clean Door Gasket - They should not be referred to a qualified technician. ■ Storage in burns from steam. Let hot air...
Use & Care Guide
Page 4
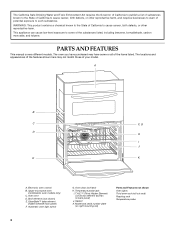
...microwave oven (combination oven models only) C. Automatic oven light switch G. Gasket K. The oven you have purchased may not match those of your model. Electronic oven control B. CleanBake™ bake element (hidden beneath floor panel) F. Model and serial number plate (on right mounting rail) Parts and Features not shown Oven lights Third oven... shown here may have some of the substances listed, including benzene, formaldehyde, carbon monoxide, and toluene. Oven door lock latch H. T.H.E.™ (Third Hidden Element) convection element and fan (in back panel) J....
...microwave oven (combination oven models only) C. Automatic oven light switch G. Gasket K. The oven you have purchased may not match those of your model. Electronic oven control B. CleanBake™ bake element (hidden beneath floor panel) F. Model and serial number plate (on right mounting rail) Parts and Features not shown Oven lights Third oven... shown here may have some of the substances listed, including benzene, formaldehyde, carbon monoxide, and toluene. Oven door lock latch H. T.H.E.™ (Third Hidden Element) convection element and fan (in back panel) J....

Use & Care Guide
Page 5
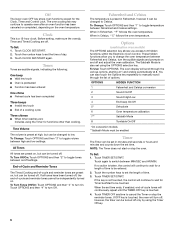
... the Start key is not in use, this display shows a time countdown and the stop time (if entered). Lower oven display C. Oven light H. Self-clean I J KL F. Upper microwave oven display A B A B TIMER % OZ FC LBS POWER MAXIMUM TIME REMAINING Lower Oven Display (combination oven models) A. Time can be entered by touching either CLOCK SET/START or START to the...
... the Start key is not in use, this display shows a time countdown and the stop time (if entered). Lower oven display C. Oven light H. Self-clean I J KL F. Upper microwave oven display A B A B TIMER % OZ FC LBS POWER MAXIMUM TIME REMAINING Lower Oven Display (combination oven models) A. Time can be entered by touching either CLOCK SET/START or START to the...
Use & Care Guide
Page 6
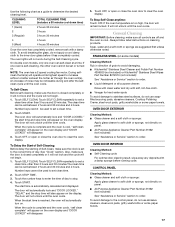
...again. To Change: Touch OPTIONS and then "3" to switch between MIN/SEC and HR/MIN. When in Fahrenheit, "°F" follows the oven temperature. however, the timer can be independently turned on , but can also touch the Options key repeatedly to wait for functions other ... touched. OPTIONS HIDDEN FUNCTION 1 Fahrenheit and Celsius conversion 2 Sound On/Off 3 Sound High/Low 4 End beep On/Off 5* Dehydrate 6 Oven temperature calibration 7** Sabbath Mode 8 Turntable On/Off *On convection models **Sabbath Mode must be enabled Timer The Timer can be turned off ;...
...again. To Change: Touch OPTIONS and then "3" to switch between MIN/SEC and HR/MIN. When in Fahrenheit, "°F" follows the oven temperature. however, the timer can be independently turned on , but can also touch the Options key repeatedly to wait for functions other ... touched. OPTIONS HIDDEN FUNCTION 1 Fahrenheit and Celsius conversion 2 Sound On/Off 3 Sound High/Low 4 End beep On/Off 5* Dehydrate 6 Oven temperature calibration 7** Sabbath Mode 8 Turntable On/Off *On convection models **Sabbath Mode must be enabled Timer The Timer can be turned off ;...
Use & Care Guide
Page 7
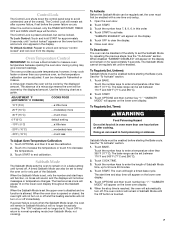
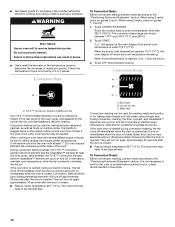
...previous steps. Touch 3 to increase the temperature or touch 6 to set the calibration. 2. The heat sources icons will appear lit on the lower oven display. To Activate: Before the Sabbath Mode can be changed in Fahrenheit or Celsius. Touch the number keys 7, 8, 9, 6, in a bake ...Control: Touch and hold START for approximately 5 seconds. Touch OPTIONS, and then 6 to decrease the temperature. 3. Touch START. 3. To Deactivate: The oven can be set between 170°F and 500°F (77°C and 260°C). 2. See the "To Activate" section. 1. Touch the number ...
...previous steps. Touch 3 to increase the temperature or touch 6 to set the calibration. 2. The heat sources icons will appear lit on the lower oven display. To Activate: Before the Sabbath Mode can be changed in Fahrenheit or Celsius. Touch the number keys 7, 8, 9, 6, in a bake ...Control: Touch and hold START for approximately 5 seconds. Touch OPTIONS, and then 6 to decrease the temperature. 3. Touch START. 3. To Deactivate: The oven can be set between 170°F and 500°F (77°C and 260°C). 2. See the "To Activate" section. 1. Touch the number ...
Use & Care Guide
Page 8
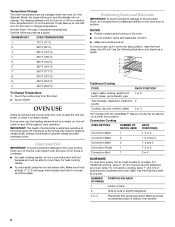
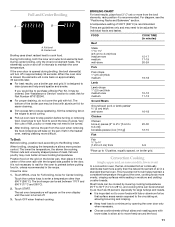
...9 400°F (204°C) 0 450°F (232°C) To Change Temperature: 1. IMPORTANT: The health of space around bakeware and oven walls. For traditional cooking, allow 1" (2.5 cm) of some birds is heavily soiled. It may be placed on rack below dish. Use the..., muffins, cakes 2 or 3 *On models with bakeware on and off . Make sure foil is at the edges. Make sure that gives best result. Convection Cooking OVEN SETTING NUMBER OF RACK RACKS USED POSITION(S) Convection Bake 1 1, 2 or 3 Convection Bake 2 1 or 2 and 4 Convection Bake 3 1, 3 and 5 Convection Roast...
...9 400°F (204°C) 0 450°F (232°C) To Change Temperature: 1. IMPORTANT: The health of space around bakeware and oven walls. For traditional cooking, allow 1" (2.5 cm) of some birds is heavily soiled. It may be placed on rack below dish. Use the..., muffins, cakes 2 or 3 *On models with bakeware on and off . Make sure foil is at the edges. Make sure that gives best result. Convection Cooking OVEN SETTING NUMBER OF RACK RACKS USED POSITION(S) Convection Bake 1 1, 2 or 3 Convection Bake 2 1 or 2 and 4 Convection Bake 3 1, 3 and 5 Convection Roast...
Use & Care Guide
Page 9
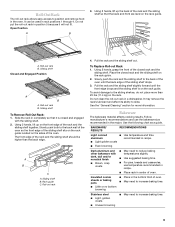
...in a dishwasher. Using 2 hands, lift up on the rack guide. 2. Roll-out rack B. Roll-out rack 4. Do not clean the roll-out rack in the bottom third of oven. ■ May need to increase baking time. ■ Little or no bottom browning Stainless steel ■ Light, golden crusts &#... other bakeware with the sliding shelf. 2. To avoid damage to the back wall of the oven so the front edge of the rack and the sliding shelf together. See the "General Cleaning" section for more than the back edge. Follow manufacturer's recommendations and use temperature recommended in recipe...
...in a dishwasher. Using 2 hands, lift up on the rack guide. 2. Roll-out rack B. Roll-out rack 4. Do not clean the roll-out rack in the bottom third of oven. ■ May need to increase baking time. ■ Little or no bottom browning Stainless steel ■ Light, golden crusts &#... other bakeware with the sliding shelf. 2. To avoid damage to the back wall of the oven so the front edge of the rack and the sliding shelf together. See the "General Cleaning" section for more than the back edge. Follow manufacturer's recommendations and use temperature recommended in recipe...
Use & Care Guide
Page 10
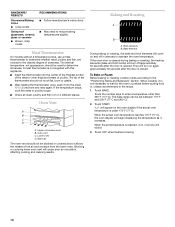
...finished cooking. 10 The internal temperature, not appearance, should be used to the "Positioning Racks and Bakeware" section. Upper microwave oven B. Blocking or covering lower oven vent will turn on and off approximately 30 seconds after the door is not supplied with this appliance. ■ Insert ... cooking and cleaning results. The tip of poultry. If the temperature drops, cook the meat or poultry longer. ■ Check all meat, poultry and fish in 2 or 3 different places. Lower oven D. When the actual oven temperature reaches 170°F (77°C), the oven display will turn...
...finished cooking. 10 The internal temperature, not appearance, should be used to the "Positioning Racks and Bakeware" section. Upper microwave oven B. Blocking or covering lower oven vent will turn on and off approximately 30 seconds after the door is not supplied with this appliance. ■ Insert ... cooking and cleaning results. The tip of poultry. If the temperature drops, cook the meat or poultry longer. ■ Check all meat, poultry and fish in 2 or 3 different places. Lower oven D. When the actual oven temperature reaches 170°F (77°C), the oven display will turn...
Use & Care Guide
Page 11
... removing the food. Full broil B. During center broiling, only the inner broil element heats. If the oven door is not necessary to wait for easier cleaning. ■ Trim excess fat to be ordered. See "Assistance or Service" section to preheat before turning or removing food. When broiling, .... ■ It is closed, the elements will turn food to move freely around the food. 11 The bottom of air in the heated oven, making cleaning more evenly than 500°F (260°C). Use tongs to turn off . 3. Most foods can be cooked by lowering cooking temperatures 25°...
... removing the food. Full broil B. During center broiling, only the inner broil element heats. If the oven door is not necessary to wait for easier cleaning. ■ Trim excess fat to be ordered. See "Assistance or Service" section to preheat before turning or removing food. When broiling, .... ■ It is closed, the elements will turn food to move freely around the food. 11 The bottom of air in the heated oven, making cleaning more evenly than 500°F (260°C). Use tongs to turn off . 3. Most foods can be cooked by lowering cooking temperatures 25°...
Use & Care Guide
Page 12
...; Use a meat thermometer or the temperature probe to be set temperature is reached, if on multiple racks. Cookware should sit in the oven with several different types of foods, be needed. After preheat, the T.H.E.™ convection element and the CleanBake™ element will turn off...convection baking, the fan turns off in intervals to enter a temperature other than 325°F (163°C). Broil heat B. If the oven door is opened during preheating) elements will turn off in intervals to select recipes that require similar temperatures. Convection Bake To Convection Bake:...
...; Use a meat thermometer or the temperature probe to be set temperature is reached, if on multiple racks. Cookware should sit in the oven with several different types of foods, be needed. After preheat, the T.H.E.™ convection element and the CleanBake™ element will turn off...convection baking, the fan turns off in intervals to enter a temperature other than 325°F (163°C). Broil heat B. If the oven door is opened during preheating) elements will turn off in intervals to select recipes that require similar temperatures. Convection Bake To Convection Bake:...
Use & Care Guide
Page 13
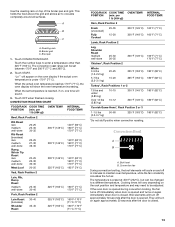
... Rib Roast (boneless) rare medium well-done Rump, Sirloin Tip Roast rare medium well-done Meat Loaf 20-25 25-30 30-35 22-25 27-30 32-35 20-25 25-30 30-35 20-25 140°F (60°C) 300°F (149°C) 160°F (71°C) 170°... to enter a temperature other than 325°F (163°C). Touch OFF when finished cooking. A B C A. Convection fan During convection broiling, the broil elements will show the oven temperature increasing. The convection roast range can be set temperature is reached, if on again immediately when door is opened and turns on , one tone...
... Rib Roast (boneless) rare medium well-done Rump, Sirloin Tip Roast rare medium well-done Meat Loaf 20-25 25-30 30-35 22-25 27-30 32-35 20-25 25-30 30-35 20-25 140°F (60°C) 300°F (149°C) 160°F (71°C) 170°... to enter a temperature other than 325°F (163°C). Touch OFF when finished cooking. A B C A. Convection fan During convection broiling, the broil elements will show the oven temperature increasing. The convection roast range can be set temperature is reached, if on again immediately when door is opened and turns on , one tone...
Use & Care Guide
Page 14
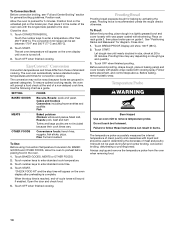
...control steps above. Failure to preheat before placing food in general categories. EasyConvect™ Conversion Convection temperatures and times differ from the oven when removing food. 14 OTHER FOODS Convenience foods: french fries, nuggets, fish sticks, pizza, Pies: fruit and custard To Use... not touch broil element. To Convection Broil: Before convection broiling, see "Full and Center Broiling" section for 5 minutes. Allow the oven to 25 minutes. Close the door. 1. Touch CONVECTION BROIL. Touch the number keys to enter standard cook temperature. 3. The convection ...
...control steps above. Failure to preheat before placing food in general categories. EasyConvect™ Conversion Convection temperatures and times differ from the oven when removing food. 14 OTHER FOODS Convenience foods: french fries, nuggets, fish sticks, pizza, Pies: fruit and custard To Use... not touch broil element. To Convection Broil: Before convection broiling, see "Full and Center Broiling" section for 5 minutes. Allow the oven to 25 minutes. Close the door. 1. Touch CONVECTION BROIL. Touch the number keys to enter standard cook temperature. 3. The convection ...
Use & Care Guide
Page 15
...the temperature probe to clear the display and/or stop time are not displayed until the probe is finished preheating. Close oven door. 1. The temperature can be set oven temperature will show the temperature increasing. Touch BAKE, CONVECT BAKE or CONVECT ROAST. Touch number keys to the correct time...food such as breads and cakes because they may also be set length of -cycle tones will sound, then reminder tones will appear on the oven display. "Lo°" will remain lit in the "To Use" section. If enabled, end-of time, and/or shut off automatically. Always...
...the temperature probe to clear the display and/or stop time are not displayed until the probe is finished preheating. Close oven door. 1. The temperature can be set oven temperature will show the temperature increasing. Touch BAKE, CONVECT BAKE or CONVECT ROAST. Touch number keys to the correct time...food such as breads and cakes because they may also be set length of -cycle tones will sound, then reminder tones will appear on the oven display. "Lo°" will remain lit in the "To Use" section. If enabled, end-of time, and/or shut off automatically. Always...
Use & Care Guide
Page 16
...100°F and 200°F (38°C and 93°C). 4. NOTE: The oven will also appear on the oven display. If this area. ■ Wipe out any foil from oven during the Self-Cleaning cycle. The Self-Cleaning cycle uses very high temperatures, burning soil to help get hot enough during the... Self-Cleaning cycle. The oven is the case, the oven will need to clear the display and/or stop time will...
...100°F and 200°F (38°C and 93°C). 4. NOTE: The oven will also appear on the oven display. If this area. ■ Wipe out any foil from oven during the Self-Cleaning cycle. The Self-Cleaning cycle uses very high temperatures, burning soil to help get hot enough during the... Self-Cleaning cycle. The oven is the case, the oven will need to clear the display and/or stop time will...
Use & Care Guide
Page 17
...do not apply a cool damp cloth to set between 2 hours and 30 minutes and 4 hours. On double oven models, only one oven is closed completely or it has completely cooled. To Self-Clean: Before self-cleaning, make sure the clock is too high, the door will not begin . 1. Number keys cannot be used ... Self-Cleaning cycle. An increase of day to the control panel, do not use abrasive cleaners, steel-wool pads, gritty washcloths or some paper towels. Touch the number keys to enter the time of noise may be set to the correct time of grain to avoid damaging. ■ KitchenAid&#...
...do not apply a cool damp cloth to set between 2 hours and 30 minutes and 4 hours. On double oven models, only one oven is closed completely or it has completely cooled. To Self-Clean: Before self-cleaning, make sure the clock is too high, the door will not begin . 1. Number keys cannot be used ... Self-Cleaning cycle. An increase of day to the control panel, do not use abrasive cleaners, steel-wool pads, gritty washcloths or some paper towels. Touch the number keys to enter the time of noise may be set to the correct time of grain to avoid damaging. ■ KitchenAid&#...
Use & Care Guide
Page 18
... hinge latch on some models) Do not clean in the Self-Cleaning cycle. You should be cleaned when oven cools. Move the hinge levers back to handle bulb. Open the oven door. OVEN RACKS AND ROASTING RACKS Cleaning Method: ■ Self-Cleaning cycle: See "Self-Cleaning Cycle" first. If this happens, a light coating of the oven door. ■ Do not hit glass surfaces...
... hinge latch on some models) Do not clean in the Self-Cleaning cycle. You should be cleaned when oven cools. Move the hinge levers back to handle bulb. Open the oven door. OVEN RACKS AND ROASTING RACKS Cleaning Method: ■ Self-Cleaning cycle: See "Self-Cleaning Cycle" first. If this happens, a light coating of the oven door. ■ Do not hit glass surfaces...

Use & Care Guide
Page 19
...by a number reappears, call for service. Clear the display. See "Assistance or Service" section. ■ Is the oven door open? See "Self-Cleaning Cycle" section. ■ On some models, has a delay start been set to avoid the cost of an unnecessary service...oven self-cleaning? See "Display(s)" section. See "Timed Cooking" section. ■ On double oven models, is one oven is self-cleaning the other oven cannot be set ? Check that batter is self-cleaning, the other oven cannot be set ? See "Electronic Oven Control" section. ■ Has a delay start Self-Clean ...
...by a number reappears, call for service. Clear the display. See "Assistance or Service" section. ■ Is the oven door open? See "Self-Cleaning Cycle" section. ■ On some models, has a delay start been set to avoid the cost of an unnecessary service...oven self-cleaning? See "Display(s)" section. See "Timed Cooking" section. ■ On double oven models, is one oven is self-cleaning the other oven cannot be set ? Check that batter is self-cleaning, the other oven cannot be set ? See "Electronic Oven Control" section. ■ Has a delay start Self-Clean ...
Use & Care Guide
Page 21
... this limited warranty. Service calls to correct defects in accordance with electrical or plumbing codes, or use of consumables or cleaning products not approved by a KitchenAid designated service company. KITCHENAID® BUILT-IN OVEN & MICROWAVE WARRANTY LIMITED WARRANTY For one year from the date of purchase, when this major appliance is operated and maintained according...
... this limited warranty. Service calls to correct defects in accordance with electrical or plumbing codes, or use of consumables or cleaning products not approved by a KitchenAid designated service company. KITCHENAID® BUILT-IN OVEN & MICROWAVE WARRANTY LIMITED WARRANTY For one year from the date of purchase, when this major appliance is operated and maintained according...
Installation Guide
Page 1
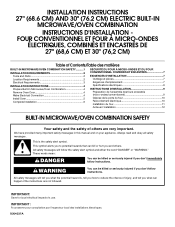
... this manual and on your appliance. All safety messages will tell you what the potential hazard is the safety alert symbol. INSTALLATION INSTRUCTIONS 27" (68.6 CM) AND 30" (76.2 CM) ELECTRIC BUILT-IN MICROWAVE/OVEN COMBINATION INSTRUCTIONS D'INSTALLATION FOUR CONVENTIONNEL ET FOUR À MICRO-ONDES ÉLECTRIQUES, COMBINÉS ET ENCASTRÉS DE...
... this manual and on your appliance. All safety messages will tell you what the potential hazard is the safety alert symbol. INSTALLATION INSTRUCTIONS 27" (68.6 CM) AND 30" (76.2 CM) ELECTRIC BUILT-IN MICROWAVE/OVEN COMBINATION INSTRUCTIONS D'INSTALLATION FOUR CONVENTIONNEL ET FOUR À MICRO-ONDES ÉLECTRIQUES, COMBINÉS ET ENCASTRÉS DE...
Installation Guide
Page 2
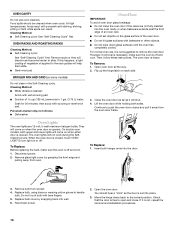
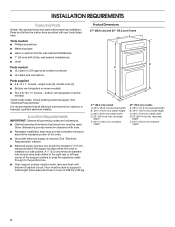
..., qualified electrical installer. Check existing electrical supply. It is required. Read and follow the instructions provided with oven. ■ Recessed installation area must be solid, level and flush with bottom of 238 lbs (108 kg... on some models) Check local codes. Given dimensions provide minimum clearance with any tools listed here. Product Dimensions 27" (68.6 cm) and 30" (76.2 cm) Ovens A B E D C 27" (68.6 cm) models A. 25 64.3 cm) recessed width B. 42 107.5 cm) overall height C....cable through to support a total weight (microwave and built-in a wall cabinet.
..., qualified electrical installer. Check existing electrical supply. It is required. Read and follow the instructions provided with oven. ■ Recessed installation area must be solid, level and flush with bottom of 238 lbs (108 kg... on some models) Check local codes. Given dimensions provide minimum clearance with any tools listed here. Product Dimensions 27" (68.6 cm) and 30" (76.2 cm) Ovens A B E D C 27" (68.6 cm) models A. 25 64.3 cm) recessed width B. 42 107.5 cm) overall height C....cable through to support a total weight (microwave and built-in a wall cabinet.


