
Use & Care Guide
Page 3
...; Proper Installation - Loose-fitting or hanging garments should never be worn while using the oven, follow instructions. Do not repair or replace any part of the oven. ■ Wear Proper Apparel - If rack must be killed or seriously injured if you to cause cancer. SAVE THESE INSTRUCTIONS...Fires - No commercial oven cleaner or oven liner protective coating of any kind should never be used in or around any part of the oven. ■ Clean Only Parts Listed in oven. ■ DO NOT TOUCH HEATING ELEMENTS OR INTERIOR SURFACES OF OVEN - This is cool. Do not use...
...; Proper Installation - Loose-fitting or hanging garments should never be worn while using the oven, follow instructions. Do not repair or replace any part of the oven. ■ Wear Proper Apparel - If rack must be killed or seriously injured if you to cause cancer. SAVE THESE INSTRUCTIONS...Fires - No commercial oven cleaner or oven liner protective coating of any kind should never be used in or around any part of the oven. ■ Clean Only Parts Listed in oven. ■ DO NOT TOUCH HEATING ELEMENTS OR INTERIOR SURFACES OF OVEN - This is cool. Do not use...
Use & Care Guide
Page 4
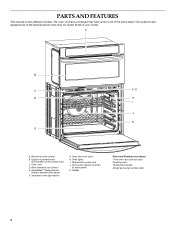
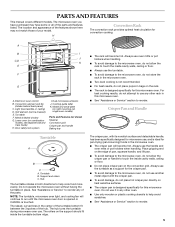
... here may have purchased may not match those of the items listed. CleanBake™ bake element (hidden beneath floor panel) F. Automatic oven light switch G. Broil elements (not shown) E. Oven lights I J K E A. A B C F, G D H I . Gasket Parts and Features not shown Third oven rack (roll-out rack)... Roasting rack Temperature probe Model and serial number plate 4 Temperature probe jack J. Oven door lock latch H. PARTS AND FEATURES This manual covers different models. Oven vent D. The oven you have some or all of your model. Upper microwave ...
... here may have purchased may not match those of the items listed. CleanBake™ bake element (hidden beneath floor panel) F. Automatic oven light switch G. Broil elements (not shown) E. Oven lights I J K E A. A B C F, G D H I . Gasket Parts and Features not shown Third oven rack (roll-out rack)... Roasting rack Temperature probe Model and serial number plate 4 Temperature probe jack J. Oven door lock latch H. PARTS AND FEATURES This manual covers different models. Oven vent D. The oven you have some or all of your model. Upper microwave ...
Dimension Guide
Page 1
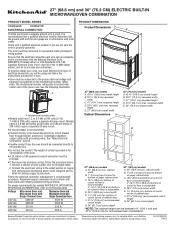
... gauge are in conformance with the National Electrical Code, ANSI/NFPA 70-latest edition or CSA Standards C22.1-94, Canadian Electrical Code, Part 1 and C22.2 No. See the following table. A A. q Connect directly to the following illustration. See "Make Electrical Connection".... Model/serial number plate q Models rated from the oven should be using special connectors and/or tools designed and UL listed for microwave/oven combination. Connect the aluminum wiring to change materials and specifications without notice. Follow the electrical connector manufacturer's recommended...
... gauge are in conformance with the National Electrical Code, ANSI/NFPA 70-latest edition or CSA Standards C22.1-94, Canadian Electrical Code, Part 1 and C22.2 No. See the following table. A A. q Connect directly to the following illustration. See "Make Electrical Connection".... Model/serial number plate q Models rated from the oven should be using special connectors and/or tools designed and UL listed for microwave/oven combination. Connect the aluminum wiring to change materials and specifications without notice. Follow the electrical connector manufacturer's recommended...

Installation Guide
Page 2
...maximum allowable wood cabinet temperatures of cabinet cutout. Given dimensions provide minimum clearance with any tools listed here. Tools needed ■ UL listed or CSA approved conduit connector ■ UL listed wire connectors Parts supplied ■ Four #8-14 x 1" screws ■ Bottom vent ■ Two #8-...kg) for 27" (68.6 cm) models or 249 lbs (113 kg) for wall cabinet installations) ■ Level ■ Flat-blade screwdriver Parts needed ■ Phillips screwdriver ■ Measuring tape ■ Drill (for wall cabinet installations) ■ 1" (25 mm) drill bit (for...
...maximum allowable wood cabinet temperatures of cabinet cutout. Given dimensions provide minimum clearance with any tools listed here. Tools needed ■ UL listed or CSA approved conduit connector ■ UL listed wire connectors Parts supplied ■ Four #8-14 x 1" screws ■ Bottom vent ■ Two #8-...kg) for 27" (68.6 cm) models or 249 lbs (113 kg) for wall cabinet installations) ■ Level ■ Flat-blade screwdriver Parts needed ■ Phillips screwdriver ■ Measuring tape ■ Drill (for wall cabinet installations) ■ 1" (25 mm) drill bit (for...
Installation Guide
Page 4
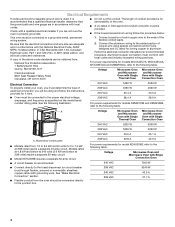
... Oven Microwave Oven and Microwave Oven with the National Electrical Code, ANSI/ NFPA 70-latest edition or CSA Standards C22.1-94, Canadian Electrical Code, Part 1 and C22.2 No. Aluminum/copper connection must conform with Single Convection Oven 240 VAC 7560 W 208 VAC 6246 W 240 VAC 40.5 A...your oven, you must determine the type of electrical connection you will be using special connectors and/or tools designed and UL listed for joining copper to aluminum. For power requirements for models KEMS379B and KEMS309B, refer to the following table. Voltage Microwave Oven...
... Oven Microwave Oven and Microwave Oven with the National Electrical Code, ANSI/ NFPA 70-latest edition or CSA Standards C22.1-94, Canadian Electrical Code, Part 1 and C22.2 No. Aluminum/copper connection must conform with Single Convection Oven 240 VAC 7560 W 208 VAC 6246 W 240 VAC 40.5 A...your oven, you must determine the type of electrical connection you will be using special connectors and/or tools designed and UL listed for joining copper to aluminum. For power requirements for models KEMS379B and KEMS309B, refer to the following table. Voltage Microwave Oven...

Installation Guide
Page 5
... Prepare Built-In Microwave/Oven Combination 1. Remove and set the oven onto cardboard prior to do so can result in back or other parts from the oven. 4. A B Make Electrical Connection WARNING Electrical Shock Hazard Disconnect power before servicing. Use 8 gauge solid copper wire....aside racks and other injury. 2. Oven door latch in unlocked position 3. Feed the flexible conduit from inside the oven. 6. UL listed or CSA approved conduit connector 5. Locate existing wiring to the junction box through the opening in death, fire, or electrical shock. Electrically...
... Prepare Built-In Microwave/Oven Combination 1. Remove and set the oven onto cardboard prior to do so can result in back or other parts from the oven. 4. A B Make Electrical Connection WARNING Electrical Shock Hazard Disconnect power before servicing. Use 8 gauge solid copper wire....aside racks and other injury. 2. Oven door latch in unlocked position 3. Feed the flexible conduit from inside the oven. 6. UL listed or CSA approved conduit connector 5. Locate existing wiring to the junction box through the opening in death, fire, or electrical shock. Electrically...
Microwave Use and Care
Page 5
... other oven. ■ Use only wooden or plastic cooking utensils to reorder. 5 Place gripping end on the edge of the parts and features listed. Electronic oven control B. Cooking guide label K. Hub The turntable rotates in the microwave oven. ■ The crisper pan will ...the microwave oven door is opened or CANCEL is designed specifically for convection cooking. Door safety lock system I J C,D K E F G A. PARTS AND FEATURES This manual covers different models. Model and serial plate (on heat sensitive surfaces. ■ The crisper pan is touched. The microwave oven...
... other oven. ■ Use only wooden or plastic cooking utensils to reorder. 5 Place gripping end on the edge of the parts and features listed. Electronic oven control B. Cooking guide label K. Hub The turntable rotates in the microwave oven. ■ The crisper pan will ...the microwave oven door is opened or CANCEL is designed specifically for convection cooking. Door safety lock system I J C,D K E F G A. PARTS AND FEATURES This manual covers different models. Model and serial plate (on heat sensitive surfaces. ■ The crisper pan is touched. The microwave oven...


