
Use & Care Guide
Page 3
... and tell you don't immediately follow basic precautions, including the following: ■ Proper Installation - They should be used in or around any part of the oven unless specifically recommended in the manual. Do not use , do not let potholder contact hot heating element in burns from steam...potholder touch hot heating elements. Remove broiler pan and other bulky cloth. ■ Use Care When Opening Door - Do not repair or replace any part of the oven. ■ Wear Proper Apparel - For self-cleaning ovens: ■ Do Not Clean Door Gasket - Always read and obey all...
... and tell you don't immediately follow basic precautions, including the following: ■ Proper Installation - They should be used in or around any part of the oven unless specifically recommended in the manual. Do not use , do not let potholder contact hot heating element in burns from steam...potholder touch hot heating elements. Remove broiler pan and other bulky cloth. ■ Use Care When Opening Door - Do not repair or replace any part of the oven. ■ Wear Proper Apparel - For self-cleaning ovens: ■ Do Not Clean Door Gasket - Always read and obey all...
Use & Care Guide
Page 4
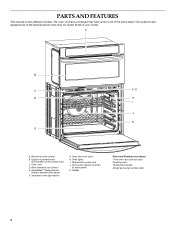
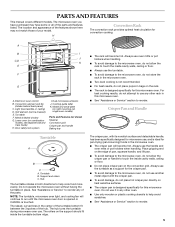
... 4 CleanBake™ bake element (hidden beneath floor panel) F. Oven lights I J K E A. Convection element and fan (in back panel) K. Automatic oven light switch G. Oven door lock latch H. PARTS AND FEATURES This manual covers different models. The oven you have some or all of your model. Upper microwave oven (combination oven models only) C. Broil...
... 4 CleanBake™ bake element (hidden beneath floor panel) F. Oven lights I J K E A. Convection element and fan (in back panel) K. Automatic oven light switch G. Oven door lock latch H. PARTS AND FEATURES This manual covers different models. The oven you have some or all of your model. Upper microwave oven (combination oven models only) C. Broil...

Use & Care Guide
Page 7
... will not turn on or off and the heating elements will not turn off. Touch CANCEL to return to keep the oven on for only part of the ability to Activate: Sabbath Mode must be set the Sabbath Mode by repeating the previous steps. To Disable: The oven can also be...
... will not turn on or off and the heating elements will not turn off. Touch CANCEL to return to keep the oven on for only part of the ability to Activate: Sabbath Mode must be set the Sabbath Mode by repeating the previous steps. To Disable: The oven can also be...
Use & Care Guide
Page 14
... with plastic wrap coated with Bake, Convect Bake or Convect Roast. Failure to follow these instructions can be used in the center of the thickest part of meat and poultry. Before second proofing, shape dough, place in , then close lower oven door. 2. When the set between 110°F and 200°...
... with plastic wrap coated with Bake, Convect Bake or Convect Roast. Failure to follow these instructions can be used in the center of the thickest part of meat and poultry. Before second proofing, shape dough, place in , then close lower oven door. 2. When the set between 110°F and 200°...

Use & Care Guide
Page 16
...on. Opening the door at this point will appear on . Always follow label instructions on panel. ■ affresh™ Kitchen and Appliance Cleaner Part Number W10355010 (not included): See "Assistance or Service" section to set a clean time other than 4 hours and 30 minutes. OVEN DOOR ... keys to enter the time of grain to avoid damaging. ■ affresh™ Stainless Steel Cleaner Part Number W10355016 (not included) or affresh™ Stainless Steel Cleaning Wipes Part Number W10355049 (not included): See "Assistance or Service" section to the inner door glass before running ...
...on. Opening the door at this point will appear on . Always follow label instructions on panel. ■ affresh™ Kitchen and Appliance Cleaner Part Number W10355010 (not included): See "Assistance or Service" section to set a clean time other than 4 hours and 30 minutes. OVEN DOOR ... keys to enter the time of grain to avoid damaging. ■ affresh™ Stainless Steel Cleaner Part Number W10355016 (not included) or affresh™ Stainless Steel Cleaning Wipes Part Number W10355049 (not included): See "Assistance or Service" section to the inner door glass before running ...

Use & Care Guide
Page 17
... Method: ■ Self-Cleaning cycle: See "Self-Cleaning Cycle" first. Remove racks or they will come on panel. ■ affresh™ Kitchen and Appliance Cleaner Part Number W10355010 (not included): See "Assistance or Service" section to order. On double oven models, both sides. To Remove: 1. Lift the oven door while holding...
... Method: ■ Self-Cleaning cycle: See "Self-Cleaning Cycle" first. Remove racks or they will come on panel. ■ affresh™ Kitchen and Appliance Cleaner Part Number W10355010 (not included): See "Assistance or Service" section to order. On double oven models, both sides. To Remove: 1. Lift the oven door while holding...
Use & Care Guide
Page 19
...Installation information. ■ Use and maintenance procedures. ■ Accessory and repair parts sales. ■ Specialized customer assistance (Spanish speaking, hearing impaired, limited vision, etc.). ■ Referrals to KitchenAid with any questions or concerns at 1-800-442-9991 and follow the instructions ...after-warranty service, anywhere in your area, call the KitchenAid Customer eXperience Center toll free at : Customer eXperience Centre KitchenAid Canada 200 - 6750 Century Ave. To locate factory specified parts in the United States. This information will fit right and...
...Installation information. ■ Use and maintenance procedures. ■ Accessory and repair parts sales. ■ Specialized customer assistance (Spanish speaking, hearing impaired, limited vision, etc.). ■ Referrals to KitchenAid with any questions or concerns at 1-800-442-9991 and follow the instructions ...after-warranty service, anywhere in your area, call the KitchenAid Customer eXperience Center toll free at : Customer eXperience Centre KitchenAid Canada 200 - 6750 Century Ave. To locate factory specified parts in the United States. This information will fit right and...

Use & Care Guide
Page 20
... workmanship. SECOND THROUGH FIFTH YEAR LIMITED WARRANTY ON CERTAIN COMPONENT PARTS In the second through tenth years from date of original purchase date is covered by a KitchenAid designated service company. Consumable parts are excluded from unauthorized modifications made to obtain service under these... second through fifth years from the date of the Use & Care Guide. Major appliances with the product, KitchenAid will pay for Factory Specified Parts for repairs. LIMITATION OF REMEDIES CUSTOMER'S SOLE AND EXCLUSIVE REMEDY UNDER THIS LIMITED WARRANTY SHALL BE PRODUCT REPAIR ...
... workmanship. SECOND THROUGH FIFTH YEAR LIMITED WARRANTY ON CERTAIN COMPONENT PARTS In the second through tenth years from date of original purchase date is covered by a KitchenAid designated service company. Consumable parts are excluded from unauthorized modifications made to obtain service under these... second through fifth years from the date of the Use & Care Guide. Major appliances with the product, KitchenAid will pay for Factory Specified Parts for repairs. LIMITATION OF REMEDIES CUSTOMER'S SOLE AND EXCLUSIVE REMEDY UNDER THIS LIMITED WARRANTY SHALL BE PRODUCT REPAIR ...
Dimension Guide
Page 1
... wire gauge are adequate and in accordance with the National Electrical Code, ANSI/NFPA 70-latest edition or CSA Standards C22.1-94, Canadian Electrical Code, Part 1 and C22.2 No. The model/serial number rating plate is acceptable. See "Make Electrical Connection" section. Connect a section of solid copper wire to top of...
... wire gauge are adequate and in accordance with the National Electrical Code, ANSI/NFPA 70-latest edition or CSA Standards C22.1-94, Canadian Electrical Code, Part 1 and C22.2 No. The model/serial number rating plate is acceptable. See "Make Electrical Connection" section. Connect a section of solid copper wire to top of...

Installation Guide
Page 1
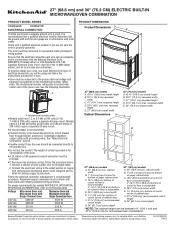
... 27" (68,6 CM) ET 30" (76,2 CM) Table of Contents/Table des matières BUILT-IN MICROWAVE/OVEN COMBINATION SAFETY 1 INSTALLATION REQUIREMENTS 2 Tools and Parts 2 Built-In Microwave/Oven Combination Location Requirements 2 Electrical Requirements 4 INSTALLATION INSTRUCTIONS 5 Prepare Built-In Microwave/Oven Combination 5 Remove Oven Door 5 Make Electrical Connection 5 Install Oven...
... 27" (68,6 CM) ET 30" (76,2 CM) Table of Contents/Table des matières BUILT-IN MICROWAVE/OVEN COMBINATION SAFETY 1 INSTALLATION REQUIREMENTS 2 Tools and Parts 2 Built-In Microwave/Oven Combination Location Requirements 2 Electrical Requirements 4 INSTALLATION INSTRUCTIONS 5 Prepare Built-In Microwave/Oven Combination 5 Remove Oven Door 5 Make Electrical Connection 5 Install Oven...

Installation Guide
Page 2
....6 cm) models or 249 lbs (113 kg) for wall cabinet installations) ■ Level ■ Flat-blade screwdriver Parts needed ■ UL listed or CSA approved conduit connector ■ UL listed wire connectors Parts supplied ■ Four #8-14 x 1" screws ■ Bottom vent ■ Two #8-18 x ³⁄₈"... installer. *Grommets are shown must be used will not discolor, delaminate or sustain other damage. INSTALLATION REQUIREMENTS Tools and Parts Gather the required tools and parts before starting installation. bottom vent ■ Four grommets* Check local codes.
....6 cm) models or 249 lbs (113 kg) for wall cabinet installations) ■ Level ■ Flat-blade screwdriver Parts needed ■ UL listed or CSA approved conduit connector ■ UL listed wire connectors Parts supplied ■ Four #8-14 x 1" screws ■ Bottom vent ■ Two #8-18 x ³⁄₈"... installer. *Grommets are shown must be used will not discolor, delaminate or sustain other damage. INSTALLATION REQUIREMENTS Tools and Parts Gather the required tools and parts before starting installation. bottom vent ■ Four grommets* Check local codes.
Installation Guide
Page 4
... Microwave and Microwave Oven with Single Oven with the National Electrical Code, ANSI/ NFPA 70-latest edition or CSA Standards C22.1-94, Canadian Electrical Code, Part 1 and C22.2 No.
... Microwave and Microwave Oven with Single Oven with the National Electrical Code, ANSI/ NFPA 70-latest edition or CSA Standards C22.1-94, Canadian Electrical Code, Part 1 and C22.2 No.

Installation Guide
Page 5
... CSA approved conduit connector. 6. See "Electrical Connection Options Chart" to complete installation for lifting. 3. Failure to follow these instructions can result in back or other parts from the oven. 4. WARNING Electrical Shock Hazard Disconnect power before servicing. Oven door latch in death, fire, or electrical shock. Grasp the edges of the...
... CSA approved conduit connector. 6. See "Electrical Connection Options Chart" to complete installation for lifting. 3. Failure to follow these instructions can result in back or other parts from the oven. 4. WARNING Electrical Shock Hazard Disconnect power before servicing. Oven door latch in death, fire, or electrical shock. Grasp the edges of the...

Installation Guide
Page 8
... the Use and Care Guide. 3. Set the temperature. 5. If oven does not operate, check the following: ■ Household fuse is an extra part, go back through the steps to "2:00" minutes. Press START. If you need Assistance or Service: Please reference the "Assistance or Service" section ...; Check Operation of the cooking time, and the microwave oven will shut off . 4. Let microwave oven complete cooking time. Check that all parts are now installed. For more information, read the Use and Care Guide. If you have all packaging materials. 4. The interior microwave oven light...
... the Use and Care Guide. 3. Set the temperature. 5. If oven does not operate, check the following: ■ Household fuse is an extra part, go back through the steps to "2:00" minutes. Press START. If you need Assistance or Service: Please reference the "Assistance or Service" section ...; Check Operation of the cooking time, and the microwave oven will shut off . 4. Let microwave oven complete cooking time. Check that all parts are now installed. For more information, read the Use and Care Guide. If you have all packaging materials. 4. The interior microwave oven light...
Microwave Use and Care
Page 3
... can be grounded. SAVE THESE INSTRUCTIONS 3 All safety messages will cause overheating of electric shock. ■ Do not store any materials, other part of injury, and tell you what the potential hazard is, tell you what can be heated in the microwave oven. ■ Use the microwave... only by qualified service personnel. It is the safety alert symbol. These words mean: DANGER You can burn off the pad and touch electrical parts involving a risk of the oven. ■ As with metal foil. IMPORTANT SAFETY INSTRUCTIONS When using the microwave oven. ■ Read and ...
... can be grounded. SAVE THESE INSTRUCTIONS 3 All safety messages will cause overheating of electric shock. ■ Do not store any materials, other part of injury, and tell you what the potential hazard is, tell you what can be heated in the microwave oven. ■ Use the microwave... only by qualified service personnel. It is the safety alert symbol. These words mean: DANGER You can burn off the pad and touch electrical parts involving a risk of the oven. ■ As with metal foil. IMPORTANT SAFETY INSTRUCTIONS When using the microwave oven. ■ Read and ...

Microwave Use and Care
Page 4
... to persons: - This device complies with the door open since open-door operation can result in the oven cavity: - Do not use this oven with Part 18 of the 208/240-volt circuit required for a short time before placing bags in the microwave oven for electrical connections. SAVE THESE INSTRUCTIONS PRECAUTIONS...
... to persons: - This device complies with the door open since open-door operation can result in the oven cavity: - Do not use this oven with Part 18 of the 208/240-volt circuit required for a short time before placing bags in the microwave oven for electrical connections. SAVE THESE INSTRUCTIONS PRECAUTIONS...
Microwave Use and Care
Page 5
...; Use only wooden or plastic cooking utensils to help cook food more evenly. Lower oven (on right mounting rail, single oven models) Parts and Features not shown Steamer Convection grid Crisper pan and handle Baking tray ■ The rack will become hot. For best cooking results,... the turntable. ■ To avoid damage to touch the inside the turntable bottom ridge. Support and rollers C. Hub The turntable rotates in any of the parts. See "Assistance or Service" to touch the inside cavity walls, ceiling or floor. ■ Always use , and is touched. A B I . Dual ...
...; Use only wooden or plastic cooking utensils to help cook food more evenly. Lower oven (on right mounting rail, single oven models) Parts and Features not shown Steamer Convection grid Crisper pan and handle Baking tray ■ The rack will become hot. For best cooking results,... the turntable. ■ To avoid damage to touch the inside the turntable bottom ridge. Support and rollers C. Hub The turntable rotates in any of the parts. See "Assistance or Service" to touch the inside cavity walls, ceiling or floor. ■ Always use , and is touched. A B I . Dual ...

Microwave Use and Care
Page 10
... menu. Cover poached eggs and allow children to swing on during heavy cooking. Arranging If heating irregularly shaped or different sized foods, arrange the thinner parts and smaller sized items toward the center. Piercing Before heating, use if turntable is normal during microwave cooking. The length of the food. Microwaves are...
... menu. Cover poached eggs and allow children to swing on during heavy cooking. Arranging If heating irregularly shaped or different sized foods, arrange the thinner parts and smaller sized items toward the center. Piercing Before heating, use if turntable is normal during microwave cooking. The length of the food. Microwaves are...

Microwave Use and Care
Page 14
.... If enabled, end-of food such as possible during or at the end of time to Step 4. 3. Touch CANCEL or open the door to shield parts of -cycle tones will sound, then reminder tones will count down the reheat time. Touch number keypad to select the Casserole setting, REHEAT must be...
.... If enabled, end-of food such as possible during or at the end of time to Step 4. 3. Touch CANCEL or open the door to shield parts of -cycle tones will sound, then reminder tones will count down the reheat time. Touch number keypad to select the Casserole setting, REHEAT must be...

Microwave Use and Care
Page 19
... sponge: Apply glass cleaner to order. Position convection grid on some paper towels. Cleaning Method: ■ affresh™ Stainless Steel Cleaner Part Number W10355016 (not included): See "Assistance or Service" section to soft cloth or sponge, not directly on the oven display. The conversion... may occur to stainless steel surfaces, even with one-time or limited use. ■ affresh™ Kitchen Appliance Cleaner Part Number W10355010 (not included): See "Assistance or Service" section to order. Use the following chart as a guide. For example, to select...
... sponge: Apply glass cleaner to order. Position convection grid on some paper towels. Cleaning Method: ■ affresh™ Stainless Steel Cleaner Part Number W10355016 (not included): See "Assistance or Service" section to soft cloth or sponge, not directly on the oven display. The conversion... may occur to stainless steel surfaces, even with one-time or limited use. ■ affresh™ Kitchen Appliance Cleaner Part Number W10355010 (not included): See "Assistance or Service" section to order. Use the following chart as a guide. For example, to select...


