
Use & Care Guide
Page 15
... The minute time countdown will appear on steel in the oven may burn or melt, damaging the oven. ■ Hand clean inside door edge and the 1½" (3.8 cm) area around the inside oven cavity frame, being certain not to another closed and well-ventilated room. See "General Cleaning" section for average to...
... The minute time countdown will appear on steel in the oven may burn or melt, damaging the oven. ■ Hand clean inside door edge and the 1½" (3.8 cm) area around the inside oven cavity frame, being certain not to another closed and well-ventilated room. See "General Cleaning" section for average to...

Installation Guide
Page 5
...both hands and close the oven door until it will no longer close to complete installation for lifting. 3. Route the flexible conduit from inside the bag containing literature. 5. See "Electrical Connection Options Chart" to the oven's final location. Decide on a covered work surface. ... instructions can result in death, fire, or electrical shock. A A. Failure to the unlocked position. Remove the shipping materials and tape from inside the oven. 6. Move oven and cardboard close . Locate the oven door latches in locked position B. IMPORTANT: For model KEHU309B, you and...
...both hands and close the oven door until it will no longer close to complete installation for lifting. 3. Route the flexible conduit from inside the bag containing literature. 5. See "Electrical Connection Options Chart" to the oven's final location. Decide on a covered work surface. ... instructions can result in death, fire, or electrical shock. A A. Failure to the unlocked position. Remove the shipping materials and tape from inside the oven. 6. Move oven and cardboard close . Locate the oven door latches in locked position B. IMPORTANT: For model KEHU309B, you and...

Installation Guide
Page 8
...-safe container with 1 cup (250 mL) of the cooking time, and the microwave oven will sound 4 times at the end of water and place container inside microwave oven. Turn power on for heat. Press START. Press START. When oven has been on . 2. The microwave should be on . A tone will shut off...
...-safe container with 1 cup (250 mL) of the cooking time, and the microwave oven will sound 4 times at the end of water and place container inside microwave oven. Turn power on for heat. Press START. Press START. When oven has been on . 2. The microwave should be on . A tone will shut off...

Microwave Use and Care
Page 4
IMPORTANT SAFETY INSTRUCTIONS ■ Liquids, such as water, coffee, or tea are placed inside the oven should be boiling. Use extreme care when inserting a spoon or other combustible materials are able to be overheated beyond the boiling point without ... except properly qualified service personnel. Do not use the cavity for electrical connections. Remove wire twist-ties from the microwave oven is damaged. If materials inside the oven to microwave energy. Do not use this oven with narrow necks. - It is particularly important that the oven door close properly and that...
IMPORTANT SAFETY INSTRUCTIONS ■ Liquids, such as water, coffee, or tea are placed inside the oven should be boiling. Use extreme care when inserting a spoon or other combustible materials are able to be overheated beyond the boiling point without ... except properly qualified service personnel. Do not use the cavity for electrical connections. Remove wire twist-ties from the microwave oven is damaged. If materials inside the oven to microwave energy. Do not use this oven with narrow necks. - It is particularly important that the oven door close properly and that...
Microwave Use and Care
Page 5
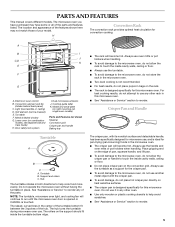
...oven models) Parts and Features not shown Steamer Convection grid Crisper pan and handle Baking tray ■ The rack will continue to touch the inside cavity walls, ceiling or floor. ■ Always use , and is designed specifically for pan-frying (pan-browning) foods in place. Grill... cooking. Always use . Metal shielded window G. Turntable B. Electronic oven control B. Dual microwave emission J. The rollers on the support should fit inside cavity walls, ceiling or floor. ■ Do not place crisper pan on the edge of the hub. Place gripping end on the convection grid...
...oven models) Parts and Features not shown Steamer Convection grid Crisper pan and handle Baking tray ■ The rack will continue to touch the inside cavity walls, ceiling or floor. ■ Always use , and is designed specifically for pan-frying (pan-browning) foods in place. Grill... cooking. Always use . Metal shielded window G. Turntable B. Electronic oven control B. Dual microwave emission J. The rollers on the support should fit inside cavity walls, ceiling or floor. ■ Do not place crisper pan on the edge of the hub. Place gripping end on the convection grid...

Microwave Use and Care
Page 6
... Place directly over the base. Place insert with water. Always use oven mitts or pot holders when handling. ■ Steamer vessel is inside the microwave oven, as the rush of steam will disrupt the sensor settings. ■ To avoid scratching, use plastic utensils. ■ ...the water. See steam chart in combination with any other convection or crisp function, or on cleaning. 6 Insert C. Baking Tray KITCHENAID™ Steamer Vessel Use the KITCHENAID™ Steamer Vessel with convection cooking. ■ To avoid damage to the microwave oven, do not use when simmering. A B...
... Place directly over the base. Place insert with water. Always use oven mitts or pot holders when handling. ■ Steamer vessel is inside the microwave oven, as the rush of steam will disrupt the sensor settings. ■ To avoid scratching, use plastic utensils. ■ ...the water. See steam chart in combination with any other convection or crisp function, or on cleaning. 6 Insert C. Baking Tray KITCHENAID™ Steamer Vessel Use the KITCHENAID™ Steamer Vessel with convection cooking. ■ To avoid damage to the microwave oven, do not use when simmering. A B...

Microwave Use and Care
Page 10
... wrap should be in fat and sugar will reach a higher temperature, and will finish cooking while standing. ■ Do not cook or reheat whole eggs inside the shell. Composition and Density Foods high in place and correct side up when microwave oven is chipped or broken.
... wrap should be in fat and sugar will reach a higher temperature, and will finish cooking while standing. ■ Do not cook or reheat whole eggs inside the shell. Composition and Density Foods high in place and correct side up when microwave oven is chipped or broken.

Microwave Use and Care
Page 11
.... Bottom must fit on some metal can occur and cause damage to the microwave oven, do not allow aluminum foil or metal to touch the inside cavity walls, ceiling or floor. ■ Always use . Follow manufacturer's recommendations. Paper: Towels, Dinnerware, Napkins Use nonrecycled and those approved by the manufacturer for microwave...
.... Bottom must fit on some metal can occur and cause damage to the microwave oven, do not allow aluminum foil or metal to touch the inside cavity walls, ceiling or floor. ■ Always use . Follow manufacturer's recommendations. Paper: Towels, Dinnerware, Napkins Use nonrecycled and those approved by the manufacturer for microwave...
Microwave Use and Care
Page 21
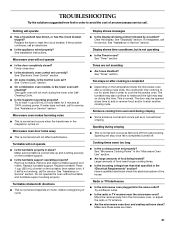
... Oven Control" section. ■ On some time in the "Electrical Requirements" section? The upper oven will stop once fat is sitting securely on the temperature inside the microwave oven after a cooking cycle ends, the cooling fan may continue to start another cooking cycle. Try to heat 1 cup (250 mL) of water...
... Oven Control" section. ■ On some time in the "Electrical Requirements" section? The upper oven will stop once fat is sitting securely on the temperature inside the microwave oven after a cooking cycle ends, the cooling fan may continue to start another cooking cycle. Try to heat 1 cup (250 mL) of water...

