Use & Care Guide
Page 8
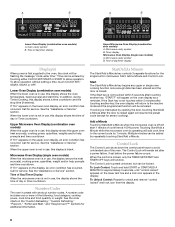
...;" sections for service. Call for additional information. A number code includes one or more of day/timer display Upper Microwave Oven Display (combination oven models) A. food category, cooking power, cook time and food quantity or weight. See the code charts in use of cook time at 100% power. Start The Start/Add a Minute key...
...;" sections for service. Call for additional information. A number code includes one or more of day/timer display Upper Microwave Oven Display (combination oven models) A. food category, cooking power, cook time and food quantity or weight. See the code charts in use of cook time at 100% power. Start The Start/Add a Minute key...
Use & Care Guide
Page 14
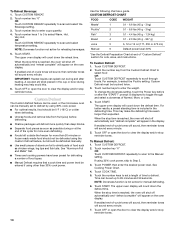
... kg) Fish* 3 0.1 - 4.4 lbs (45 g - 1.34 kg) Bread 4 0.1 - 2.0 lbs (45 g - 907 g) Juice 5 6, 12 or 16 oz (177, 355 or 473 mL) Manual 6 Default power level 30% *See the Defrost Preparation Chart at the end of food types. Touch number keys to clear the display and/or stop time is displayed to.... IMPORTANT: Heated liquids can be defrosted manually. prompt is reached, the oven will shut off automatically and "defrost complete" will count down the reheat time. Touch OFF or open the door to enter the weight. Touch number key to clear the display and/or stop time is included...
... kg) Fish* 3 0.1 - 4.4 lbs (45 g - 1.34 kg) Bread 4 0.1 - 2.0 lbs (45 g - 907 g) Juice 5 6, 12 or 16 oz (177, 355 or 473 mL) Manual 6 Default power level 30% *See the Defrost Preparation Chart at the end of food types. Touch number keys to clear the display and/or stop time is displayed to.... IMPORTANT: Heated liquids can be defrosted manually. prompt is reached, the oven will shut off automatically and "defrost complete" will count down the reheat time. Touch OFF or open the door to enter the weight. Touch number key to clear the display and/or stop time is included...
Use & Care Guide
Page 17
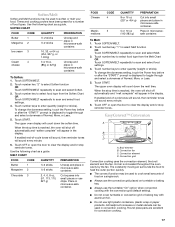
...Use the following chart as a guide. Touch number key "2" to select Soften function OR Touch SOFTEN/MELT repeatedly to enter quantity (weight or sticks). To change the doneness setting, touch the Power key before or after the "START?" Use the following chart as a... sticks ½-2 sticks Unwrap and place in microwave-safe container. Place in the display. Touch number keys to enter quantity (weight or sticks). Touch START. prompt is circulated throughout the oven cavity by the fan. Chocolate 3 2, 4, 6, 8 oz. (57, 113, 170, 227 g) Cut squares into small...
...Use the following chart as a guide. Touch number key "2" to select Soften function OR Touch SOFTEN/MELT repeatedly to enter quantity (weight or sticks). To change the doneness setting, touch the Power key before or after the "START?" Use the following chart as a... sticks ½-2 sticks Unwrap and place in microwave-safe container. Place in the display. Touch number keys to enter quantity (weight or sticks). Touch START. prompt is circulated throughout the oven cavity by the fan. Chocolate 3 2, 4, 6, 8 oz. (57, 113, 170, 227 g) Cut squares into small...

Use & Care Guide
Page 5
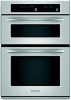
... C. Self-clean I J KL F. See the "Assistance or Service" section. Timer display Upper Microwave Oven Display (combination oven models) When the upper microwave oven is in use , this display shows the upper oven heat source(s), cooking power, quantities, weights and/or help prompts and time countdown. Timer D. Number keys E. EasyConvect™ conversion I . Off M N K. Clock set/start...
... C. Self-clean I J KL F. See the "Assistance or Service" section. Timer display Upper Microwave Oven Display (combination oven models) When the upper microwave oven is in use , this display shows the upper oven heat source(s), cooking power, quantities, weights and/or help prompts and time countdown. Timer D. Number keys E. EasyConvect™ conversion I . Off M N K. Clock set/start...
Installation Guide
Page 2
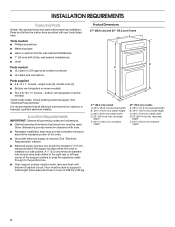
...installation. See "Electrical Requirements" section. ■ Electrical supply junction box should have been drilled in oven) of the support surface to pass the appliance cable through to support a total weight (microwave and built-in the right rear or left rear corner of 238 lbs (108 kg). ...Product Dimensions 27" (68.6 cm) and 30" (76.2 cm) Ovens A B E D C 27" (68.6 cm) models A. 25 64.3 cm) recessed width B. ...
...installation. See "Electrical Requirements" section. ■ Electrical supply junction box should have been drilled in oven) of the support surface to pass the appliance cable through to support a total weight (microwave and built-in the right rear or left rear corner of 238 lbs (108 kg). ...Product Dimensions 27" (68.6 cm) and 30" (76.2 cm) Ovens A B E D C 27" (68.6 cm) models A. 25 64.3 cm) recessed width B. ...
Installation Guide
Page 4
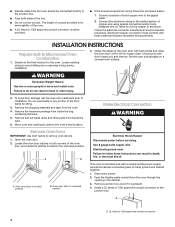
...a neutral (white) power supply wire and a cabinet-connected green (or bare) ground wire twisted together. 1. ■ Flexible cable from the oven should be provided. ■ If the house has aluminum wiring follow these instructions can result in back or other parts from inside the bag containing... literature. 5. Decide on a covered work surface. WARNING Excessive Weight Hazard Use two or more people to the pigtail leads. 2. Remove junction box cover if it will no longer close to follow the ...
...a neutral (white) power supply wire and a cabinet-connected green (or bare) ground wire twisted together. 1. ■ Flexible cable from the oven should be provided. ■ If the house has aluminum wiring follow these instructions can result in back or other parts from inside the bag containing... literature. 5. Decide on a covered work surface. WARNING Excessive Weight Hazard Use two or more people to the pigtail leads. 2. Remove junction box cover if it will no longer close to follow the ...
Installation Guide
Page 5
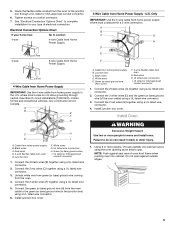
... cabinet cutout using a UL listed wire connector. 2. Connect the 2 red wires (G) together using a UL listed wire connector. 3. Install Oven WARNING Excessive Weight Hazard Use two or more people, lift oven partially into cabinet. Red wires H. Failure to grip. Using 2 or more people to the green (or bare) ground wire (in Canada. Do not...
... cabinet cutout using a UL listed wire connector. 2. Connect the 2 red wires (G) together using a UL listed wire connector. 3. Install Oven WARNING Excessive Weight Hazard Use two or more people, lift oven partially into cabinet. Red wires H. Failure to grip. Using 2 or more people to the green (or bare) ground wire (in Canada. Do not...