Installation Instructions
Page 1
Write down the model and serial numbers before installing cooktop. Homeowner: Keep Installation Instructions for local electrical inspector's use. Model Serial Part No. 8286553 Installation Instructions 30" (76.2 cm) and 36" (91.4 cm) ELECTRIC Built-in Ceramic Downdraft Cooktop IMPORTANT: Read and save these instructions. Both numbers are on the model/serial rating plate, located on the bottom of the cooktop. IMPORTANT: Installer: Leave Installation Instructions with the homeowner. Save Installation Instructions for future reference.
Write down the model and serial numbers before installing cooktop. Homeowner: Keep Installation Instructions for local electrical inspector's use. Model Serial Part No. 8286553 Installation Instructions 30" (76.2 cm) and 36" (91.4 cm) ELECTRIC Built-in Ceramic Downdraft Cooktop IMPORTANT: Read and save these instructions. Both numbers are on the model/serial rating plate, located on the bottom of the cooktop. IMPORTANT: Installer: Leave Installation Instructions with the homeowner. Save Installation Instructions for future reference.
Installation Instructions
Page 2
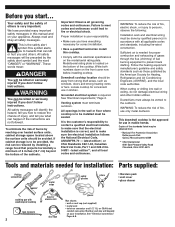
... fans must be done by reaching over heated surface units, cabinet storage space located above the surface units should be away from : * National ... Phillips screwdriver metal snips safety glasses pliers • literature pack • vent cover • glass cleaner caulking gun with all safety...outdoors. Write both numbers down on the bottom of the cooktop. Follow the heating equipment manufacturer's guideline and safety standards such...not supplied) • metal vent • twist-on the model/serial rating plate. These words mean: DANGER You will identify the hazard,...
... fans must be done by reaching over heated surface units, cabinet storage space located above the surface units should be away from : * National ... Phillips screwdriver metal snips safety glasses pliers • literature pack • vent cover • glass cleaner caulking gun with all safety...outdoors. Write both numbers down on the bottom of the cooktop. Follow the heating equipment manufacturer's guideline and safety standards such...not supplied) • metal vent • twist-on the model/serial rating plate. These words mean: DANGER You will identify the hazard,...
Installation Instructions
Page 3
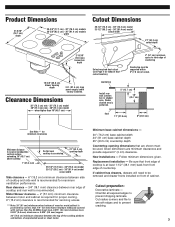
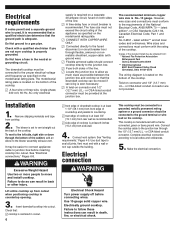
...36" (91.4 cm) model cutout width Side clearance - 6" (15.2 cm) minimum clearance between the top of the cooking platform and bottom of wood or metal cabinet is recommended. Given dimensions are shown must be used. Follow minimum dimensions given. Rear clearance - 3/4" (19.1 mm) clearance between rear edge of cooktop... minimum clearances Minimum distance to nearest combustible vertical surface extending 18" (45.7 cm) above cooktop 1" (25.4 mm) Do Not seal cooktop to countertop. 21" (53.3 cm) opening dimensions that front edge of cooktop and rear wall is protected by not less ...
...36" (91.4 cm) model cutout width Side clearance - 6" (15.2 cm) minimum clearance between the top of the cooking platform and bottom of wood or metal cabinet is recommended. Given dimensions are shown must be used. Follow minimum dimensions given. Rear clearance - 3/4" (19.1 mm) clearance between rear edge of cooktop... minimum clearances Minimum distance to nearest combustible vertical surface extending 18" (45.7 cm) above cooktop 1" (25.4 mm) Do Not seal cooktop to countertop. 21" (53.3 cm) opening dimensions that front edge of cooktop and rear wall is protected by not less ...
Installation Instructions
Page 4
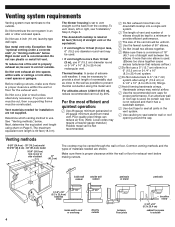
...stud unless absolutely necessary. Determine which venting method to use 4-inch (10 cm) laundry-type wall caps. The blower housing is recommended. This downdraft cooktop is rated at 60 feet (18.3 m) of straight vent or the equivalent. • If vent length is a minimum of 18" (45.7... the metal vent. For altitudes above 4,500 ft (1372 m), reduce recommended vent run by 20%. Venting methods 9-5/8" (24.4 cm) - 30" (76.2 cm) model 13-5/16" (33.8 cm) - 36" (91.4 cm) model 9-3/4" (24.8 cm) hole in a 6" (15.2 cm) or 3-1/4" x 10" (8.3 x 25.4 cm) system. ࠜ Do Not reduce back to 5" (...
...stud unless absolutely necessary. Determine which venting method to use 4-inch (10 cm) laundry-type wall caps. The blower housing is recommended. This downdraft cooktop is rated at 60 feet (18.3 m) of straight vent or the equivalent. • If vent length is a minimum of 18" (45.7... the metal vent. For altitudes above 4,500 ft (1372 m), reduce recommended vent run by 20%. Venting methods 9-5/8" (24.4 cm) - 30" (76.2 cm) model 13-5/16" (33.8 cm) - 36" (91.4 cm) model 9-3/4" (24.8 cm) hole in a 6" (15.2 cm) or 3-1/4" x 10" (8.3 x 25.4 cm) system. ࠜ Do Not reduce back to 5" (...
Installation Instructions
Page 6
...separate ground wire is used, it is recommended that a qualified electrician determine that : cooktop is centered in cutout. 6 supply is required on a separate 30-ampere circuit, fused on the model/serial rating plate. ࠜ CONNECT WITH COPPER WIRE ONLY. ࠜ Connected directly to the fused...No.-10 gauge. The recommended minimum copper wire size is located on the model/serial rating plate. See "Venting requirements," Pages 4-5. Electrically ground cooktop. Use duct tape to vent straight out the back of the cooktop. ࠜ A four-wire or three-wire, single-phase, 240-volt...
...separate ground wire is used, it is recommended that a qualified electrician determine that : cooktop is centered in cutout. 6 supply is required on a separate 30-ampere circuit, fused on the model/serial rating plate. ࠜ CONNECT WITH COPPER WIRE ONLY. ࠜ Connected directly to the fused...No.-10 gauge. The recommended minimum copper wire size is located on the model/serial rating plate. See "Venting requirements," Pages 4-5. Electrically ground cooktop. Use duct tape to vent straight out the back of the cooktop. ࠜ A four-wire or three-wire, single-phase, 240-volt...
Installation Instructions
Page 7
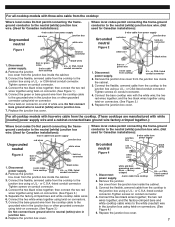
For all cooktop models with four-wire cable from the cooktop. (These cooktops are manufactured with white [neutral] power supply wire and a ... two white wires together using twist-on conduit connector. 4. or CSAlisted conduit connector 2. Remove the junction box cover from cooktop U.L.- or CSA- Connect the two black wires together; Put a twist-on connector on conduit connector. 4. Disconnect power ...red wires junction box twist-on connector. (See Figure 1.) 5. For all cooktop models with the white wire; then connect the two red wires together using a U.L.-
For all cooktop models with four-wire cable from the cooktop. (These cooktops are manufactured with white [neutral] power supply wire and a ... two white wires together using twist-on conduit connector. 4. or CSAlisted conduit connector 2. Remove the junction box cover from cooktop U.L.- or CSA- Connect the two black wires together; Put a twist-on connector on conduit connector. 4. Disconnect power ...red wires junction box twist-on connector. (See Figure 1.) 5. For all cooktop models with the white wire; then connect the two red wires together using a U.L.-
Installation Instructions
Page 8
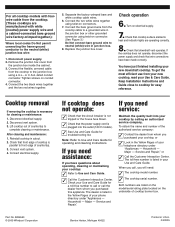
... operating, cleaning or maintaining your cooktop; Turn on conduit connector. 4. If the cooktop does not operate, disconnect the power supply and check that cooktop surface elements heat and indicator lights are operating correctly. 8. Cooktop removal If removing the cooktop is necessary for easy reference....and Repair." When you need : ✓ The cooktop model number. ✓ The cooktop serial number. Check that front edge of cooktop is plugged into your Use and Care Guide. Reinstall cooktop in U.S.A. 04/2005 If cooktop does not operate: ✓ Check that the circuit ...
... operating, cleaning or maintaining your cooktop; Turn on conduit connector. 4. If the cooktop does not operate, disconnect the power supply and check that cooktop surface elements heat and indicator lights are operating correctly. 8. Cooktop removal If removing the cooktop is necessary for easy reference....and Repair." When you need : ✓ The cooktop model number. ✓ The cooktop serial number. Check that front edge of cooktop is plugged into your Use and Care Guide. Reinstall cooktop in U.S.A. 04/2005 If cooktop does not operate: ✓ Check that the circuit ...
Use and Care Guide
Page 4
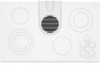
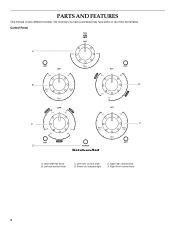
PARTS AND FEATURES This manual covers different models. Power on indicator light E. Right rear control knob F. Control Panel A B E C F D A. Downdraft fan knob B. Left rear control knob C. Left front control knob D. Right front control knob 4 The cooktop you have purchased may have some or all of the items listed.
PARTS AND FEATURES This manual covers different models. Power on indicator light E. Right rear control knob F. Control Panel A B E C F D A. Downdraft fan knob B. Left rear control knob C. Left front control knob D. Right front control knob 4 The cooktop you have purchased may have some or all of the items listed.

Use and Care Guide
Page 5
Downdraft vent cover B. Ceramic glass cooktop F D. Surface cooking area F. Power on outside bottom of cooktop) G G. Downdraft vent location E. Model and serial number plate (located on indicator light H. Control panel I D E H A. Filter C. Stainless steel frame (on some models) 5 Cooktop A B C I .
Downdraft vent cover B. Ceramic glass cooktop F D. Surface cooking area F. Power on outside bottom of cooktop) G G. Downdraft vent location E. Model and serial number plate (located on indicator light H. Control panel I D E H A. Filter C. Stainless steel frame (on some models) 5 Cooktop A B C I .
Use and Care Guide
Page 7
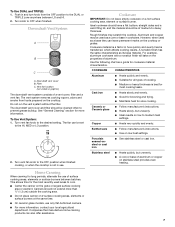
...on the grate or largest surface cooking area or element. Rough finishes may be set to the DUAL or TRIPLE zone anywhere between batches. Aluminum and copper may scratch the cooktop. Cast iron s Heats slowly and evenly. s Good for cookware material characteristics. Ceramic or Ceramic glass s Follow manufacturer's instructions...from the OFF position to the HI, MED or LO position. 2. Earthenware s Follow manufacturer's instructions. s Use on the cooktop. Home Canning When canning for slow cooking. s On ceramic glass models, use only flat-bottomed canners. Filter C.
...on the grate or largest surface cooking area or element. Rough finishes may be set to the DUAL or TRIPLE zone anywhere between batches. Aluminum and copper may scratch the cooktop. Cast iron s Heats slowly and evenly. s Good for cookware material characteristics. Ceramic or Ceramic glass s Follow manufacturer's instructions...from the OFF position to the HI, MED or LO position. 2. Earthenware s Follow manufacturer's instructions. s Use on the cooktop. Home Canning When canning for slow cooking. s On ceramic glass models, use only flat-bottomed canners. Filter C.
Use and Care Guide
Page 8
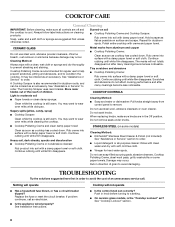
...surface with soft, lint-free cloth. Cleaning Method: s KitchenAid® Stainless Steel Cleaner & Polish (not included): See "Assistance or Service" section to remove. s Liquid detergent or all controls are suggested here first in knob before turning to a setting. Replace the fuse or reset the circuit breaker. s On ceramic glass models... the control knob set ? Soap, water and a soft cloth or sponge are off and the cooktop is the "Cooktop Lockout" set correctly? CERAMIC GLASS Do not use to help prevent scratches, pitting and abrasions, and to order. Metal marks from ...
...surface with soft, lint-free cloth. Cleaning Method: s KitchenAid® Stainless Steel Cleaner & Polish (not included): See "Assistance or Service" section to remove. s Liquid detergent or all controls are suggested here first in knob before turning to a setting. Replace the fuse or reset the circuit breaker. s On ceramic glass models... the control knob set ? Soap, water and a soft cloth or sponge are off and the cooktop is the "Cooktop Lockout" set correctly? CERAMIC GLASS Do not use to help prevent scratches, pitting and abrasions, and to order. Metal marks from ...

Use and Care Guide
Page 9
...specified parts will help , follow the menu prompts. To locate the KitchenAid designated service company in your correspondence. 9 Cooktop Cleaner (ceramic glass models) Order Part Number 31464 Cooktop Protectant Order Part Number 31463 If you need replacement parts If you...the surface cooking area, element or surface burner. For further assistance If you need further assistance, you still need to build every new KITCHENAID® appliance. KitchenAid designated service technicians are trained to KitchenAid Canada with : s Features and specifications on cooktop ...
...specified parts will help , follow the menu prompts. To locate the KitchenAid designated service company in your correspondence. 9 Cooktop Cleaner (ceramic glass models) Order Part Number 31464 Cooktop Protectant Order Part Number 31463 If you need replacement parts If you...the surface cooking area, element or surface burner. For further assistance If you need further assistance, you still need to build every new KITCHENAID® appliance. KitchenAid designated service technicians are trained to KitchenAid Canada with : s Features and specifications on cooktop ...
Use and Care Guide
Page 10
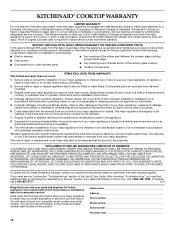
... house fuses, or to published user or operator instructions and/or installation instructions. 4. Dealer name Address Phone number Model number Serial number Purchase date 10 Damage resulting from accident, alteration, misuse, abuse, fire, flood, acts of ...KitchenAid or KitchenAid Canada will pay for Factory Specified Parts and repair labor to thermal shock of purchase, when this limited warranty does not apply. SECOND THROUGH FIFTH YEAR LIMITED WARRANTY ON CERTAIN COMPONENT PARTS In the second through fifth years from the date of the ceramic glass cooktop ■ Surface...
... house fuses, or to published user or operator instructions and/or installation instructions. 4. Dealer name Address Phone number Model number Serial number Purchase date 10 Damage resulting from accident, alteration, misuse, abuse, fire, flood, acts of ...KitchenAid or KitchenAid Canada will pay for Factory Specified Parts and repair labor to thermal shock of purchase, when this limited warranty does not apply. SECOND THROUGH FIFTH YEAR LIMITED WARRANTY ON CERTAIN COMPONENT PARTS In the second through fifth years from the date of the ceramic glass cooktop ■ Surface...
Parts List
Page 1
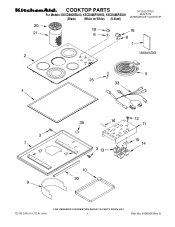
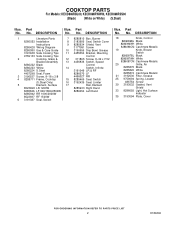
COOKTOP PARTS 36" ELECTRIC For Models: KECD866RBL00, KECD866RWW00, KECD866RSS00 BUILT−IN DOWNDRDAFT COOKTOP (Black) (White on White) (S.Steel) 12−05 Litho in U.S.A. (cre) 1 Part No. 8186306 Rev.A
COOKTOP PARTS 36" ELECTRIC For Models: KECD866RBL00, KECD866RWW00, KECD866RSS00 BUILT−IN DOWNDRDAFT COOKTOP (Black) (White on White) (S.Steel) 12−05 Litho in U.S.A. (cre) 1 Part No. 8186306 Rev.A
Parts List
Page 2
... 25 9759094 Spring, Locator 486754 Screw 30 3193032 Gasket, Vent Shield 33 8286055 Light, Hot Surface Indicator 35 3193094 Plate, Cover 2 8186306 Part No. Part No. COOKTOP PARTS For Models: KECD866RBL00, KECD866RWW00, KECD866RSS00 (Black) (White on White) (S.Steel) Illus. DESCRIPTION 1 Literature... Care Guide 10 3190656 Drip Bowl, Grease 3191638 Safe Cooking Tips 11 4455354 Bracket, Mounting 9759133 Safe Cooking Tips Control 2 Cooktop, Glass & 12 311865 Screw, 8−32 x 7/32 Bracket Assembly 13 4456836 Switch, Speed 8286222 Black Control 8286223 White 14...
... 25 9759094 Spring, Locator 486754 Screw 30 3193032 Gasket, Vent Shield 33 8286055 Light, Hot Surface Indicator 35 3193094 Plate, Cover 2 8186306 Part No. Part No. COOKTOP PARTS For Models: KECD866RBL00, KECD866RWW00, KECD866RSS00 (Black) (White on White) (S.Steel) Illus. DESCRIPTION 1 Literature... Care Guide 10 3190656 Drip Bowl, Grease 3191638 Safe Cooking Tips 11 4455354 Bracket, Mounting 9759133 Safe Cooking Tips Control 2 Cooktop, Glass & 12 311865 Screw, 8−32 x 7/32 Bracket Assembly 13 4456836 Switch, Speed 8286222 Black Control 8286223 White 14...


