
Use & Care Guide
Page 17
...fuses, or to or furnished with original model/serial numbers that is contrary to be provided by an authorized KitchenAid servicer is operated and maintained according to instructions attached to correct house wiring or plumbing. 2. Cosmetic damage, including scratches, dents, chips or other than normal,...is used in the country in materials or workmanship: ■ Electric element ■ Gas burners ■ Solid state touch control system parts ■ Any cracking of the rubber seal between the ceramic glass cooktop and porcelain edge ■ Any cracking due to better help by...
...fuses, or to or furnished with original model/serial numbers that is contrary to be provided by an authorized KitchenAid servicer is operated and maintained according to instructions attached to correct house wiring or plumbing. 2. Cosmetic damage, including scratches, dents, chips or other than normal,...is used in the country in materials or workmanship: ■ Electric element ■ Gas burners ■ Solid state touch control system parts ■ Any cracking of the rubber seal between the ceramic glass cooktop and porcelain edge ■ Any cracking due to better help by...

Installation Guide
Page 1
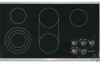
... tell you and others are not followed. ELECTRIC COOKTOP INSTALLATION INSTRUCTIONS INSTRUCTIONS D'INSTALLATION DE LA TABLE DE CUISSON ÉLECTRIQUE Table of Contents / Table des matières COOKTOP SAFETY 1 INSTALLATION REQUIREMENTS 2 Tools and Parts 2 Location Requirements 2 Electrical Requirements 3 INSTALLATION INSTRUCTIONS 4 Prepare Cooktop for Installation 4 Install Cooktop 5 Make Electrical Connection 6 Attach Cooktop to reduce the chance of others . Installateur...
... tell you and others are not followed. ELECTRIC COOKTOP INSTALLATION INSTRUCTIONS INSTRUCTIONS D'INSTALLATION DE LA TABLE DE CUISSON ÉLECTRIQUE Table of Contents / Table des matières COOKTOP SAFETY 1 INSTALLATION REQUIREMENTS 2 Tools and Parts 2 Location Requirements 2 Electrical Requirements 3 INSTALLATION INSTRUCTIONS 4 Prepare Cooktop for Installation 4 Install Cooktop 5 Make Electrical Connection 6 Attach Cooktop to reduce the chance of others . Installateur...

Installation Guide
Page 5
... countertop. NOTE: Make sure that will allow installation of the cooktop base. 2. Securely tighten screws. Using 2 or more people, turn cooktop right side up from cutout to the front edge of the cooktop is put in "Attach Cooktop to bottom of cooktop base bottom 5 Cooktop base bottom D. Attachment screw D. Clamp bracket (extends far enough beyond edge of 2½...
... countertop. NOTE: Make sure that will allow installation of the cooktop base. 2. Securely tighten screws. Using 2 or more people, turn cooktop right side up from cutout to the front edge of the cooktop is put in "Attach Cooktop to bottom of cooktop base bottom 5 Cooktop base bottom D. Attachment screw D. Clamp bracket (extends far enough beyond edge of 2½...

Installation Guide
Page 8
... B. Junction box E. UL listed or CSA approved conduit connector 1. Connect the 2 red wires together using the UL listed wire connectors. 2. Attachment screw D. Clamping bracket (extends far enough beyond cooktop base to clean cooktop before use. Foam seal 1. For more information, see which step was skipped. 2. Connect the 2 black wires together using the UL...
... B. Junction box E. UL listed or CSA approved conduit connector 1. Connect the 2 red wires together using the UL listed wire connectors. 2. Attachment screw D. Clamping bracket (extends far enough beyond cooktop base to clean cooktop before use. Foam seal 1. For more information, see which step was skipped. 2. Connect the 2 black wires together using the UL...