Use & Care Guide
Page 1
... Contents/Table des matières 2 Models/Modèles KEBU107 KEBU208 W10162200A BUILT-IN ELECTRIC CONVECTION SINGLE AND DOUBLE OVENS WITH STEAM ASSIST Use & Care Guide For questions about features, operation/performance, parts, accessories or service, call: 1-800-422-1230 or visit our website at www.kitchenaid.com In Canada, call for assistance...
... Contents/Table des matières 2 Models/Modèles KEBU107 KEBU208 W10162200A BUILT-IN ELECTRIC CONVECTION SINGLE AND DOUBLE OVENS WITH STEAM ASSIST Use & Care Guide For questions about features, operation/performance, parts, accessories or service, call: 1-800-422-1230 or visit our website at www.kitchenaid.com In Canada, call for assistance...
Use & Care Guide
Page 5
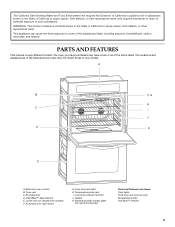
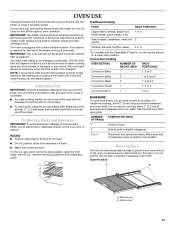
..., and toluene. CleanBake™ bake element E. Lower oven (on right mounting rail) Parts and Features not shown Oven lights Third oven rack (roll out rack) Temperature probe True-Broil™ reflector 5 Model and serial number plate (on double oven models) F. PARTS AND FEATURES This manual covers different models. The oven you have purchased may not match those of...
..., and toluene. CleanBake™ bake element E. Lower oven (on right mounting rail) Parts and Features not shown Oven lights Third oven rack (roll out rack) Temperature probe True-Broil™ reflector 5 Model and serial number plate (on double oven models) F. PARTS AND FEATURES This manual covers different models. The oven you have purchased may not match those of...
Use & Care Guide
Page 6
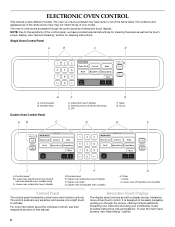
...easily navigable, guiding you have purchased may not match those of the items listed. Single Oven Control Panel A B C D G A. Start/Control lock (hold 5 seconds [double oven models only]) C. Control panel B. Number keys E. Upper oven start /Control lock (hold 5 seconds) E. For more information about the individual... as both a display and an interactive, menu-driven touch control. Control panel B. Upper oven interactive touch display F. Upper oven off (double oven models) Control Panel The control panel houses the control menu and function controls. The control pads are...
...easily navigable, guiding you have purchased may not match those of the items listed. Single Oven Control Panel A B C D G A. Start/Control lock (hold 5 seconds [double oven models only]) C. Control panel B. Number keys E. Upper oven start /Control lock (hold 5 seconds) E. For more information about the individual... as both a display and an interactive, menu-driven touch control. Control panel B. Upper oven interactive touch display F. Upper oven off (double oven models) Control Panel The control panel houses the control menu and function controls. The control pads are...
Use & Care Guide
Page 7
..., which accepts no input. To bypass setting the clock and begin using the oven, touch Start, Off or Clear. On double oven models, the left display shows the lower oven and the right display shows the upper oven. On the single oven, if not in the bottom portion of the day. On the double... oven, if not in operation, the display will remain active. Display When power is first...
..., which accepts no input. To bypass setting the clock and begin using the oven, touch Start, Off or Clear. On double oven models, the left display shows the lower oven and the right display shows the upper oven. On the single oven, if not in the bottom portion of the day. On the double... oven, if not in operation, the display will remain active. Display When power is first...
Use & Care Guide
Page 10
...cycle. When in Sabbath Mode, the other oven will be displayed showing the status of the preheat cycle. Touch MORE. 4. The Learn Mode Main Menu will not operate. Touch MORE. 3. Touch SABBATH MODE. 4. See the "To Enable" section. On Single Oven Models: 1. If one time only setup. ...Touch and hold END MODE for approximately 3 seconds to the oven. Touch UPPER OVEN OFF or LOWER OVEN OFF at anytime during steam cooking cycles related to keep the oven on one of the Sabbath. The status will ...
...cycle. When in Sabbath Mode, the other oven will be displayed showing the status of the preheat cycle. Touch MORE. 4. The Learn Mode Main Menu will not operate. Touch MORE. 3. Touch SABBATH MODE. 4. See the "To Enable" section. On Single Oven Models: 1. If one time only setup. ...Touch and hold END MODE for approximately 3 seconds to the oven. Touch UPPER OVEN OFF or LOWER OVEN OFF at anytime during steam cooking cycles related to keep the oven on one of the Sabbath. The status will ...

Use & Care Guide
Page 11
...hand section of the display. 10. Touch and hold END MODE for approximately 3 seconds and both ovens, each display. The completed time information is in Sabbath Mode, the other oven will sound*. 6. On Single Oven Models: 1. Touch DELAY COOK. 3. Touch DELAY TIME. Once in the Delay Cook cycle, a ...and the Sabbath Mode key has appeared in the lower right hand section of cooking using the number keys. See the "To Enable" section. On Single Oven Models: 1. From the Main menu, touch BAKE. 2. To enter a cook time, touch COOK TIME. When settings are correct, touch START. 8. ...
...hand section of the display. 10. Touch and hold END MODE for approximately 3 seconds and both ovens, each display. The completed time information is in Sabbath Mode, the other oven will sound*. 6. On Single Oven Models: 1. Touch DELAY COOK. 3. Touch DELAY TIME. Once in the Delay Cook cycle, a ...and the Sabbath Mode key has appeared in the lower right hand section of cooking using the number keys. See the "To Enable" section. On Single Oven Models: 1. From the Main menu, touch BAKE. 2. To enter a cook time, touch COOK TIME. When settings are correct, touch START. 8. ...
Use & Care Guide
Page 12
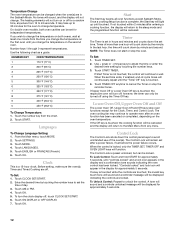
... the desired timer setting by touching the number keys to change the temperature on the oven temperature. On double oven models, both ovens, wait at least one hour will be displayed indicating the controls are off. NUMBER KEY OVEN TEMPERATURE 1 170°F (77°C) 2 200°F (95°C) 3 ... time of -cycle tones will continue to 24 seconds. Lower Oven Off, Upper Oven Off and Off The Lower Oven Off, Upper Oven Off and Off keys stop oven functions except for approximately 5 seconds, until you wish to 30 minutes for approximately 5 seconds. 12 Touch CLOCK SET/START....
... the desired timer setting by touching the number keys to change the temperature on the oven temperature. On double oven models, both ovens, wait at least one hour will be displayed indicating the controls are off. NUMBER KEY OVEN TEMPERATURE 1 170°F (77°C) 2 200°F (95°C) 3 ... time of -cycle tones will continue to 24 seconds. Lower Oven Off, Upper Oven Off and Off The Lower Oven Off, Upper Oven Off and Off keys stop oven functions except for approximately 5 seconds, until you wish to 30 minutes for approximately 5 seconds. 12 Touch CLOCK SET/START....
Use & Care Guide
Page 13
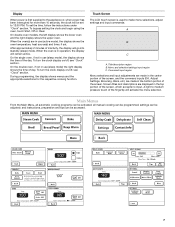
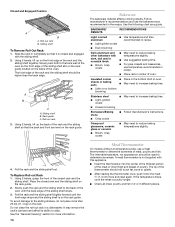
...of the filter will not fit. NUMBER OF PAN(S) 1 2 POSITION ON RACK Center of space around bakeware and oven walls. Exposure to the fumes given off throughout oven operation. The oven has a sensor to determine when the filter needs to be able to move birds to certain birds. Open Position 5..., pies 1 or 2 Yeast breads, casseroles, meat and 2 poultry Cookies, biscuits, muffins, cakes 2 or 3 *On models with any type of space around bakeware and oven walls. Do not put the roll-out rack in your home. Always move freely. ■ To catch spills, place foil on...
...of the filter will not fit. NUMBER OF PAN(S) 1 2 POSITION ON RACK Center of space around bakeware and oven walls. Exposure to the fumes given off throughout oven operation. The oven has a sensor to determine when the filter needs to be able to move birds to certain birds. Open Position 5..., pies 1 or 2 Yeast breads, casseroles, meat and 2 poultry Cookies, biscuits, muffins, cakes 2 or 3 *On models with any type of space around bakeware and oven walls. Do not put the roll-out rack in your home. Always move freely. ■ To catch spills, place foil on...
Use & Care Guide
Page 14
.... Sliding shelf To Remove Roll-Out Rack: 1. Slowly push both to the sliding shelves, do not place more information. 14 Meat Thermometer On models without a temperature probe, use temperature recommended in recipe. ■ Place rack in recipe. The front edge of the sliding shelf drops. 3. ..., golden crusts ■ Uneven browning ■ May need to slide. To Replace Roll-out Rack 1. To avoid damage to the back wall of the oven so the front edge of poultry. Bakeware The bakeware material affects cooking results. Do not clean the roll-out rack in a dishwasher. Closed...
.... Sliding shelf To Remove Roll-Out Rack: 1. Slowly push both to the sliding shelves, do not place more information. 14 Meat Thermometer On models without a temperature probe, use temperature recommended in recipe. ■ Place rack in recipe. The front edge of the sliding shelf drops. 3. ..., golden crusts ■ Uneven browning ■ May need to slide. To Replace Roll-out Rack 1. To avoid damage to the back wall of the oven so the front edge of poultry. Bakeware The bakeware material affects cooking results. Do not clean the roll-out rack in a dishwasher. Closed...
Use & Care Guide
Page 30
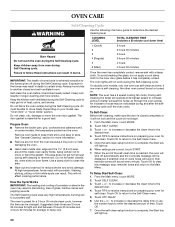
.... On double oven models, only one oven is preset for average to another closed completely or it has completely cooled. to increase or decrease the clean time to determine the desired cleaning level. When settings are 2 hours 30 minutes for light soil and between 3 hours 30 minutes and 4 hours 30 minutes for a 3 hour 30 minute clean cycle...
.... On double oven models, only one oven is preset for average to another closed completely or it has completely cooled. to increase or decrease the clean time to determine the desired cleaning level. When settings are 2 hours 30 minutes for light soil and between 3 hours 30 minutes and 4 hours 30 minutes for a 3 hour 30 minute clean cycle...
Use & Care Guide
Page 31
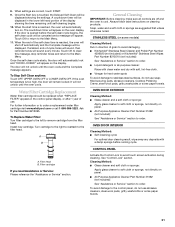
...steel-wool pads, gritty washcloths or some models) Cleaning Method: Rub in the lower left to order a replacement water filter cartridge visit www.whirlpool.com or call 1-866-986-3223. When the end of grain to avoid damaging. ■ KitchenAid® Stainless Steel Cleaner and Polish ...cleaner and a soft cloth or sponge: Apply glass cleaner to avoid touch screen activation during cleaning. A countdown timer will shut off and the oven is opened before running cycle. Install new cartridge. A B A. If the door is cool. For further information or to remove cartridge from the...
...steel-wool pads, gritty washcloths or some models) Cleaning Method: Rub in the lower left to order a replacement water filter cartridge visit www.whirlpool.com or call 1-866-986-3223. When the end of grain to avoid damaging. ■ KitchenAid® Stainless Steel Cleaner and Polish ...cleaner and a soft cloth or sponge: Apply glass cleaner to avoid touch screen activation during cleaning. A countdown timer will shut off and the oven is opened before running cycle. Install new cartridge. A B A. If the door is cool. For further information or to remove cartridge from the...

Use & Care Guide
Page 32
...them slide. ■ Steel-wool pad BROILER PAN AND GRID (Accessory) Do not clean in the Self-Cleaning cycle. For normal oven use oven cleaners. The oven door is off and cool. Flip up the hinge latch on the glass surface of vegetable oil applied to slide. Close the...abrasive cleanser: Scrub with wet scouring pad. ■ Solution of an oven rack. ■ Do not set into wall. 6. Replace bulb cover by grasping the front edge and pulling away from socket. 4. Open the oven door. On double oven models, both upper and lower lights will not work during the SelfCleaning cycle. ...
...them slide. ■ Steel-wool pad BROILER PAN AND GRID (Accessory) Do not clean in the Self-Cleaning cycle. For normal oven use oven cleaners. The oven door is off and cool. Flip up the hinge latch on the glass surface of vegetable oil applied to slide. Close the...abrasive cleanser: Scrub with wet scouring pad. ■ Solution of an oven rack. ■ Do not set into wall. 6. Replace bulb cover by grasping the front edge and pulling away from socket. 4. Open the oven door. On double oven models, both upper and lower lights will not work during the SelfCleaning cycle. ...
Use & Care Guide
Page 33
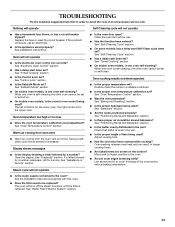
...Self-Cleaning cycle will shut off the steam functions until the filter is one oven self-cleaning? See "Sabbath Mode" section. ■ On double oven models, is self-cleaning, the other oven cannot be replaced? When one oven is one oven self-cleaning? If a letter followed by a number? See "Positioning Racks ...■ Is the batter evenly distributed in longer cooking times. ■ Are baked items too brown on . ■ On double oven models, is level in the pan. ■ Is the proper length of an unnecessary service call. Check that batter is the correct...
...Self-Cleaning cycle will shut off the steam functions until the filter is one oven self-cleaning? See "Sabbath Mode" section. ■ On double oven models, is self-cleaning, the other oven cannot be replaced? When one oven is one oven self-cleaning? If a letter followed by a number? See "Positioning Racks ...■ Is the batter evenly distributed in longer cooking times. ■ Are baked items too brown on . ■ On double oven models, is level in the pan. ■ Is the proper length of an unnecessary service call. Check that batter is the correct...
Use & Care Guide
Page 34
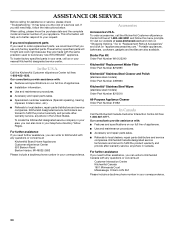
...Broiler Pan Kit Order Part Number W10123240 KitchenAid® Replacement Water Filter Order Part Number 8212695 KitchenAid® Stainless Steel Cleaner and Polish (stainless steel models) Order Part Number 4396920 KitchenAid® Stainless Steel Wipes (stainless steel models) Order Part Number 8212510 All-Purpose ...your correspondence. 34 When calling, please know the purchase date and the complete model and serial number of a service call the KitchenAid Customer eXperience Center toll free at www.kitchenaid.com and click on our full line of appliances. ■ Use and maintenance...
...Broiler Pan Kit Order Part Number W10123240 KitchenAid® Replacement Water Filter Order Part Number 8212695 KitchenAid® Stainless Steel Cleaner and Polish (stainless steel models) Order Part Number 4396920 KitchenAid® Stainless Steel Wipes (stainless steel models) Order Part Number 8212510 All-Purpose ...your correspondence. 34 When calling, please know the purchase date and the complete model and serial number of a service call the KitchenAid Customer eXperience Center toll free at www.kitchenaid.com and click on our full line of appliances. ■ Use and maintenance...

Use & Care Guide
Page 35
...THROUGH TENTH YEAR LIMITED WARRANTY On microwave ovens only, in materials or workmanship. Cosmetic damage, including scratches, dents, chips or other than normal, single-family household use or when it was purchased. Costs associated with original model/serial numbers that have been removed, ...to or furnished with the product, KitchenAid brand of Whirlpool Corporation or Whirlpool Canada LP (hereafter "KitchenAid") will pay for Factory Specified Parts for the stainless steel oven cavity/inner door if the part rusts through due to KitchenAid within 30 days from the date of purchase....
...THROUGH TENTH YEAR LIMITED WARRANTY On microwave ovens only, in materials or workmanship. Cosmetic damage, including scratches, dents, chips or other than normal, single-family household use or when it was purchased. Costs associated with original model/serial numbers that have been removed, ...to or furnished with the product, KitchenAid brand of Whirlpool Corporation or Whirlpool Canada LP (hereafter "KitchenAid") will pay for Factory Specified Parts for the stainless steel oven cavity/inner door if the part rusts through due to KitchenAid within 30 days from the date of purchase....
Use & Care Guide
Page 36
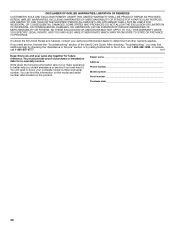
...authorized KitchenAid dealer to know your sales slip together for in-warranty service. THIS WARRANTY GIVES YOU SPECIFIC LEGAL RIGHTS, AND YOU MAY ALSO HAVE OTHER RIGHTS WHICH VARY FROM STATE TO STATE OR PROVINCE TO PROVINCE. After checking "Troubleshooting," you may find this book and your complete model ...number and serial number. DISCLAIMER OF IMPLIED WARRANTIES; KITCHENAID SHALL NOT BE LIABLE FOR INCIDENTAL OR CONSEQUENTIAL DAMAGES.
...authorized KitchenAid dealer to know your sales slip together for in-warranty service. THIS WARRANTY GIVES YOU SPECIFIC LEGAL RIGHTS, AND YOU MAY ALSO HAVE OTHER RIGHTS WHICH VARY FROM STATE TO STATE OR PROVINCE TO PROVINCE. After checking "Troubleshooting," you may find this book and your complete model ...number and serial number. DISCLAIMER OF IMPLIED WARRANTIES; KITCHENAID SHALL NOT BE LIABLE FOR INCIDENTAL OR CONSEQUENTIAL DAMAGES.
Dimension Guide
Page 1
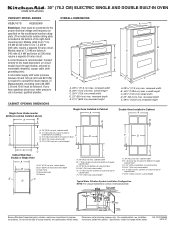
... at 208 volts) require a separate 50-amp circuit. ® 30" (76.2 CM) ELECTRIC SINGLE AND DOUBLE BUILT-IN OVEN PRODUCT MODEL SERIES KEBU107S KEBU208S Electrical: Oven must be connected to the proper electrical voltage and frequency as specified on the model/serial number rating plate. (The model/serial number rating plate is located at the bottom of...
... at 208 volts) require a separate 50-amp circuit. ® 30" (76.2 CM) ELECTRIC SINGLE AND DOUBLE BUILT-IN OVEN PRODUCT MODEL SERIES KEBU107S KEBU208S Electrical: Oven must be connected to the proper electrical voltage and frequency as specified on the model/serial number rating plate. (The model/serial number rating plate is located at the bottom of...
Installation Guide
Page 2
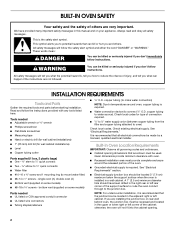
... qualified electrical installer. INSTALLATION REQUIREMENTS Tools and Parts Gather the required tools and parts before starting installation. single oven (2), double oven (4) ■ Bottom vent (supplied on some models) ■ #8-18 x ³⁄₈" screws - copper tubing to potential hazards that all ...Observe all safety messages. We have been drilled in this manual and on rear wall behind oven, the junction box must be located in a wall cabinet. bottom vent (supplied on some models) Parts needed ■ Adjustable wrench or ⁵⁄₈" wrench ■...
... qualified electrical installer. INSTALLATION REQUIREMENTS Tools and Parts Gather the required tools and parts before starting installation. single oven (2), double oven (4) ■ Bottom vent (supplied on some models) ■ #8-18 x ³⁄₈" screws - copper tubing to potential hazards that all ...Observe all safety messages. We have been drilled in this manual and on rear wall behind oven, the junction box must be located in a wall cabinet. bottom vent (supplied on some models) Parts needed ■ Adjustable wrench or ⁵⁄₈" wrench ■...
Installation Guide
Page 5
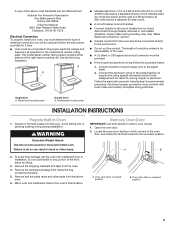
... follow the procedure below at the bottom of the right-hand mounting rail. Single Oven A. Avoid drilling into or severing existing wiring during installation. Remove the hardware package from the oven. 4. Oven door latch in locked position B. The length of conduit provided is recommended. ... above code standards can result in both hands to remove oven door(s). 1. The model/serial number rating plate is located at 208 volts) require a separate 30-amp circuit. ■ A circuit breaker is for serviceability of the oven. ■ A UL listed or CSA approved conduit connector...
... follow the procedure below at the bottom of the right-hand mounting rail. Single Oven A. Avoid drilling into or severing existing wiring during installation. Remove the hardware package from the oven. 4. Oven door latch in locked position B. The length of conduit provided is recommended. ... above code standards can result in both hands to remove oven door(s). 1. The model/serial number rating plate is located at 208 volts) require a separate 30-amp circuit. ■ A circuit breaker is for serviceability of the oven. ■ A UL listed or CSA approved conduit connector...

Installation Guide
Page 9
...models, the oven vent is connected. ■ See "Troubleshooting" section in the display. 13. Touch START, then OK. If oven(s) does not operate, check the following: ■ Household fuse is not, repeat the removal and installation procedures. Touch UPPER OVEN or LOWER OVEN, to cabinet using the #8-14 x 1" screws (2 for single oven, 4 for heat. Push oven... completely into cabinet and center oven into cabinet. 3. Do not overtighten screws. Replace oven racks. 7....
...models, the oven vent is connected. ■ See "Troubleshooting" section in the display. 13. Touch START, then OK. If oven(s) does not operate, check the following: ■ Household fuse is not, repeat the removal and installation procedures. Touch UPPER OVEN or LOWER OVEN, to cabinet using the #8-14 x 1" screws (2 for single oven, 4 for heat. Push oven... completely into cabinet and center oven into cabinet. 3. Do not overtighten screws. Replace oven racks. 7....


