Use & Care Guide
Page 9
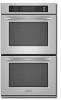
...forward until the back edge of the sliding shelf drops. 3. To avoid damage to position and remove food in the oven. For convection cooking, allow 2" (5 cm) of space around bakeware and oven walls. Roll-Out Rack The roll-out rack allows easy access to the sliding shelves, do not place more information. 9... Roast 1 Convection Broil 1 RACK POSITION(S) 1, 2 or 3 1 or 2 and 4 1, 3 and 5 1, 2 or 3 3 or 4 BAKEWARE To cook food evenly, hot air must be able to the back wall of the oven so the front edge of the sliding shelf sits on the rack guide located on the sides of the...
...forward until the back edge of the sliding shelf drops. 3. To avoid damage to position and remove food in the oven. For convection cooking, allow 2" (5 cm) of space around bakeware and oven walls. Roll-Out Rack The roll-out rack allows easy access to the sliding shelves, do not place more information. 9... Roast 1 Convection Broil 1 RACK POSITION(S) 1, 2 or 3 1 or 2 and 4 1, 3 and 5 1, 2 or 3 3 or 4 BAKEWARE To cook food evenly, hot air must be able to the back wall of the oven so the front edge of the sliding shelf sits on the rack guide located on the sides of the...

Use & Care Guide
Page 19
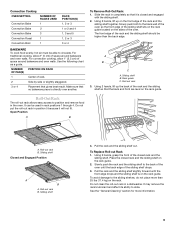
...the bulb, make sure the oven is set objects on or off. Disconnect power. 2. For normal oven use, it away from socket. 4. Reconnect power. On double oven models, both upper and lower lights will come on when the oven door is opened . IMPORTANT: Oven Door To avoid oven door glass breakage: ■... Remove: 1. Porcelain enamel only, not chrome ■ Dishwasher Oven Lights The oven lights are not fully inserted into the oven cavity or when bakeware extends past the front edge of an oven rack. ■ Do not set into wall. 6. Flip up the hinge latch on some models) Do ...
...the bulb, make sure the oven is set objects on or off. Disconnect power. 2. For normal oven use, it away from socket. 4. Reconnect power. On double oven models, both upper and lower lights will come on when the oven door is opened . IMPORTANT: Oven Door To avoid oven door glass breakage: ■... Remove: 1. Porcelain enamel only, not chrome ■ Dishwasher Oven Lights The oven lights are not fully inserted into the oven cavity or when bakeware extends past the front edge of an oven rack. ■ Do not set into wall. 6. Flip up the hinge latch on some models) Do ...

Installation Guide
Page 2
... kg). 2 All safety messages will tell you what can be located 3" (7.6 cm) maximum below the support surface when the oven is required. single oven (2), double oven (4) ■ Bottom vent (supplied on some models) ■ Two #8-18 x ³⁄₈" screws - This is... recommended that are very important. All safety messages will not fit into the cabinet opening dimensions that the junction box be recessed and located in a wall ...
... kg). 2 All safety messages will tell you what can be located 3" (7.6 cm) maximum below the support surface when the oven is required. single oven (2), double oven (4) ■ Bottom vent (supplied on some models) ■ Two #8-18 x ³⁄₈" screws - This is... recommended that are very important. All safety messages will not fit into the cabinet opening dimensions that the junction box be recessed and located in a wall ...

Technical Guide
Page 15
...cm) max. recessed depth E. 49 9/16 " (125.9 cm) recessed height 30" (76.2 cm) models A. 28 5/16 " (71.9 cm) max. single oven (2), double oven (4) • Bottom vent (supplied on some models) • Two # 8-18 x 3/8˝ screws - plied on some models) Check local codes. See "Electrical... in a wall cabinet. lations) • 1˝ (25 mm) drill bit (for wall cabinet instal- overall height C. 26 3/4 " (67.9 cm) overall width D. 23" (58.4 cm) max. Read and follow the instructions provided with oven. lations) • Level Parts needed for correct installation. D C 27" (68.6...
...cm) max. recessed depth E. 49 9/16 " (125.9 cm) recessed height 30" (76.2 cm) models A. 28 5/16 " (71.9 cm) max. single oven (2), double oven (4) • Bottom vent (supplied on some models) • Two # 8-18 x 3/8˝ screws - plied on some models) Check local codes. See "Electrical... in a wall cabinet. lations) • 1˝ (25 mm) drill bit (for wall cabinet instal- overall height C. 26 3/4 " (67.9 cm) overall width D. 23" (58.4 cm) max. Read and follow the instructions provided with oven. lations) • Level Parts needed for correct installation. D C 27" (68.6...

Technical Guide
Page 86
... diagnosis of the appliance if a fuse is blown, a circuit breaker is tripped, or if there is less than a 240 volt power supply at the wall outlet. CONVECT BROIL PREHEAT A CONVECT BROIL SS (CONVECTION MODELS ONLY) L1 BK BK BK BK BK T4-4 (T4-2) T4-3 (T4-1) P10-4 P8-1...(T5-4) P10-3 (P10-1) P8-4 BU OUT BROIL 1450WBU OR IN BROIL 1800W OR BK/W DOUBLE LINE BREAK RELAY R/W R R W R/W BLOWER SPEED RESISTOR OR OR GY GY UP BLOWER GY GY BLOWER SPEED RESISTOR LOW BLOWER N W W W W L2 R OVEN SHUTDOWN THERMAL CUTOFF (NON-RESETTABLE) 105°C (221°F) R CONVECT BROIL PREHEAT B -...
... diagnosis of the appliance if a fuse is blown, a circuit breaker is tripped, or if there is less than a 240 volt power supply at the wall outlet. CONVECT BROIL PREHEAT A CONVECT BROIL SS (CONVECTION MODELS ONLY) L1 BK BK BK BK BK T4-4 (T4-2) T4-3 (T4-1) P10-4 P8-1...(T5-4) P10-3 (P10-1) P8-4 BU OUT BROIL 1450WBU OR IN BROIL 1800W OR BK/W DOUBLE LINE BREAK RELAY R/W R R W R/W BLOWER SPEED RESISTOR OR OR GY GY UP BLOWER GY GY BLOWER SPEED RESISTOR LOW BLOWER N W W W W L2 R OVEN SHUTDOWN THERMAL CUTOFF (NON-RESETTABLE) 105°C (221°F) R CONVECT BROIL PREHEAT B -...


