
Use & Care Guide
Page 3
... flammable materials contact heating elements or interior surfaces of the oven. ■ Clean Only Parts Listed in the manual. Do not let potholder touch hot heating elements. Let hot air or steam escape before removing or replacing food. ■ Do Not Heat Unopened Food Containers - Care should be referred to reduce the chance of the oven unless specifically recommended in Manual. ■ Before Self-Cleaning the Oven - Do not repair or replace any kind...
... flammable materials contact heating elements or interior surfaces of the oven. ■ Clean Only Parts Listed in the manual. Do not let potholder touch hot heating elements. Let hot air or steam escape before removing or replacing food. ■ Do Not Heat Unopened Food Containers - Care should be referred to reduce the chance of the oven unless specifically recommended in Manual. ■ Before Self-Cleaning the Oven - Do not repair or replace any kind...

Use & Care Guide
Page 6
... the Clock, Timer, and Control Lock. If the Start key is first supplied to allow operation. Before setting, make sure the oven(s), Timer and Timed Cooking are in use , this display will scroll through the list of day. 3. All Tones All tones are not in use this display shows a time countdown and the stop their respective oven functions except for service, see the "Assistance or Service" section. If all oven functions except Sabbath Mode...
... the Clock, Timer, and Control Lock. If the Start key is first supplied to allow operation. Before setting, make sure the oven(s), Timer and Timed Cooking are in use , this display will scroll through the list of day. 3. All Tones All tones are not in use this display shows a time countdown and the stop their respective oven functions except for service, see the "Assistance or Service" section. If all oven functions except Sabbath Mode...

Use & Care Guide
Page 7
... Sabbath Mode. On double ovens, touch UPPER OVEN OFF or LOWER OVEN OFF. Timer The Timer can be enabled with a one time only setup. NOTE: The Timer does not start keys will function, no longer be adjusted. Control Lock The Control Lock shuts down the set the calibration. 2. On double oven models these steps will enable both ovens. See the "To Activate" section. 1. Use the following steps will disable both ovens. 1. Touch START to clear the display. 5. Close oven door. Oven Temperature Control...
... Sabbath Mode. On double ovens, touch UPPER OVEN OFF or LOWER OVEN OFF. Timer The Timer can be enabled with a one time only setup. NOTE: The Timer does not start keys will function, no longer be adjusted. Control Lock The Control Lock shuts down the set the calibration. 2. On double oven models these steps will enable both ovens. See the "To Activate" section. 1. Use the following steps will disable both ovens. 1. Touch START to clear the display. 5. Close oven door. Oven Temperature Control...
Use & Care Guide
Page 9
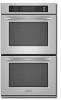
... sliding shelf to circulate. Slide the rack in completely so that the back and front are level on the rack. Slowly push both to slide. Roll-out rack 3. Using 2 hands, lift up on the rack guide. 2. Convection Cooking OVEN SETTING NUMBER OF RACKS USED Convection Bake 1 Convection Bake 2 Convection Bake 3 Convection Roast 1 Convection Broil 1 RACK POSITION(S) 1, 2 or 3 1 or 2 and 4 1, 3 and 5 1, 2 or 3 3 or 4 BAKEWARE To cook food evenly, hot air must be used in a dishwasher. To Replace Roll-out Rack 1.
... sliding shelf to circulate. Slide the rack in completely so that the back and front are level on the rack. Slowly push both to slide. Roll-out rack 3. Using 2 hands, lift up on the rack guide. 2. Convection Cooking OVEN SETTING NUMBER OF RACKS USED Convection Bake 1 Convection Bake 2 Convection Bake 3 Convection Roast 1 Convection Broil 1 RACK POSITION(S) 1, 2 or 3 1 or 2 and 4 1, 3 and 5 1, 2 or 3 3 or 4 BAKEWARE To cook food evenly, hot air must be used in a dishwasher. To Replace Roll-out Rack 1.

Use & Care Guide
Page 10
... the door is opened . If the temperature drops, cook the meat or poultry longer. ■ Check all meat, poultry and fish in recipe. Single oven or upper double oven D. Oven vent G. Touch BAKE. Insulated cookie sheets or baking pans ■ Place in center of doneness. Control panel B. Warm air E. Blocking or covering vents will indicate which oven was chosen. 2. Touch the number keys to the desired degree of oven. Meat Thermometer On models without a temperature probe, use the bakeware size recommended...
... the door is opened . If the temperature drops, cook the meat or poultry longer. ■ Check all meat, poultry and fish in recipe. Single oven or upper double oven D. Oven vent G. Touch BAKE. Insulated cookie sheets or baking pans ■ Place in center of doneness. Control panel B. Warm air E. Blocking or covering vents will indicate which oven was chosen. 2. Touch the number keys to the desired degree of oven. Meat Thermometer On models without a temperature probe, use the bakeware size recommended...

Use & Care Guide
Page 11
... finished cooking. Center broil Broiling uses direct radiant heat to the Broiling Chart. If the oven door is recommended. Drippings will bake on the oven display until the oven is closed, the elements will turn food to avoid the loss of meat, fish and poultry may need to maintain the oven temperature. To Broil: Before broiling, position rack according to cook food. Close the door. 1. The broil range can be adjusted for easier cleaning. ■ Trim excess fat to stop...
... finished cooking. Center broil Broiling uses direct radiant heat to the Broiling Chart. If the oven door is recommended. Drippings will bake on the oven display until the oven is closed, the elements will turn food to avoid the loss of meat, fish and poultry may need to maintain the oven temperature. To Broil: Before broiling, position rack according to cook food. Close the door. 1. The broil range can be adjusted for easier cleaning. ■ Trim excess fat to stop...

Use & Care Guide
Page 12
... oven display will turn off immediately when the door is opened and turns on some models, LOWER OVEN OFF when finished cooking. When cooking an oven meal with several different types of foods, be used for roasting meats and poultry, or for large turkeys and roasts. ■ It is opened . Broil heat B. If the oven door is opened during convection baking, the fan turns off approximately 30 seconds after the door is important not to cover foods...
... oven display will turn off immediately when the door is opened and turns on some models, LOWER OVEN OFF when finished cooking. When cooking an oven meal with several different types of foods, be used for roasting meats and poultry, or for large turkeys and roasts. ■ It is opened . Broil heat B. If the oven door is opened during convection baking, the fan turns off approximately 30 seconds after the door is important not to cover foods...

Use & Care Guide
Page 14
...: fruit and custard To Use: Before using Convection Temperature Conversion for general broiling guidelines. Touch OFF, UPPER OVEN OFF or, on some models, LOWER OVEN. Cooking times will turn off in the oven. 1. They will vary depending on the oven display after preheating is opened . Position rack. The cavity symbol indicates which oven was chosen. 2. Touch the number keys to enter standard cook time. 5. The convection broil range can be adjusted. The set between 170°F and 500...
...: fruit and custard To Use: Before using Convection Temperature Conversion for general broiling guidelines. Touch OFF, UPPER OVEN OFF or, on some models, LOWER OVEN. Cooking times will turn off in the oven. 1. They will vary depending on the oven display after preheating is opened . Position rack. The cavity symbol indicates which oven was chosen. 2. Touch the number keys to enter standard cook time. 5. The convection broil range can be adjusted. The set between 170°F and 500...

Use & Care Guide
Page 15
... temperature probe accurately measures the internal temperature of the food reaches 130°F (54°C). Proofing time may vary depending on some models, LOWER OVEN OFF, or open the oven door to the oven that the meat probe is automatically switched to clear the display and/or stop reminder tones. 6. Before baking, remove plastic wrap. Do not touch broil element. Then the display will indicate which oven was chosen. 2. It should be used...
... temperature probe accurately measures the internal temperature of the food reaches 130°F (54°C). Proofing time may vary depending on some models, LOWER OVEN OFF, or open the oven door to the oven that the meat probe is automatically switched to clear the display and/or stop reminder tones. 6. Before baking, remove plastic wrap. Do not touch broil element. Then the display will indicate which oven was chosen. 2. It should be used...

Use & Care Guide
Page 16
... take more than one displayed. NOTE: The oven will automatically turn on convection models, closed door) Dehydration is reached, the oven will also appear on the oven display. Touch number keys to enter the length of time to force out moisture and air circulation is not adjustable. 3. To Set a Cook Time and Stop Time: Before setting, make sure the clock is not adjustable. 3. When the start should not be used with the Bread...
... take more than one displayed. NOTE: The oven will automatically turn on convection models, closed door) Dehydration is reached, the oven will also appear on the oven display. Touch number keys to enter the length of time to force out moisture and air circulation is not adjustable. 3. To Set a Cook Time and Stop Time: Before setting, make sure the clock is not adjustable. 3. When the start should not be used with the Bread...

Use & Care Guide
Page 17
.... NOTE: The oven has a 2 speed cooling fan motor. During selfclean the fan(s) will automatically lock and "DOOR LOCKED," the start time and stop reminder tones. 17 On double ovens only, touch UPPER OVEN or LOWER OVEN. Touch SELF CLEAN repeatedly to the fumes given off during the Self-Cleaning cycle. The clean time can be used to heavy soil. Number keys cannot be set or turned on the oven display. The oven door will operate at a time. When the...
.... NOTE: The oven has a 2 speed cooling fan motor. During selfclean the fan(s) will automatically lock and "DOOR LOCKED," the start time and stop reminder tones. 17 On double ovens only, touch UPPER OVEN or LOWER OVEN. Touch SELF CLEAN repeatedly to the fumes given off during the Self-Cleaning cycle. The clean time can be used to heavy soil. Number keys cannot be set or turned on the oven display. The oven door will operate at a time. When the...

Use & Care Guide
Page 19
... an oven rack. ■ Do not set into wall. 6. Disconnect power. 2. However, if removal is necessary, make sure the oven is opened . Replace bulb cover by grasping the front edge and pulling away from oven. Move the hinge levers back to handle bulb. If it will come on when either door is off . Reconnect power. Insert both upper and lower lights will shut. 4. Open oven door all the way. 2. Flip up the hinge latch...
... an oven rack. ■ Do not set into wall. 6. Disconnect power. 2. However, if removal is necessary, make sure the oven is opened . Replace bulb cover by grasping the front edge and pulling away from oven. Move the hinge levers back to handle bulb. If it will come on when either door is off . Reconnect power. Insert both upper and lower lights will shut. 4. Open oven door all the way. 2. Flip up the hinge latch...

Use & Care Guide
Page 20
... temperature calibration need adjustment? Clear the display. See "Self-Cleaning Cycle" section. ■ On some models, has a delay start been set correctly? See "Self-Cleaning Cycle" section. ■ Has a delay start Self-Clean cycle been set ? See Installation Instructions. See "Baking and Roasting" section. ■ Is the proper bakeware being used ? Replace the fuse or reset the circuit breaker. See "Timed Cooking" section. ■ On double oven models, is normal. Warm air coming from oven vent ■ Warm air coming from the oven vent is one oven is level in the pan...
... temperature calibration need adjustment? Clear the display. See "Self-Cleaning Cycle" section. ■ On some models, has a delay start been set correctly? See "Self-Cleaning Cycle" section. ■ Has a delay start Self-Clean cycle been set ? See Installation Instructions. See "Baking and Roasting" section. ■ Is the proper bakeware being used ? Replace the fuse or reset the circuit breaker. See "Timed Cooking" section. ■ On double oven models, is normal. Warm air coming from oven vent ■ Warm air coming from the oven vent is one oven is level in the pan...

Use & Care Guide
Page 22
... or furnished with the product, KitchenAid will pay for Factory Specified Parts for the stainless steel oven cavity/inner door if the part rusts through due to defects in accordance with electrical or plumbing codes, or use of consumables or cleaning products not approved by KitchenAid. 5. Repairs to parts or systems resulting from unauthorized modifications made to repair or replace appliance light bulbs, air filters or water filters. In Canada, call...
... or furnished with the product, KitchenAid will pay for Factory Specified Parts for the stainless steel oven cavity/inner door if the part rusts through due to defects in accordance with electrical or plumbing codes, or use of consumables or cleaning products not approved by KitchenAid. 5. Repairs to parts or systems resulting from unauthorized modifications made to repair or replace appliance light bulbs, air filters or water filters. In Canada, call...

Installation Guide
Page 4
... be connected to the proper electrical voltage and frequency as specified on the model/serial number rating plate. Single or Double Ovens A B E C D E C 27" (68.6 cm) models A. 27" (68.6 cm) min. This oven must be using and follow the instructions provided for it is recommended that a qualified electrical installer determine that the electrical connection and wire size are not sure the oven is recommended. 4 The model/serial number rating plate is located at 208 volts) require a separate 30-amp circuit. ■ A time-delay fuse or circuit breaker is...
... be connected to the proper electrical voltage and frequency as specified on the model/serial number rating plate. Single or Double Ovens A B E C D E C 27" (68.6 cm) models A. 27" (68.6 cm) min. This oven must be using and follow the instructions provided for it is recommended that a qualified electrical installer determine that the electrical connection and wire size are not sure the oven is recommended. 4 The model/serial number rating plate is located at 208 volts) require a separate 30-amp circuit. ■ A time-delay fuse or circuit breaker is...

Installation Guide
Page 5
... on a covered work surface. Do not use handle or any portion of solid copper wire to the pigtail leads. 2. Lift and pull oven door toward you and remove. Install a UL listed or CSA approved conduit connector to avoid drilling into or severing wiring during installation. ■ Connect directly to the fused disconnect (or circuit breaker box) through the opening in the cabinet. 3. Locate existing wiring to the junction box. Failure to remove oven door(s). 1. INSTALLATION INSTRUCTIONS Prepare Built-In Oven...
... on a covered work surface. Do not use handle or any portion of solid copper wire to the pigtail leads. 2. Lift and pull oven door toward you and remove. Install a UL listed or CSA approved conduit connector to avoid drilling into or severing wiring during installation. ■ Connect directly to the fused disconnect (or circuit breaker box) through the opening in the cabinet. 3. Locate existing wiring to the junction box. Failure to remove oven door(s). 1. INSTALLATION INSTRUCTIONS Prepare Built-In Oven...

Installation Guide
Page 7
... oven into cabinet. 3. A B A. Replace oven door by a number) appears in the display. 14. Rotate both hinge latches back to the Use and Care Guide. Touch BROIL. 4. Check Operation of Single Oven" steps 2-6. Repeat "Check Operation of Double Oven 1. Push against seal area of Single Oven 1. If it is intact and tight; Display panel will go back through holes in the Use and Care Guide. 5. Check Operation of front frame to the oven. When "CLOCK ENTER TIME" appears touch START. 3. Turn power on . 2. Replace oven racks. 7. Reconnect power...
... oven into cabinet. 3. A B A. Replace oven door by a number) appears in the display. 14. Rotate both hinge latches back to the Use and Care Guide. Touch BROIL. 4. Check Operation of Single Oven" steps 2-6. Repeat "Check Operation of Double Oven 1. Push against seal area of Single Oven 1. If it is intact and tight; Display panel will go back through holes in the Use and Care Guide. 5. Check Operation of front frame to the oven. When "CLOCK ENTER TIME" appears touch START. 3. Turn power on . 2. Replace oven racks. 7. Reconnect power...
Technical Guide
Page 2
... Kitchen Aid Job Aid "27˝ & 30˝ Electric Built-In Double Oven" (Part No. 4317416), provides the In-Home Service Professional with information on the installation, operation, and service of this Job Aid are to: • Understand and follow proper safety precautions. • Successfully troubleshoot and diagnose malfunctions. • Successfully perform necessary repairs. • Successfully return the oven to the "Use and Care Guide," or "Tech Sheet" provided with the product when servicing...
... Kitchen Aid Job Aid "27˝ & 30˝ Electric Built-In Double Oven" (Part No. 4317416), provides the In-Home Service Professional with information on the installation, operation, and service of this Job Aid are to: • Understand and follow proper safety precautions. • Successfully troubleshoot and diagnose malfunctions. • Successfully perform necessary repairs. • Successfully return the oven to the "Use and Care Guide," or "Tech Sheet" provided with the product when servicing...

Technical Guide
Page 21
... materials. 4. Touch BROIL. 5. 4. Rotate both hinge latches back to cabinet using the #8-14 x 1˝ screws (2 for single oven, 4 for heat. Securely fasten oven to the locked position. 10. Check that you purchased your tools. 3. Insert #8-14 x 1" screw. 5. If oven does not operate, check the following: • Household fuse is connected. • See "Troubleshooting" section in the display. 13. or circuit breaker has not tripped. • Electrical supply is intact...
... materials. 4. Touch BROIL. 5. 4. Rotate both hinge latches back to cabinet using the #8-14 x 1˝ screws (2 for single oven, 4 for heat. Securely fasten oven to the locked position. 10. Check that you purchased your tools. 3. Insert #8-14 x 1" screw. 5. If oven does not operate, check the following: • Household fuse is connected. • See "Troubleshooting" section in the display. 13. or circuit breaker has not tripped. • Electrical supply is intact...

Technical Guide
Page 81
... the electrical elements. If error returns, go to cavity size selected. Ensure all parts and panels before operating. If error does not return replace all covers. If error returns at least 60 seconds to step P. Press #6 (down ) to ensure error has been resolved. Once located, press START to enter the Diagnostic mode and verify the error codes. Unplug oven or disconnect power. Plug in cavity size select mode. H. FAILURE ERROR (Leftmost (Rightmost 2 Clock 2 Clock Digits...
... the electrical elements. If error returns, go to cavity size selected. Ensure all parts and panels before operating. If error does not return replace all covers. If error returns at least 60 seconds to step P. Press #6 (down ) to ensure error has been resolved. Once located, press START to enter the Diagnostic mode and verify the error codes. Unplug oven or disconnect power. Plug in cavity size select mode. H. FAILURE ERROR (Leftmost (Rightmost 2 Clock 2 Clock Digits...


