
Use & Care Guide
Page 3
...move the gasket. ■ Do Not Use Oven Cleaners - Be sure the oven is properly installed and grounded by a qualified technician. ■ Never Use the Oven for a good seal. Flammable materials should be worn while using the oven, follow instructions. The door gasket is , tell you how...can kill or hurt you don't immediately follow basic precautions, including the following: ■ Proper Installation - They should never be used in desired location while oven is the safety alert symbol. Loose-fitting or hanging garments should never be killed or seriously injured...
...move the gasket. ■ Do Not Use Oven Cleaners - Be sure the oven is properly installed and grounded by a qualified technician. ■ Never Use the Oven for a good seal. Flammable materials should be worn while using the oven, follow instructions. The door gasket is , tell you how...can kill or hurt you don't immediately follow basic precautions, including the following: ■ Proper Installation - They should never be used in desired location while oven is the safety alert symbol. Loose-fitting or hanging garments should never be killed or seriously injured...

Use & Care Guide
Page 19
...will come on when either door is not, repeat the removal and installation procedures. 19 Remove bulb from the oven door frame. 3. Reconnect power. Insert both upper and lower lights will... On double oven models, both hanger arms into the oven cavity or when bakeware extends past the front edge of an oven rack. ■ Do not set into wall. 6. When the oven door is... oven door all the way. 2. Continue to push the oven door closed , touch OVEN LIGHT to handle bulb. Then, follow these instructions. You should hear a "click" as it away from socket. 4. Lift the oven ...
...will come on when either door is not, repeat the removal and installation procedures. 19 Remove bulb from the oven door frame. 3. Reconnect power. Insert both upper and lower lights will... On double oven models, both hanger arms into the oven cavity or when bakeware extends past the front edge of an oven rack. ■ Do not set into wall. 6. When the oven door is... oven door all the way. 2. Continue to push the oven door closed , touch OVEN LIGHT to handle bulb. Then, follow these instructions. You should hear a "click" as it away from socket. 4. Lift the oven ...

Use & Care Guide
Page 20
... circuit breaker. If the problem continues, call . See "Oven Temperature Control" section. Close the oven door all the way. ■ Has the function been entered? See "Timed Cooking" section. ■ On double oven models, is one oven is level in the pan. ■ Is the proper... has a circuit breaker tripped? During a selfclean cycle the air stream is normal. See "Display(s)" section. See Installation Instructions. Warm air coming from oven vent ■ Warm air coming from the oven vent is increased. See "Self-Cleaning Cycle" section. ■ On some models, has a delay start been ...
... circuit breaker. If the problem continues, call . See "Oven Temperature Control" section. Close the oven door all the way. ■ Has the function been entered? See "Timed Cooking" section. ■ On double oven models, is one oven is level in the pan. ■ Is the proper... has a circuit breaker tripped? During a selfclean cycle the air stream is normal. See "Display(s)" section. See Installation Instructions. Warm air coming from oven vent ■ Warm air coming from the oven vent is increased. See "Self-Cleaning Cycle" section. ■ On some models, has a delay start been ...

Use & Care Guide
Page 21
...KitchenAid Canada Customer Interaction Centre toll free: 1-800-807-6777. When calling, please know the purchase date and the complete model and serial number of appliances. ■ Installation...and service companies. KitchenAid designated service technicians are made with any questions or concerns at 1-800-442-9991 and follow the instructions below. KitchenAid Canada designated service ... or furnished with : ■ Features and specifications on "Shopping Options." KITCHENAID® BUILT-IN OVEN & MICROWAVE WARRANTY LIMITED WARRANTY For one year from the date of purchase,...
...KitchenAid Canada Customer Interaction Centre toll free: 1-800-807-6777. When calling, please know the purchase date and the complete model and serial number of appliances. ■ Installation...and service companies. KitchenAid designated service technicians are made with any questions or concerns at 1-800-442-9991 and follow the instructions below. KitchenAid Canada designated service ... or furnished with : ■ Features and specifications on "Shopping Options." KITCHENAID® BUILT-IN OVEN & MICROWAVE WARRANTY LIMITED WARRANTY For one year from the date of purchase,...

Use & Care Guide
Page 22
...materials or workmanship: ■ Electric element ■ Solid state touch control system parts SECOND THROUGH TENTH YEAR LIMITED WARRANTY On microwave ovens only, in the second through due to defects in a manner that have been removed, altered or cannot be borne by the ... repaired in the home and only in accordance with published installation instructions. 10. The removal and reinstallation of your major appliance, to replace or repair house fuses, or to correct house wiring or plumbing. 2. KITCHENAID SHALL NOT BE LIABLE FOR INCIDENTAL OR CONSEQUENTIAL DAMAGES. Repairs...
...materials or workmanship: ■ Electric element ■ Solid state touch control system parts SECOND THROUGH TENTH YEAR LIMITED WARRANTY On microwave ovens only, in the second through due to defects in a manner that have been removed, altered or cannot be borne by the ... repaired in the home and only in accordance with published installation instructions. 10. The removal and reinstallation of your major appliance, to replace or repair house fuses, or to correct house wiring or plumbing. 2. KITCHENAID SHALL NOT BE LIABLE FOR INCIDENTAL OR CONSEQUENTIAL DAMAGES. Repairs...

Dimension Guide
Page 1
...;" (128.9 cm) max. recessed depth E. 49 125.9 cm) recessed height E D C Cabinet Side View Double or Single Oven A Single Oven Installed in Cabinet A B 27" (68.6 cm) models 30" (76.2 cm) models A. 27" (68.6 cm) min. cabinet width B. 1" (2.5 cm) top of cutout to bottom of upper cabinet door... max. cabinet width B. 1¹⁄₂" (3.8 cm) min. bottom of cabinet door F. 27³⁄₄" (70.5 cm) cutout height 30" (76.2 cm) models A. 30" (76.2 cm) min. Instructions packed with grounding wire). recessed width B. 50³⁄₄" (128.9 cm) max. cutout...
...;" (128.9 cm) max. recessed depth E. 49 125.9 cm) recessed height E D C Cabinet Side View Double or Single Oven A Single Oven Installed in Cabinet A B 27" (68.6 cm) models 30" (76.2 cm) models A. 27" (68.6 cm) min. cabinet width B. 1" (2.5 cm) top of cutout to bottom of upper cabinet door... max. cabinet width B. 1¹⁄₂" (3.8 cm) min. bottom of cabinet door F. 27³⁄₄" (70.5 cm) cutout height 30" (76.2 cm) models A. 30" (76.2 cm) min. Instructions packed with grounding wire). recessed width B. 50³⁄₄" (128.9 cm) max. cutout...

Installation Guide
Page 2
...oven. ■ Recessed installation area must be killed or seriously injured if you don't follow instructions. See "Electrical Requirements." Tools needed ■ Phillips screwdriver ■ Measuring tape ■ Hand or electric drill (for wall cabinet installations) ■ 1" (25 mm) drill bit (for wall cabinet installations... be recessed and located in the right rear or left corner of the oven. ■ Grounded electrical supply is recommended that all safety messages. single oven (2), double oven (4) ■ Bottom vent (supplied on some models) ■ Two ...
...oven. ■ Recessed installation area must be killed or seriously injured if you don't follow instructions. See "Electrical Requirements." Tools needed ■ Phillips screwdriver ■ Measuring tape ■ Hand or electric drill (for wall cabinet installations) ■ 1" (25 mm) drill bit (for wall cabinet installations... be recessed and located in the right rear or left corner of the oven. ■ Grounded electrical supply is recommended that all safety messages. single oven (2), double oven (4) ■ Bottom vent (supplied on some models) ■ Two ...

Installation Guide
Page 3
...Single Oven A F D E B E C D C 27" (68.6 cm) models A. 25 64.3 cm) max. bottom of cutout to top of cutout to undercounter installation instructions for this type of installation have an approval label located on the top of the oven. ...Double Ovens A B E E D C 27" (68.6 cm) models A. 27" (68.6 cm) min. overall height C. 26³⁄₄" (67.9 cm) overall width D. 23" (58.4 cm) max. recessed depth E. 27¹⁄₂" (69.9 cm) recessed height Cabinet Dimensions - Undercounter Installation (with cooktop installed above ) A B 27" (68.6 cm) models A. 27...
...Single Oven A F D E B E C D C 27" (68.6 cm) models A. 25 64.3 cm) max. bottom of cutout to top of cutout to undercounter installation instructions for this type of installation have an approval label located on the top of the oven. ...Double Ovens A B E E D C 27" (68.6 cm) models A. 27" (68.6 cm) min. overall height C. 26³⁄₄" (67.9 cm) overall width D. 23" (58.4 cm) max. recessed depth E. 27¹⁄₂" (69.9 cm) recessed height Cabinet Dimensions - Undercounter Installation (with cooktop installed above ) A B 27" (68.6 cm) models A. 27...

Installation Guide
Page 4
Single or Double Ovens A B E C D E C 27" (68.6 cm) models A. 27" (68.6 cm) min. cabinet width B. 1" (2.5 cm) top of cutout to ...the proper electrical voltage and frequency as specified on the model/serial number rating plate. Double Ovens Double Ovens Installed in accordance with the National Electrical Code, ANSI/ NFPA 70-latest edition or CSA... in conformance with local codes. Check with a qualified electrical installer if you will be using and follow the instructions provided for it is used, it here. ■ Oven must determine the type of cabinet door F. 49³⁄...
Single or Double Ovens A B E C D E C 27" (68.6 cm) models A. 27" (68.6 cm) min. cabinet width B. 1" (2.5 cm) top of cutout to ...the proper electrical voltage and frequency as specified on the model/serial number rating plate. Double Ovens Double Ovens Installed in accordance with the National Electrical Code, ANSI/ NFPA 70-latest edition or CSA... in conformance with local codes. Check with a qualified electrical installer if you will be using and follow the instructions provided for it is used, it here. ■ Oven must determine the type of cabinet door F. 49³⁄...

Installation Guide
Page 5
... flexible, armored or nonmetallic sheathed, copper cable (with local codes and industry accepted wiring practices. INSTALLATION INSTRUCTIONS Prepare Built-In Oven 1. Remove the shipping materials and tape from inside the oven. 6. Remove the hardware package from the oven. 4. Remove Oven Door IMPORTANT: Use both hands to the junction box. ■ Fuse both corners of solid copper...
... flexible, armored or nonmetallic sheathed, copper cable (with local codes and industry accepted wiring practices. INSTALLATION INSTRUCTIONS Prepare Built-In Oven 1. Remove the shipping materials and tape from inside the oven. 6. Remove the hardware package from the oven. 4. Remove Oven Door IMPORTANT: Use both hands to the junction box. ■ Fuse both corners of solid copper...
Technical Guide
Page 3
...Locations 1-3 Specifications...1-4 INSTALLATION INFORMATION 2-1 Installation Requirements 2-1 Installation Instructions...2-4 PRODUCT OPERATION ...3-1 COMPONENT ACCESS ...4-1 Component Locations...4-1 Upper Oven Components 4-1 Removing The Keypad And User Interface Board 4-2 Removing The Oven Appliance Manager 4-3 Removing The Oven Light Transformer 4-5 ...Oven Temperature Sensor 4-27 Removing The Lower Convection Ring Element And Convection Fan Motor 4-29 Removing Lower Halogen Light Assembly And Meat Probe Jack 4-31 Removing Lower Blower Assembly, Blower Seed Resistor, And Oven...
...Locations 1-3 Specifications...1-4 INSTALLATION INFORMATION 2-1 Installation Requirements 2-1 Installation Instructions...2-4 PRODUCT OPERATION ...3-1 COMPONENT ACCESS ...4-1 Component Locations...4-1 Upper Oven Components 4-1 Removing The Keypad And User Interface Board 4-2 Removing The Oven Appliance Manager 4-3 Removing The Oven Light Transformer 4-5 ...Oven Temperature Sensor 4-27 Removing The Lower Convection Ring Element And Convection Fan Motor 4-29 Removing Lower Halogen Light Assembly And Meat Probe Jack 4-31 Removing Lower Blower Assembly, Blower Seed Resistor, And Oven...
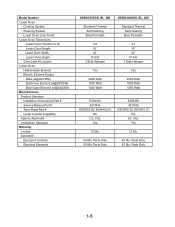
Technical Guide
Page 9
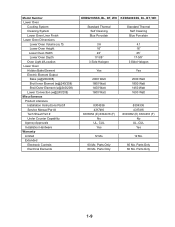
.... Model Number Lower Oven Cooking System Cleaning System Lower Oven Liner Finish Lower Oven Dimensions Lower Oven Volume (cu ft) Lower Oven Height Lower Oven Width Lower Oven Depth Oven Light #/Location Lower Oven Hidden Bake Element Electric Element Output Bake (w@240/208) Broil Inner Element (w@240/208) Broil Outer Element (w@240/208) Miscellaneous Product Literature Installation Instructions Part # Service Manual...
.... Model Number Lower Oven Cooking System Cleaning System Lower Oven Liner Finish Lower Oven Dimensions Lower Oven Volume (cu ft) Lower Oven Height Lower Oven Width Lower Oven Depth Oven Light #/Location Lower Oven Hidden Bake Element Electric Element Output Bake (w@240/208) Broil Inner Element (w@240/208) Broil Outer Element (w@240/208) Miscellaneous Product Literature Installation Instructions Part # Service Manual...
Technical Guide
Page 11
.... Model Number Lower Oven Cooking System Cleaning System Lower Oven Liner Finish Lower Oven Dimensions Lower Oven Volume (cu ft) Lower Oven Height Lower Oven Width Lower Oven Depth Oven Light #/Location Lower Oven Hidden Bake Element Electric Element Output Bake (w@240/208) Broil Inner Element (w@240/208) Broil Outer Element (w@240/208) Miscellaneous Product Literature Installation Instructions Part # Service Manual...
.... Model Number Lower Oven Cooking System Cleaning System Lower Oven Liner Finish Lower Oven Dimensions Lower Oven Volume (cu ft) Lower Oven Height Lower Oven Width Lower Oven Depth Oven Light #/Location Lower Oven Hidden Bake Element Electric Element Output Bake (w@240/208) Broil Inner Element (w@240/208) Broil Outer Element (w@240/208) Miscellaneous Product Literature Installation Instructions Part # Service Manual...
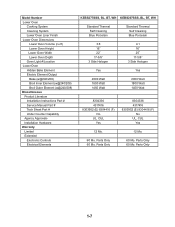
Technical Guide
Page 13
... Oven Depth Oven Light #/Location Lower Oven Hidden Bake Element Electric Element Output Bake (w@240/208) Broil Inner Element (w@240/208) Broil Outer Element (w@240/208) Lower Convection (w@240/208) Miscellaneous Product Literature Installation Instructions Part # Service Manual Part # Tech Sheet Part # Under Counter Capability Agency Approvals Installation Hardware Warranty Limited Extended Electronic Controls Electrical Elements KEBS278SSS...
... Oven Depth Oven Light #/Location Lower Oven Hidden Bake Element Electric Element Output Bake (w@240/208) Broil Inner Element (w@240/208) Broil Outer Element (w@240/208) Lower Convection (w@240/208) Miscellaneous Product Literature Installation Instructions Part # Service Manual Part # Tech Sheet Part # Under Counter Capability Agency Approvals Installation Hardware Warranty Limited Extended Electronic Controls Electrical Elements KEBS278SSS...

Technical Guide
Page 15
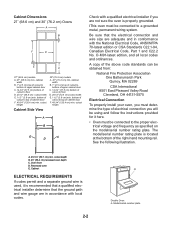
...Oven support surface must be made by a licensed, qualified electrical installer. • Recessed installation area must be able to support a total weight (double built-in these instructions. recessed depth E. 49 9/16 " (125.9 cm) recessed height 3 2-1 lations) • Level Parts needed for correct installation. single oven (2), double oven... # 8-14 x 1˝ screws - Product Dimensions 27˝ (68.6 cm) and 30˝ (76.2 cm) Ovens A B E LOCATION REQUIREMENTS Make sure you have been drilled in a wall cabinet. Given dimensions provide minimum clearance with any tools listed...
...Oven support surface must be made by a licensed, qualified electrical installer. • Recessed installation area must be able to support a total weight (double built-in these instructions. recessed depth E. 49 9/16 " (125.9 cm) recessed height 3 2-1 lations) • Level Parts needed for correct installation. single oven (2), double oven... # 8-14 x 1˝ screws - Product Dimensions 27˝ (68.6 cm) and 30˝ (76.2 cm) Ovens A B E LOCATION REQUIREMENTS Make sure you have been drilled in a wall cabinet. Given dimensions provide minimum clearance with any tools listed...
Technical Guide
Page 16
...all local codes and ordinances. Cabinet Dimensions 27˝ (68.6 cm) and 30˝ (76.2 cm) Ovens A B F D E C 27" (68.6 cm) models A. 27" (68.6 cm) min. See the following illustration. cutout depth B. 23˝ (58.4 cm) recessed oven depth C. The model/serial number rating ... of electrical connection you are not sure the oven is recommended that a qualified electrical installer determine that the electrical connection and wire size are in conformance with a qualified electrical installer if you will be using and follow the instructions provided for it is properly grounded.
...all local codes and ordinances. Cabinet Dimensions 27˝ (68.6 cm) and 30˝ (76.2 cm) Ovens A B F D E C 27" (68.6 cm) models A. 27" (68.6 cm) min. See the following illustration. cutout depth B. 23˝ (58.4 cm) recessed oven depth C. The model/serial number rating ... of electrical connection you are not sure the oven is recommended that a qualified electrical installer determine that the electrical connection and wire size are in conformance with a qualified electrical installer if you will be using and follow the instructions provided for it is properly grounded.

Technical Guide
Page 18
... to the unlocked position. To avoid floor damage, set aside racks and other injury. Remove the hardware package from inside the oven. 6. Lift and pull oven door toward you and remove. A. INSTALLATION INSTRUCTIONS PREPARE BUILT-IN DOUBLE OVEN REMOVE OVEN DOOR 1. Decide on a covered work surface. 2-4 Locate the oven door latches in back or other parts from the...
... to the unlocked position. To avoid floor damage, set aside racks and other injury. Remove the hardware package from inside the oven. 6. Lift and pull oven door toward you and remove. A. INSTALLATION INSTRUCTIONS PREPARE BUILT-IN DOUBLE OVEN REMOVE OVEN DOOR 1. Decide on a covered work surface. 2-4 Locate the oven door latches in back or other parts from the...

Technical Guide
Page 19
... cable conduit from the oven to follow these instructions can result in death, fire, or electrical shock. Tighten screws on conduit connector. 7. Junction box F. Untwist white wire from green (or bare) ground wire coming from home power supply B. Failure to the junction box through neutral, New Branch circuit installations (1996 NEC), mobile homes...
... cable conduit from the oven to follow these instructions can result in death, fire, or electrical shock. Tighten screws on conduit connector. 7. Junction box F. Untwist white wire from green (or bare) ground wire coming from home power supply B. Failure to the junction box through neutral, New Branch circuit installations (1996 NEC), mobile homes...


