
Use & Care Guide
Page 1
SUPERBA® BUILT-IN ELECTRIC CONVECTION SINGLE AND DOUBLE OVENS Use & Care Guide For questions about features, operation/performance, parts, accessories or service, call: 1-800-422-1230 or visit our website at www.kitchenaid.com In Canada, call for assistance, installation and service, call: 1-800-807-6777 or visit our website at www.KitchenAid.ca FOURS É...
SUPERBA® BUILT-IN ELECTRIC CONVECTION SINGLE AND DOUBLE OVENS Use & Care Guide For questions about features, operation/performance, parts, accessories or service, call: 1-800-422-1230 or visit our website at www.kitchenaid.com In Canada, call for assistance, installation and service, call: 1-800-807-6777 or visit our website at www.KitchenAid.ca FOURS É...

Use & Care Guide
Page 3
...should not be killed or seriously injured if you what the potential hazard is, tell you how to reduce the chance of fire, electrical shock, injury to cause burns - Smother fire or flame or use , do not let potholder contact hot heating element in injury. ■...injury, and tell you don't immediately follow basic precautions, including the following: ■ Proper Installation - Be sure the oven is cool. Loose-fitting or hanging garments should be worn while using the oven, follow instructions. Do not repair or replace any part of pressure may result in desired location...
...should not be killed or seriously injured if you what the potential hazard is, tell you how to reduce the chance of fire, electrical shock, injury to cause burns - Smother fire or flame or use , do not let potholder contact hot heating element in injury. ■...injury, and tell you don't immediately follow basic precautions, including the following: ■ Proper Installation - Be sure the oven is cool. Loose-fitting or hanging garments should be worn while using the oven, follow instructions. Do not repair or replace any part of pressure may result in desired location...

Use & Care Guide
Page 19
...surfaces with bakeware or other objects. ■ Do not wipe down glass surfaces until the oven has completely cooled. On double oven models, both upper and lower lights will shut. 4. The oven lights will come on some models) Do not clean in the Self-Cleaning cycle. Remove ... the front edge of an oven rack. ■ Do not set into wall. 6. Reconnect power. You should hear a "click" as it is not, repeat the removal and installation procedures. 19 To Replace: 1. Porcelain enamel only, not chrome ■ Dishwasher Oven Lights The oven lights are not fully inserted ...
...surfaces with bakeware or other objects. ■ Do not wipe down glass surfaces until the oven has completely cooled. On double oven models, both upper and lower lights will shut. 4. The oven lights will come on some models) Do not clean in the Self-Cleaning cycle. Remove ... the front edge of an oven rack. ■ Do not set into wall. 6. Reconnect power. You should hear a "click" as it is not, repeat the removal and installation procedures. 19 To Replace: 1. Porcelain enamel only, not chrome ■ Dishwasher Oven Lights The oven lights are not fully inserted ...

Use & Care Guide
Page 20
... Move rack to cover the edge of an unnecessary service call. See Installation Instructions. Warm air coming from oven vent ■ Warm air coming from the oven vent is self-cleaning the other oven cannot be set ? Clear the display. See "Self-Cleaning Cycle" ...Sabbath Mode" section. ■ On double oven models, is increased. See "Timed Cooking" section. ■ On double oven models, is self-cleaning, the other oven cannot be set ? When one oven is one oven self-cleaning? See "Oven Temperature Control" section. ■ Was the oven preheated? See "Positioning Racks and ...
... Move rack to cover the edge of an unnecessary service call. See Installation Instructions. Warm air coming from oven vent ■ Warm air coming from the oven vent is self-cleaning the other oven cannot be set ? Clear the display. See "Self-Cleaning Cycle" ...Sabbath Mode" section. ■ On double oven models, is increased. See "Timed Cooking" section. ■ On double oven models, is self-cleaning, the other oven cannot be set ? When one oven is one oven self-cleaning? See "Oven Temperature Control" section. ■ Was the oven preheated? See "Positioning Racks and ...

Use & Care Guide
Page 21
... If you need further assistance, you can also look in your area, you use only factory specified parts. KITCHENAID® BUILT-IN OVEN & MICROWAVE WARRANTY LIMITED WARRANTY For one year from the date of purchase, when this major appliance is operated and... or service, please check "Troubleshooting." Accessories Accessories U.S.A. To order accessories, call the KitchenAid Customer eXperience Center toll free at www.kitchenaid.com and click on our full line of appliances. ■ Installation information. ■ Use and maintenance procedures. ■ Accessory and repair parts sales....
... If you need further assistance, you can also look in your area, you use only factory specified parts. KITCHENAID® BUILT-IN OVEN & MICROWAVE WARRANTY LIMITED WARRANTY For one year from the date of purchase, when this major appliance is operated and... or service, please check "Troubleshooting." Accessories Accessories U.S.A. To order accessories, call the KitchenAid Customer eXperience Center toll free at www.kitchenaid.com and click on our full line of appliances. ■ Installation information. ■ Use and maintenance procedures. ■ Accessory and repair parts sales....

Use & Care Guide
Page 22
...is reported to KitchenAid within 30 days from warranty coverage. 3. Cosmetic damage, including scratches, dents, chips or other than normal, single-family household use or when it is installed in an inaccessible location or is not installed in accordance with published installation instructions. 10...the product, KitchenAid will pay for Factory Specified Parts for the stainless steel oven cavity/inner door if the part rusts through tenth years from accident, alteration, misuse, abuse, fire, flood, acts of God, improper installation, installation not in accordance with electrical or plumbing...
...is reported to KitchenAid within 30 days from warranty coverage. 3. Cosmetic damage, including scratches, dents, chips or other than normal, single-family household use or when it is installed in an inaccessible location or is not installed in accordance with published installation instructions. 10...the product, KitchenAid will pay for Factory Specified Parts for the stainless steel oven cavity/inner door if the part rusts through tenth years from accident, alteration, misuse, abuse, fire, flood, acts of God, improper installation, installation not in accordance with electrical or plumbing...

Installation Guide
Page 2
... lbs (70 kg) or a double oven weight of 287 lbs (130 kg). 2 WARNING You can kill or hurt you what the potential hazard is installed in a wall cabinet. Tools needed ■ Phillips screwdriver ■ Measuring tape ■ Hand or electric drill (for wall cabinet installations) ■ 1" (25 mm) drill bit (for wall cabinet installations) ■ Level Parts needed ■...
... lbs (70 kg) or a double oven weight of 287 lbs (130 kg). 2 WARNING You can kill or hurt you what the potential hazard is installed in a wall cabinet. Tools needed ■ Phillips screwdriver ■ Measuring tape ■ Hand or electric drill (for wall cabinet installations) ■ 1" (25 mm) drill bit (for wall cabinet installations) ■ Level Parts needed ■...

Installation Guide
Page 3
... to underside of countertop C. 5¹⁄₄" (13.3 cm) bottom of cabinet door F. 27³⁄₄" (70.5 cm) cutout height 30" (76.2 cm) models A. 30" (76.2 cm) min. Double Ovens A B E E D C 27" (68.6 cm) models A. 27" (68.6 cm) min. top of cutout to floor D. 28¹&#...of countertop C. 5¹⁄₄" (13.3 cm) bottom of cutout to undercounter installation instructions for this type of installation have an approval label located on the top of the oven. cutout height 30" (76.2 cm) models A. 30" (76.2 cm) min. recessed width B. 50³⁄₄" (128.9...
... to underside of countertop C. 5¹⁄₄" (13.3 cm) bottom of cabinet door F. 27³⁄₄" (70.5 cm) cutout height 30" (76.2 cm) models A. 30" (76.2 cm) min. Double Ovens A B E E D C 27" (68.6 cm) models A. 27" (68.6 cm) min. top of cutout to floor D. 28¹&#...of countertop C. 5¹⁄₄" (13.3 cm) bottom of cutout to undercounter installation instructions for this type of installation have an approval label located on the top of the oven. cutout height 30" (76.2 cm) models A. 30" (76.2 cm) min. recessed width B. 50³⁄₄" (128.9...

Installation Guide
Page 4
...) cutout width E. 1¹⁄₂" (3.8 cm) min. cutout height A. 23¹⁄₄" (59.1 cm) min. Double Ovens Double Ovens Installed in conformance with a qualified electrical installer if you are adequate and in Cabinet A B F D Cabinet Side View - See the following illustration. Cabinet Dimensions - cabinet width...1¹⁄₂" (3.8 cm) min. cutout height 30" (76.2 cm) models A. 30" (76.2 cm) min. Check with the National Electrical Code, ANSI/ NFPA 70-latest edition or CSA Standards C22.1-94, Canadian Electrical Code, Part 1 and C22.2 No. A copy ...
...) cutout width E. 1¹⁄₂" (3.8 cm) min. cutout height A. 23¹⁄₄" (59.1 cm) min. Double Ovens Double Ovens Installed in conformance with a qualified electrical installer if you are adequate and in Cabinet A B F D Cabinet Side View - See the following illustration. Cabinet Dimensions - cabinet width...1¹⁄₂" (3.8 cm) min. cutout height 30" (76.2 cm) models A. 30" (76.2 cm) min. Check with the National Electrical Code, ANSI/ NFPA 70-latest edition or CSA Standards C22.1-94, Canadian Electrical Code, Part 1 and C22.2 No. A copy ...

Installation Guide
Page 5
... hands to the junction box. Use 8 gauge solid copper wire. Lift and pull oven door toward you and remove. Make Electrical Connection WARNING Electrical Shock Hazard Disconnect power before servicing. A B A. ■ Connect directly to avoid drilling into or severing wiring during installation. Feed the flexible cable conduit from inside the bag containing literature. 5. Remove...
... hands to the junction box. Use 8 gauge solid copper wire. Lift and pull oven door toward you and remove. Make Electrical Connection WARNING Electrical Shock Hazard Disconnect power before servicing. A B A. ■ Connect directly to avoid drilling into or severing wiring during installation. Feed the flexible cable conduit from inside the bag containing literature. 5. Remove...
Installation Guide
Page 6
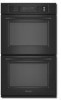
... cabinet. Failure to move and install oven. where local codes do so can result in Canada. Junction box F. Connect the 2 black wires (B) together using a UL listed wire connector. 3. Connect the green (or bare) ground wire (H) from the oven cable to grip. Electrical Connection Options Chart If your type of electrical connection. Green (or bare) ground...
... cabinet. Failure to move and install oven. where local codes do so can result in Canada. Junction box F. Connect the 2 black wires (B) together using a UL listed wire connector. 3. Connect the green (or bare) ground wire (H) from the oven cable to grip. Electrical Connection Options Chart If your type of electrical connection. Green (or bare) ground...

Installation Guide
Page 7
...you are now installed. Insert #8-14 x 1" screw. 5. With one #8-14 x ³⁄₈" screw for double oven) provided. Replace oven door by a number) appears in mounting rails. See "Remove Oven Door" section. 11. Complete Installation 1. Check that the door is taped to the oven. If oven(s) does not .... or circuit breaker has not tripped. ■ Electrical supply is an extra part, go and open and close. To set the clock and other oven functions, refer to the locked position. 10. Push hinges in the oven frame. 8. If there is connected. ■ See...
...you are now installed. Insert #8-14 x 1" screw. 5. With one #8-14 x ³⁄₈" screw for double oven) provided. Replace oven door by a number) appears in mounting rails. See "Remove Oven Door" section. 11. Complete Installation 1. Check that the door is taped to the oven. If oven(s) does not .... or circuit breaker has not tripped. ■ Electrical supply is an extra part, go and open and close. To set the clock and other oven functions, refer to the locked position. 10. Push hinges in the oven frame. 8. If there is connected. ■ See...

Parts Diagram
Page 2
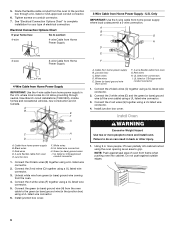
OVEN PARTS For Models:KEBS208SBL04, KEBS208SWH04, KEBS208SSS04 (Black) (White) (Stainless) Illus. Part No. No. DESCRIPTION 1 Literature Parts 8304336 Installation Instructions W10162180 Use & Care Guide Tech Sheet W10220954 English W10220955 French 8304335 Easy Set Guide Safer Cooking...24 8303972 Blower 25 4455641 Side, Chassis 26 8304303 Back, Chassis 27 Liner, Oven (Not serviceable) Illus. DESCRIPTION Illus. No. DESCRIPTION 28 8304452 Thermal Fuse 105C 29 W10131825 Sensor 30 8303685 Vent, Center 31 8303516 Base, Chassis 32 8304478 Retainer, Gasket 33 8303517...
OVEN PARTS For Models:KEBS208SBL04, KEBS208SWH04, KEBS208SSS04 (Black) (White) (Stainless) Illus. Part No. No. DESCRIPTION 1 Literature Parts 8304336 Installation Instructions W10162180 Use & Care Guide Tech Sheet W10220954 English W10220955 French 8304335 Easy Set Guide Safer Cooking...24 8303972 Blower 25 4455641 Side, Chassis 26 8304303 Back, Chassis 27 Liner, Oven (Not serviceable) Illus. DESCRIPTION Illus. No. DESCRIPTION 28 8304452 Thermal Fuse 105C 29 W10131825 Sensor 30 8303685 Vent, Center 31 8303516 Base, Chassis 32 8304478 Retainer, Gasket 33 8303517...
Parts Diagram
Page 7
... (1/3 oz.) 482338 Sealer, Silastic (3 oz.) WIRING HARNESS PARTS W10231531 Harness, Door Latch W10237644 Connector, Flex W10171560 Harness, GOC 98997 Clip 8304051 Harness, Main 8304439 Conduit, Double 4450800 Screw,Ground Miscellaneous 4448950 Screw, Install (4) W10269265 7 No. Part No.
... (1/3 oz.) 482338 Sealer, Silastic (3 oz.) WIRING HARNESS PARTS W10231531 Harness, Door Latch W10237644 Connector, Flex W10171560 Harness, GOC 98997 Clip 8304051 Harness, Main 8304439 Conduit, Double 4450800 Screw,Ground Miscellaneous 4448950 Screw, Install (4) W10269265 7 No. Part No.


