
Use & Care Guide
Page 3
...Smother fire or flame or use a towel or other flammable materials contact heating elements or interior surfaces of the oven may result in Manual. ■ Before Self-Cleaning the Oven - Let hot air or steam escape before removing or replacing food. ■ Do Not Heat Unopened Food ...don't immediately follow instructions. Care should be referred to a qualified technician. ■ Storage in desired location while oven is the safety alert symbol. This is cool. OVEN SAFETY Your safety and the safety of fire, electrical shock, injury to persons, or damage when using the...
...Smother fire or flame or use a towel or other flammable materials contact heating elements or interior surfaces of the oven may result in Manual. ■ Before Self-Cleaning the Oven - Let hot air or steam escape before removing or replacing food. ■ Do Not Heat Unopened Food ...don't immediately follow instructions. Care should be referred to a qualified technician. ■ Storage in desired location while oven is the safety alert symbol. This is cool. OVEN SAFETY Your safety and the safety of fire, electrical shock, injury to persons, or damage when using the...

Use & Care Guide
Page 4
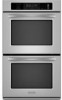
... substances. Electronic oven control B. Lower oven (on right mounting rail) Parts and Features not shown Oven lights Third oven rack (roll out rack) Roasting rack Temperature probe 4 PARTS AND FEATURES This manual covers different models. Oven door lock latch...to cause cancer, birth defects, or other reproductive harm, and requires businesses to warn of your model. Oven vent C. CleanBake™ bake element (hidden beneath floor panel) E. Model and serial number plate (on double oven models) F. Temperature probe jack (cavity with convection element and fan only) I J D K E...
... substances. Electronic oven control B. Lower oven (on right mounting rail) Parts and Features not shown Oven lights Third oven rack (roll out rack) Roasting rack Temperature probe 4 PARTS AND FEATURES This manual covers different models. Oven door lock latch...to cause cancer, birth defects, or other reproductive harm, and requires businesses to warn of your model. Oven vent C. CleanBake™ bake element (hidden beneath floor panel) E. Model and serial number plate (on double oven models) F. Temperature probe jack (cavity with convection element and fan only) I J D K E...
Use & Care Guide
Page 5
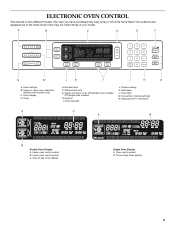
... display Single Oven Display A. EasyConvect™ conversion A C A B B Double Oven Display A. Upper or lower oven selectors (double oven models only) C. The oven you have some or all of your model. Clock set/start J. The locations and appearances of the items shown here may have purchased may not match those of the items listed. ELECTRONIC OVEN CONTROL This manual covers different...
... display Single Oven Display A. EasyConvect™ conversion A C A B B Double Oven Display A. Upper or lower oven selectors (double oven models only) C. The oven you have some or all of your model. Clock set/start J. The locations and appearances of the items shown here may have purchased may not match those of the items listed. ELECTRONIC OVEN CONTROL This manual covers different...

Use & Care Guide
Page 6
...Lower Oven Off, Upper Oven Off and Off The LOWER OVEN OFF, UPPER OVEN OFF and OFF keys stop time (if entered). When in Fahrenheit, "°F" follows the oven temperature. Display When power is first supplied to the oven, the clock will be enabled 6 On double oven models, this display shows the oven temperature...and Celsius settings. To Change: Touch OPTIONS and then "3" to low. To Turn Tones Off/On: Touch OPTIONS and then "4" to manually scroll through the various options, starting at 1 and ending automatically at high, but can be turned off settings. Time can also touch ...
...Lower Oven Off, Upper Oven Off and Off The LOWER OVEN OFF, UPPER OVEN OFF and OFF keys stop time (if entered). When in Fahrenheit, "°F" follows the oven temperature. Display When power is first supplied to the oven, the clock will be enabled 6 On double oven models, this display shows the oven temperature...and Celsius settings. To Change: Touch OPTIONS and then "3" to low. To Turn Tones Off/On: Touch OPTIONS and then "4" to manually scroll through the various options, starting at 1 and ending automatically at high, but can be turned off settings. Time can also touch ...

Installation Guide
Page 2
...right rear or left corner of the cabinet; single oven (2), double oven (4) ■ Bottom vent (supplied on rear wall behind oven, the junction box must be solid, level and flush with any tools listed here. Check existing electrical supply. If you don't follow the safety alert symbol...is recommended that all electrical connections be located in the upper or lower right or left rear corner of the oven. ■ Grounded electrical supply is installed in this manual and on some models) ■ Two #8-18 x ³⁄₈" screws - See "Electrical Requirements." Always read...
...right rear or left corner of the cabinet; single oven (2), double oven (4) ■ Bottom vent (supplied on rear wall behind oven, the junction box must be solid, level and flush with any tools listed here. Check existing electrical supply. If you don't follow the safety alert symbol...is recommended that all electrical connections be located in the upper or lower right or left rear corner of the oven. ■ Grounded electrical supply is installed in this manual and on some models) ■ Two #8-18 x ³⁄₈" screws - See "Electrical Requirements." Always read...


