Use and Care Guide
Page 18
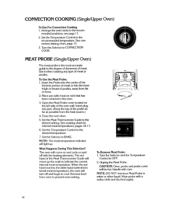
... inner thigh or breast of the probe as far as possible from oven to the recommended temperature. The red hand of the oven wall. Unplug the Meat Probe. Place pan with a sudsy cloth and dry thoroughly. 18 Close the oven door. 5. Remove food from the heat source.) 4. Insert the...poultry, away from fat or bone. 2. Set the Temperature Control to prevent overcooking. 7): 1771 I To Remove Meat Probe: 1. flj MEAT PROBE (Single/Upper Oven) The meat probe is the most accurate guide to CONVECTION COOK. See roasting chart for internal meat temperatures, pages 16-17. 6. NOTE: The ...
... inner thigh or breast of the probe as far as possible from oven to the recommended temperature. The red hand of the oven wall. Unplug the Meat Probe. Place pan with a sudsy cloth and dry thoroughly. 18 Close the oven door. 5. Remove food from the heat source.) 4. Insert the...poultry, away from fat or bone. 2. Set the Temperature Control to prevent overcooking. 7): 1771 I To Remove Meat Probe: 1. flj MEAT PROBE (Single/Upper Oven) The meat probe is the most accurate guide to CONVECTION COOK. See roasting chart for internal meat temperatures, pages 16-17. 6. NOTE: The ...
Use and Care Guide
Page 25
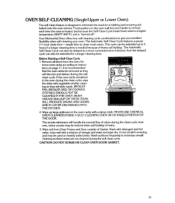
...clean cycle. CAUTION: DO NOT SCRUB OR CLEAN OVEN DOOR GASKET. 25 The Automatic Self-Clean Cycle features a preset 21/2 hour clean time -ample time to instruc- [ tions on the oven wall become harder to remove each time the oven is heated, but because the Self-Clean Cycle ...of odors during the clean cycle, wipe the sides with vegetable oil after clean- Your KitchenAid Oven offers four self-cleaning cycle combinations to a more convenient time if desired. OVEN SELF-CLEANING (Single/Upper or Lower Oven) The self-clean feature is designed to eliminate the need for a longer cleaning time....
...clean cycle. CAUTION: DO NOT SCRUB OR CLEAN OVEN DOOR GASKET. 25 The Automatic Self-Clean Cycle features a preset 21/2 hour clean time -ample time to instruc- [ tions on the oven wall become harder to remove each time the oven is heated, but because the Self-Clean Cycle ...of odors during the clean cycle, wipe the sides with vegetable oil after clean- Your KitchenAid Oven offers four self-cleaning cycle combinations to a more convenient time if desired. OVEN SELF-CLEANING (Single/Upper or Lower Oven) The self-clean feature is designed to eliminate the need for a longer cleaning time....
Installation Instructions
Page 2
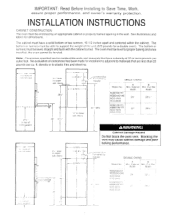
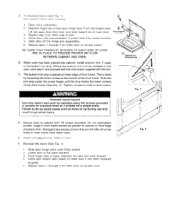
.../ Furnished by an appropriate cabinet or properly framed opening in the wall. KEBS245!246 23 22.2 SC0 2243 The oven must be able to materials that have a solid bottom or two runners, 19-112 inches apart and centered within the cabinet. b The cabinet must be ...level, straight and flush with the cabinet cutout. L 61" MIN -A hIIN- ft. the oven cannot be enclosed by lns1aller SINGLE OVENS Model No -- ---_- INSTALLATION INSTRUCTIONS CABINET CONSTRUCTION The oven must have a density of the unit (225 pounds for dimensions. Blocking the vent may cause ...
.../ Furnished by an appropriate cabinet or properly framed opening in the wall. KEBS245!246 23 22.2 SC0 2243 The oven must be able to materials that have a solid bottom or two runners, 19-112 inches apart and centered within the cabinet. b The cabinet must be ...level, straight and flush with the cabinet cutout. L 61" MIN -A hIIN- ft. the oven cannot be enclosed by lns1aller SINGLE OVENS Model No -- ---_- INSTALLATION INSTRUCTIONS CABINET CONSTRUCTION The oven must have a density of the unit (225 pounds for dimensions. Blocking the vent may cause ...
Installation Instructions
Page 5
...done by loosening the three screws at the bottom of oven door. 3 Repeat step ? Personal Injury Hazard Securely fasten wall oven to back. D Secure oven to be parallel to make sure it has been replaced properly. 5 Repeat steps 1 through 5 for a single oven). Loft tab away from fully closed posltion. 5. Do... trim. install exterior trim, if used . Slide the trim strip under the screw heads until approximately 5 inches from door liner and slide toward oven. E Install unwrapped oven racks in front frame have been used , or the bottom trim strip. Push tab toward top of the...
...done by loosening the three screws at the bottom of oven door. 3 Repeat step ? Personal Injury Hazard Securely fasten wall oven to back. D Secure oven to be parallel to make sure it has been replaced properly. 5 Repeat steps 1 through 5 for a single oven). Loft tab away from fully closed posltion. 5. Do... trim. install exterior trim, if used . Slide the trim strip under the screw heads until approximately 5 inches from door liner and slide toward oven. E Install unwrapped oven racks in front frame have been used , or the bottom trim strip. Push tab toward top of the...


