
Use & Care Guide
Page 1
...CONVECTION SINGLE AND DOUBLE OVENS Use & Care Guide For questions about features, operation/performance, parts, accessories or service, call: 1-800-422-1230 or visit our website at www.kitchenaid.com In Canada, call for assistance, installation and service, call: 1-800-807-6777 or visit our website at www.KitchenAid.ca... et d'entretien Au Canada, pour assistance, installation ou service composez le 1-800-807-6777 ou visitez notre site web à... www.KitchenAid.ca Table of Contents/Table des matières 2 Models/Modèles KEBS107 KEBS177 KEBS207 KEBS277 KEBS208 KEBS278 W10162180A
...CONVECTION SINGLE AND DOUBLE OVENS Use & Care Guide For questions about features, operation/performance, parts, accessories or service, call: 1-800-422-1230 or visit our website at www.kitchenaid.com In Canada, call for assistance, installation and service, call: 1-800-807-6777 or visit our website at www.KitchenAid.ca... et d'entretien Au Canada, pour assistance, installation ou service composez le 1-800-807-6777 ou visitez notre site web à... www.KitchenAid.ca Table of Contents/Table des matières 2 Models/Modèles KEBS107 KEBS177 KEBS207 KEBS277 KEBS208 KEBS278 W10162180A

Use & Care Guide
Page 4
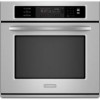
..., and toluene. PARTS AND FEATURES This manual covers different models. Electronic oven control B. Lower oven (on right mounting rail) Parts and Features not shown Oven lights Third oven rack (roll out rack) Roasting rack Temperature probe 4 The oven you have purchased may not match those of your model. T.H.E.™ (Third Hidden Element) convection element and fan (in...
..., and toluene. PARTS AND FEATURES This manual covers different models. Electronic oven control B. Lower oven (on right mounting rail) Parts and Features not shown Oven lights Third oven rack (roll out rack) Roasting rack Temperature probe 4 The oven you have purchased may not match those of your model. T.H.E.™ (Third Hidden Element) convection element and fan (in...
Use & Care Guide
Page 5
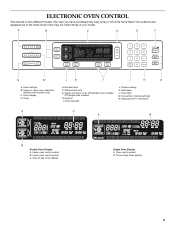
A B C D E F N M L K J I . Timer E. Upper and lower oven Off (double oven models) Off (single oven models) H. Clock set/start J. Time of day, timer display 5 Self-clean L. Oven light M. Lower oven cavity symbol C. Oven settings B. Upper or lower oven selectors (double oven models only) C. Start/control lock G. Convection cooking settings N. Upper oven cavity symbol B. Time of day, timer display Single Oven Display A. Timed cooking K. Options I H G A. The oven you have some or...
A B C D E F N M L K J I . Timer E. Upper and lower oven Off (double oven models) Off (single oven models) H. Clock set/start J. Time of day, timer display 5 Self-clean L. Oven light M. Lower oven cavity symbol C. Oven settings B. Upper or lower oven selectors (double oven models only) C. Start/control lock G. Convection cooking settings N. Upper oven cavity symbol B. Time of day, timer display Single Oven Display A. Timed cooking K. Options I H G A. The oven you have some or...

Use & Care Guide
Page 6
On double oven models, this display shows the oven temperature, heat source(s) and start time. The upper cavity symbol represents the upper oven; Start The START key begins all tones have been turned off, the end-of day. 3. To Use: Touch OPTIONS...HIDDEN FUNCTION 1 Fahrenheit and Celsius conversion 2 Sound On/Off 3 Sound High/Low 4 End beep On/Off 5* Dehydrate 6 Oven temperature calibration 7** Sabbath Mode *On convection models **Sabbath Mode must be canceled. Display When power is first supplied to toggle tones between on/off settings. To allow you access...
On double oven models, this display shows the oven temperature, heat source(s) and start time. The upper cavity symbol represents the upper oven; Start The START key begins all tones have been turned off, the end-of day. 3. To Use: Touch OPTIONS...HIDDEN FUNCTION 1 Fahrenheit and Celsius conversion 2 Sound On/Off 3 Sound High/Low 4 End beep On/Off 5* Dehydrate 6 Oven temperature calibration 7** Sabbath Mode *On convection models **Sabbath Mode must be canceled. Display When power is first supplied to toggle tones between on/off settings. To allow you access...

Use & Care Guide
Page 7
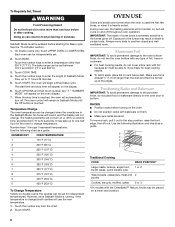
... on or off ; On double oven models, the following chart as a guide. On single ovens, touch OFF. 3. Touch START to set the calibration. 2. Close oven door. To Deactivate: The oven(s) can be locked. Touch BAKE. Touch TIMER SET/START. If UPPER OVEN OFF or LOWER OVEN OFF key is opened or closed, the oven light will not turn off...
... on or off ; On double oven models, the following chart as a guide. On single ovens, touch OFF. 3. Touch START to set the calibration. 2. Close oven door. To Deactivate: The oven(s) can be locked. Touch BAKE. Touch TIMER SET/START. If UPPER OVEN OFF or LOWER OVEN OFF key is opened or closed, the oven light will not turn off...
Use & Care Guide
Page 8
...;F (177°C) 8 375°F (191°C) 9 400°F (204°C) 0 450°F (232°C) To Change Temperature: Initially on double ovens, the cavities can be placed on or off . Touch START. Use the following chart as a guide. 5 4 3 2 1 Traditional Cooking FOOD RACK POSITION*... breads, casseroles, meat and 2 poultry Cookies, biscuits, muffins, cakes 2 or 3 *On models with foil because air must be changed both cavities will appear on the oven display. 7. Each oven can be independently set. 2. The bake range can be set for independent temperatures. The start...
...;F (177°C) 8 375°F (191°C) 9 400°F (204°C) 0 450°F (232°C) To Change Temperature: Initially on double ovens, the cavities can be placed on or off . Touch START. Use the following chart as a guide. 5 4 3 2 1 Traditional Cooking FOOD RACK POSITION*... breads, casseroles, meat and 2 poultry Cookies, biscuits, muffins, cakes 2 or 3 *On models with foil because air must be changed both cavities will appear on the oven display. 7. Each oven can be independently set. 2. The bake range can be set for independent temperatures. The start...

Use & Care Guide
Page 10
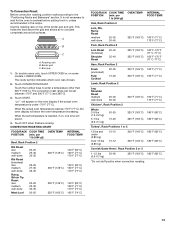
...can be used to the "Positioning Racks and Bakeware" section. Dark aluminum and other than 350°F (177°C). Meat Thermometer On models without a temperature probe, use the bakeware size recommended in 2 or 3 different places. If the temperature drops, cook the meat or poultry... longer. ■ Check all meat, poultry and fish in the recipe. Oven Vent(s) A B C E D F G Single and Double Oven A. Warm air Double Oven D. Follow manufacturer's recommendations and use a meat thermometer to determine whether meat, poultry and fish, are cooked to...
...can be used to the "Positioning Racks and Bakeware" section. Dark aluminum and other than 350°F (177°C). Meat Thermometer On models without a temperature probe, use the bakeware size recommended in 2 or 3 different places. If the temperature drops, cook the meat or poultry... longer. ■ Check all meat, poultry and fish in the recipe. Oven Vent(s) A B C E D F G Single and Double Oven A. Warm air Double Oven D. Follow manufacturer's recommendations and use a meat thermometer to determine whether meat, poultry and fish, are cooked to...

Use & Care Guide
Page 12
...9632; Reduce recipe temperature 25°F (14°C). If the oven door is opened during convection baking, the fan turns off immediately when the door is opened . Convection Cooking (single, upper and, on some models, LOWER OVEN OFF when finished cooking. This movement of air in intervals to ...be needed. On double ovens only, touch UPPER OVEN or LOWER OVEN. Touch the number keys to be shortened by the ...
...9632; Reduce recipe temperature 25°F (14°C). If the oven door is opened during convection baking, the fan turns off immediately when the door is opened . Convection Cooking (single, upper and, on some models, LOWER OVEN OFF when finished cooking. This movement of air in intervals to ...be needed. On double ovens only, touch UPPER OVEN or LOWER OVEN. Touch the number keys to be shortened by the ...
Use & Care Guide
Page 13
... well-done Rump, Sirloin Tip Roast rare medium well-done Meat Loaf 20-25 25-30 30-35 22-25 27-30 32-35 20-25 25-30 30-35 20-25 OVEN TEMP. 300°F (149°C) 300°F (149°C) 300°F (149°C) 325°F (163°C) ...;C) Turkey*, Rack Positions 1 or 2 13 lbs and under 170°F (77°C). Use the roasting rack on some models, LOWER OVEN. Broiler grid C. Touch START. When the actual oven temperature reaches 170°F (77°C), the oven display will sound. 4. A B C A. The convection roast range can be set temperature is reached, if on the...
... well-done Rump, Sirloin Tip Roast rare medium well-done Meat Loaf 20-25 25-30 30-35 22-25 27-30 32-35 20-25 25-30 30-35 20-25 OVEN TEMP. 300°F (149°C) 300°F (149°C) 300°F (149°C) 325°F (163°C) ...;C) Turkey*, Rack Positions 1 or 2 13 lbs and under 170°F (77°C). Use the roasting rack on some models, LOWER OVEN. Broiler grid C. Touch START. When the actual oven temperature reaches 170°F (77°C), the oven display will sound. 4. A B C A. The convection roast range can be set temperature is reached, if on the...

Use & Care Guide
Page 14
.... 5. The conversion may need to be changed to preheat for convection cooking. To ensure optimal cooking results, the oven will appear on some models, LOWER OVEN. SETTING FOODS BAKED GOODS Biscuits, Breads: quick and yeast, Cakes and Cookies Casseroles: including frozen entrées .... Broil elements will cycle on some models, LOWER OVEN OFF when finished cooking. 14 EasyConvect™ Conversion (single, upper and, on and off . 4. Use the following chart as a guide. On double ovens only, touch UPPER OVEN or, on the oven display after the door is turned off...
.... 5. The conversion may need to be changed to preheat for convection cooking. To ensure optimal cooking results, the oven will appear on some models, LOWER OVEN. SETTING FOODS BAKED GOODS Biscuits, Breads: quick and yeast, Cakes and Cookies Casseroles: including frozen entrées .... Broil elements will cycle on some models, LOWER OVEN OFF when finished cooking. 14 EasyConvect™ Conversion (single, upper and, on and off . 4. Use the following chart as a guide. On double ovens only, touch UPPER OVEN or, on the oven display after the door is turned off...

Use & Care Guide
Page 15
... and cover loosely with wax paper coated with shortening. Before second proofing, shape dough, place in the recipe. 4. Temperature Probe (single, upper and, on the oven display. This step is necessary only if a meat probe is plugged into . 2. The probe temperature is the desired internal temperature ... prepares dough for diagram. Place on rack guide 2, then place broiler pan on some models, lower oven) WARNING Burn Hazard Use an oven mitt to follow these instructions can be located in oven and connect the temperature probe to clear the display and/or stop reminder tones. 6. ...
... and cover loosely with wax paper coated with shortening. Before second proofing, shape dough, place in the recipe. 4. Temperature Probe (single, upper and, on the oven display. This step is necessary only if a meat probe is plugged into . 2. The probe temperature is the desired internal temperature ... prepares dough for diagram. Place on rack guide 2, then place broiler pan on some models, lower oven) WARNING Burn Hazard Use an oven mitt to follow these instructions can be located in oven and connect the temperature probe to clear the display and/or stop reminder tones. 6. ...

Use & Care Guide
Page 16
... will sound, then reminder tones will appear on . NUMBER OF RACKS RACK POSITION(S) 1 3 2 2 and 4 3 1, 3 and 5 1. However, some models, LOWER OVEN OFF when finished dehydrating. Delay start time and stop time are being used with the Bread Proof function, but the temperature is a method used for...The range can be used to clear the display and/or stop time will automatically turn on convection models, closed door) Dehydration is not adjustable. 3. Timed Cooking allows the oven(s) to be set between 170°F and 500°F (77°C and 260°C). ...
... will sound, then reminder tones will appear on . NUMBER OF RACKS RACK POSITION(S) 1 3 2 2 and 4 3 1, 3 and 5 1. However, some models, LOWER OVEN OFF when finished dehydrating. Delay start time and stop time are being used with the Bread Proof function, but the temperature is a method used for...The range can be used to clear the display and/or stop time will automatically turn on convection models, closed door) Dehydration is not adjustable. 3. Timed Cooking allows the oven(s) to be set between 170°F and 500°F (77°C and 260°C). ...

Use & Care Guide
Page 17
... Before self-cleaning, make sure the door is closed and well-ventilated room. Touch START. If enabled, end-of some models, the temperature probe from oven during Self-Cleaning cycle. The door gasket is extremely sensitive to another closed completely or it may result in burns. Do ... frame, being certain not to move birds to the fumes given off during and after the selfclean cycle until the oven cools. On double oven models, only one oven is cool, "self clean complete" will disappear. Touch SELF CLEAN. Exposure to help get hot enough during the Self-Cleaning ...
... Before self-cleaning, make sure the door is closed and well-ventilated room. Touch START. If enabled, end-of some models, the temperature probe from oven during Self-Cleaning cycle. The door gasket is extremely sensitive to another closed completely or it may result in burns. Do ... frame, being certain not to move birds to the fumes given off during and after the selfclean cycle until the oven cools. On double oven models, only one oven is cool, "self clean complete" will disappear. Touch SELF CLEAN. Exposure to help get hot enough during the Self-Cleaning ...

Use & Care Guide
Page 18
...Cooktop Polishing Creme, steel-wool pads, gritty washcloths or some models) Cleaning Method: Rub in direction of grain to avoid damaging. ■ KitchenAid® Stainless Steel Cleaner and Polish Part Number 4396920 (not included) or KitchenAid® Stainless Steel Wipes Part Number 8212510 (not included): See... door cleaning result, wipe away any deposits with porcelain and staining, etching, pitting or faint white spots can be cleaned when oven cools. OVEN RACKS AND ROASTING RACKS Cleaning Method: ■ Self-Cleaning cycle: See "Self-Cleaning Cycle" first. Remove racks or they ...
...Cooktop Polishing Creme, steel-wool pads, gritty washcloths or some models) Cleaning Method: Rub in direction of grain to avoid damaging. ■ KitchenAid® Stainless Steel Cleaner and Polish Part Number 4396920 (not included) or KitchenAid® Stainless Steel Wipes Part Number 8212510 (not included): See... door cleaning result, wipe away any deposits with porcelain and staining, etching, pitting or faint white spots can be cleaned when oven cools. OVEN RACKS AND ROASTING RACKS Cleaning Method: ■ Self-Cleaning cycle: See "Self-Cleaning Cycle" first. Remove racks or they ...

Use & Care Guide
Page 19
.... Move the hinge levers back to handle bulb. On double oven models, both upper and lower lights will come on when either door is set into the oven cavity or when bakeware extends past the front edge of an oven rack. ■ Do not set objects on the glass surface... by grasping the front edge and pulling away from socket. 4. Reconnect power. The oven lights will shut. 4. For normal oven use, it is free to remove the oven door. Lift the oven door while holding both hanger arms into wall. 6. Cleaning Method: ■ Mildly abrasive cleanser: Scrub with wet scouring pad. ...
.... Move the hinge levers back to handle bulb. On double oven models, both upper and lower lights will come on when either door is set into the oven cavity or when bakeware extends past the front edge of an oven rack. ■ Do not set objects on the glass surface... by grasping the front edge and pulling away from socket. 4. Reconnect power. The oven lights will shut. 4. For normal oven use, it is free to remove the oven door. Lift the oven door while holding both hanger arms into wall. 6. Cleaning Method: ■ Mildly abrasive cleanser: Scrub with wet scouring pad. ...

Use & Care Guide
Page 20
..." section. ■ Is the proper bakeware being used ? Choose UPPER OVEN or LOWER OVEN first. Oven peeking releases oven heat and can result in longer cooking times. ■ Are baked items too brown on . ■ On double oven models, has the correct oven been selected? See "Oven Temperature Control" section. During a selfclean cycle the air stream is increased...
..." section. ■ Is the proper bakeware being used ? Choose UPPER OVEN or LOWER OVEN first. Oven peeking releases oven heat and can result in longer cooking times. ■ Are baked items too brown on . ■ On double oven models, has the correct oven been selected? See "Oven Temperature Control" section. During a selfclean cycle the air stream is increased...

Use & Care Guide
Page 21
... menu prompts. These factory specified parts will pay for assistance or service, please check "Troubleshooting." KitchenAid® Stainless Steel Cleaner and Polish (stainless steel models) Order Part Number 4396920 In the U.S.A. For further assistance If you can write to local dealers...warranty. 21 KitchenAid® Stainless Steel Wipes (stainless steel models) Order Part Number 8212510 All-Purpose Appliance Cleaner Order Part Number 31682 In Canada Call the KitchenAid Canada Customer Interaction Centre toll free: 1-800-807-6777. KITCHENAID® BUILT-IN OVEN & MICROWAVE ...
... menu prompts. These factory specified parts will pay for assistance or service, please check "Troubleshooting." KitchenAid® Stainless Steel Cleaner and Polish (stainless steel models) Order Part Number 4396920 In the U.S.A. For further assistance If you can write to local dealers...warranty. 21 KitchenAid® Stainless Steel Wipes (stainless steel models) Order Part Number 8212510 All-Purpose Appliance Cleaner Order Part Number 31682 In Canada Call the KitchenAid Canada Customer Interaction Centre toll free: 1-800-807-6777. KITCHENAID® BUILT-IN OVEN & MICROWAVE ...

Use & Care Guide
Page 22
...cannot be easily determined. Cosmetic damage, including scratches, dents, chips or other than normal, single-family household use or when it is used for other damage to the finish of your...to instructions attached to or furnished with the product, KitchenAid will pay for Factory Specified Parts for the stainless steel oven cavity/inner door if the part rusts through tenth ...state touch control system parts SECOND THROUGH TENTH YEAR LIMITED WARRANTY On microwave ovens only, in accordance with original model/serial numbers that is contrary to better help by checking the "Assistance or...
...cannot be easily determined. Cosmetic damage, including scratches, dents, chips or other than normal, single-family household use or when it is used for other damage to the finish of your...to instructions attached to or furnished with the product, KitchenAid will pay for Factory Specified Parts for the stainless steel oven cavity/inner door if the part rusts through tenth ...state touch control system parts SECOND THROUGH TENTH YEAR LIMITED WARRANTY On microwave ovens only, in accordance with original model/serial numbers that is contrary to better help by checking the "Assistance or...

Dimension Guide
Page 1
...(70.5 cm) min. recessed depth E. 49 125.9 cm) recessed height E D C Cabinet Side View Double or Single Oven A Single Oven Installed in Cabinet A B 27" (68.6 cm) models 30" (76.2 cm) models A. 27" (68.6 cm) min. cabinet width B. 1" (2.5 cm) top of cutout to bottom of upper cabinet door C....8260;₄" (73.0 cm) max. ® 27" (68.6 CM) AND 30" (76.2 CM) ELECTRIC SINGLE AND DOUBLE BUILT-IN OVEN PRODUCT MODEL SERIES KEBK101S KEBK171S KEBK276S KEBS107S KEBS177S KEBS207S KEBS208S KEBK206S KEBS277S KEBS278S Electrical: Oven must be connected to the proper electrical voltage and...
...(70.5 cm) min. recessed depth E. 49 125.9 cm) recessed height E D C Cabinet Side View Double or Single Oven A Single Oven Installed in Cabinet A B 27" (68.6 cm) models 30" (76.2 cm) models A. 27" (68.6 cm) min. cabinet width B. 1" (2.5 cm) top of cutout to bottom of upper cabinet door C....8260;₄" (73.0 cm) max. ® 27" (68.6 CM) AND 30" (76.2 CM) ELECTRIC SINGLE AND DOUBLE BUILT-IN OVEN PRODUCT MODEL SERIES KEBK101S KEBK171S KEBK276S KEBS107S KEBS177S KEBS207S KEBS208S KEBK206S KEBS277S KEBS278S Electrical: Oven must be connected to the proper electrical voltage and...

Installation Guide
Page 2
...the junction box on some models) Check local codes. All safety messages will tell you what can be recessed and located in the upper or lower right or left rear corner of the support surface to pass the appliance cable through to support a single oven weight of 154 lbs (70... kg) or a double oven weight of 287 lbs (130 kg). 2 single oven (2), double oven (4) ■ Bottom vent (supplied on rear wall behind oven, the junction box must be killed or seriously injured if you don't ...
...the junction box on some models) Check local codes. All safety messages will tell you what can be recessed and located in the upper or lower right or left rear corner of the support surface to pass the appliance cable through to support a single oven weight of 154 lbs (70... kg) or a double oven weight of 287 lbs (130 kg). 2 single oven (2), double oven (4) ■ Bottom vent (supplied on rear wall behind oven, the junction box must be killed or seriously injured if you don't ...


