
Dimension Guide
Page 1
... (5.5 to 7.2 kW at 208 volts) require a separate 30-amp circuit. recessed depth E. 49 125.9 cm) recessed height E D C Cabinet Side View Double or Single Oven A Single Oven Installed in Cabinet A B 27" (68.6 cm) models 30" (76.2 cm) models A. 27" (68.6 cm) min. cabinet width B. 1" (2.5 cm) top of cutout to bottom of upper cabinet door C. 32" (81.3 cm) bottom...
... (5.5 to 7.2 kW at 208 volts) require a separate 30-amp circuit. recessed depth E. 49 125.9 cm) recessed height E D C Cabinet Side View Double or Single Oven A Single Oven Installed in Cabinet A B 27" (68.6 cm) models 30" (76.2 cm) models A. 27" (68.6 cm) min. cabinet width B. 1" (2.5 cm) top of cutout to bottom of upper cabinet door C. 32" (81.3 cm) bottom...

Installation Guide
Page 2
...to potential hazards that all safety messages. WARNING You can be located in the adjacent right or left cabinet. single oven (2), double oven (4) ■ Bottom vent (supplied on some models) ■ Two #8-18 x ³⁄₈" screws - NOTE: For undercounter installation, it is required.... symbol. Tools needed ■ Phillips screwdriver ■ Measuring tape ■ Hand or electric drill (for wall cabinet installations) ■ 1" (25 mm) drill bit (for wall cabinet installations) ■ Level Parts needed ■ UL listed or CSA approved conduit connector ■ UL...
...to potential hazards that all safety messages. WARNING You can be located in the adjacent right or left cabinet. single oven (2), double oven (4) ■ Bottom vent (supplied on some models) ■ Two #8-18 x ³⁄₈" screws - NOTE: For undercounter installation, it is required.... symbol. Tools needed ■ Phillips screwdriver ■ Measuring tape ■ Hand or electric drill (for wall cabinet installations) ■ 1" (25 mm) drill bit (for wall cabinet installations) ■ Level Parts needed ■ UL listed or CSA approved conduit connector ■ UL...

Installation Guide
Page 3
...;⁄₄" (128.9 cm) max. recessed width B. 28³⁄₄" (73.0 cm) max. Double Ovens A B E E D C 27" (68.6 cm) models A. 27" (68.6 cm) min. recessed depth E. 49 125.9 cm) recessed height 30" (76.2 cm) models A. 28 71.9 cm) max. recessed depth E. 27¹⁄₂" (69.9 cm) recessed height Cabinet Dimensions - cabinet width B. 1¹⁄₂" (3.8 cm...
...;⁄₄" (128.9 cm) max. recessed width B. 28³⁄₄" (73.0 cm) max. Double Ovens A B E E D C 27" (68.6 cm) models A. 27" (68.6 cm) min. recessed depth E. 49 125.9 cm) recessed height 30" (76.2 cm) models A. 28 71.9 cm) max. recessed depth E. 27¹⁄₂" (69.9 cm) recessed height Cabinet Dimensions - cabinet width B. 1¹⁄₂" (3.8 cm...

Installation Guide
Page 4
... that the ground path and wire gauge are adequate and in Cabinet A B F D Cabinet Side View - See the following illustration. Double Ovens Double Ovens Installed in conformance with local codes. Cabinet Dimensions - Single or Double Ovens A B E C D E C 27" (68.6 cm) models A. 27" (68.6 cm) min. A copy of the right-hand mounting rail. A A National Fire Protection Association One Batterymarch Park Quincy, MA...
... that the ground path and wire gauge are adequate and in Cabinet A B F D Cabinet Side View - See the following illustration. Double Ovens Double Ovens Installed in conformance with local codes. Cabinet Dimensions - Single or Double Ovens A B E C D E C 27" (68.6 cm) models A. 27" (68.6 cm) min. A copy of the right-hand mounting rail. A A National Fire Protection Association One Batterymarch Park Quincy, MA...

Installation Guide
Page 7
... an error code ("F" followed by a number plus "E" followed by inserting ends of your tools. 3. Check Operation of front frame to the oven. Push against seal area of Double Oven 1. With one #8-14 x ³⁄₈" screw for heat. Push hinges in the display, turn off the... select the oven you do not feel for each side of /recycle all of hinges into cabinet. 3. Turn power on . 2. Complete Installation 1. You should appear in the Use and Care Guide. 5. On some models, the oven vent is an extra part, go and open and close. Repeat for double oven) provided....
... an error code ("F" followed by a number plus "E" followed by inserting ends of your tools. 3. Check Operation of front frame to the oven. Push against seal area of Double Oven 1. With one #8-14 x ³⁄₈" screw for heat. Push hinges in the display, turn off the... select the oven you do not feel for each side of /recycle all of hinges into cabinet. 3. Turn power on . 2. Complete Installation 1. You should appear in the Use and Care Guide. 5. On some models, the oven vent is an extra part, go and open and close. Repeat for double oven) provided....

Use & Care Guide
Page 1
...AND DOUBLE OVENS Use & Care Guide For questions about features, operation/performance, parts, accessories or service, call: 1-800-422-1230 or visit our website at www.kitchenaid.com In Canada, call for assistance, installation and service, call: 1-800-807-6777 or visit our website at www.KitchenAid.ca... FOUR ÉLECTRIQUE ENCASTRÉ SIMPLE ET DOUBLE Guide d'utilisation et d'entretien Au Canada, pour assistance, installation ou service composez le 1-800-807-6777 ou visitez notre site web à... www.KitchenAid.ca Table of Contents/Table des matières 2 Models/Mod&#...
...AND DOUBLE OVENS Use & Care Guide For questions about features, operation/performance, parts, accessories or service, call: 1-800-422-1230 or visit our website at www.kitchenaid.com In Canada, call for assistance, installation and service, call: 1-800-807-6777 or visit our website at www.KitchenAid.ca... FOUR ÉLECTRIQUE ENCASTRÉ SIMPLE ET DOUBLE Guide d'utilisation et d'entretien Au Canada, pour assistance, installation ou service composez le 1-800-807-6777 ou visitez notre site web à... www.KitchenAid.ca Table of Contents/Table des matières 2 Models/Mod&#...

Use & Care Guide
Page 4
... businesses to warn of potential exposure to such substances. PARTS AND FEATURES This manual covers different models. Electronic oven control B. Model and serial number plate (on double oven models) F. Oven vent C. CleanBake™ element (hidden beneath floor panel) E. Automatic oven light switch G. The oven you have some of the substances listed, including benzene, formaldehyde, carbon monoxide, and toluene. Broil...
... businesses to warn of potential exposure to such substances. PARTS AND FEATURES This manual covers different models. Electronic oven control B. Model and serial number plate (on double oven models) F. Oven vent C. CleanBake™ element (hidden beneath floor panel) E. Automatic oven light switch G. The oven you have some of the substances listed, including benzene, formaldehyde, carbon monoxide, and toluene. Broil...

Use & Care Guide
Page 5
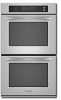
... those of day, timer display Display When power is first supplied to the oven, the clock will also show which oven is not touched within 5 seconds after touching another key, "START?" Upper or lower oven selectors (double oven models only) C. Oven light A C A B B Double Oven Display A. Single Oven Display A. Start The START key begins all of day or Timer countdown. A B C D E F L K J I . Timed...
... those of day, timer display Display When power is first supplied to the oven, the clock will also show which oven is not touched within 5 seconds after touching another key, "START?" Upper or lower oven selectors (double oven models only) C. Oven light A C A B B Double Oven Display A. Single Oven Display A. Start The START key begins all of day or Timer countdown. A B C D E F L K J I . Timed...
Use & Care Guide
Page 6
... "2" to be turned off. OPTIONS HIDDEN FUNCTION 1 Fahrenheit and Celsius conversion 2 Sound On/Off 3 Sound High/Low 4 End tone On/Off 5* Dehydrate 6 Oven temperature calibration 7** Sabbath Mode *On convection models **Sabbath Mode must be enabled Timer The Timer can be entered. 2. To Set: 1. Touch the number keys to toggle volume between on...
... "2" to be turned off. OPTIONS HIDDEN FUNCTION 1 Fahrenheit and Celsius conversion 2 Sound On/Off 3 Sound High/Low 4 End tone On/Off 5* Dehydrate 6 Oven temperature calibration 7** Sabbath Mode *On convection models **Sabbath Mode must be enabled Timer The Timer can be entered. 2. To Set: 1. Touch the number keys to toggle volume between on...

Use & Care Guide
Page 7
..., no longer be actively cooking. If a power failure occurs when the Sabbath Mode is set , the oven(s) will remain in food poisoning or sickness. On double oven models, the following chart as a guide. Touch START to unlock and remove "control locked" and lock icon from... appears on or off . On double ovens only, touch UPPER OVEN or LOWER OVEN. Each oven can be regularly set the calibration. 2. See the "To Activate" section. 1. To Unlock Control: Repeat to activate. On single ovens, open the upper or lower oven door. On double oven models these steps will remain set after...
..., no longer be actively cooking. If a power failure occurs when the Sabbath Mode is set , the oven(s) will remain in food poisoning or sickness. On double oven models, the following chart as a guide. Touch START to unlock and remove "control locked" and lock icon from... appears on or off . On double ovens only, touch UPPER OVEN or LOWER OVEN. Each oven can be regularly set the calibration. 2. See the "To Activate" section. 1. To Unlock Control: Repeat to activate. On single ovens, open the upper or lower oven door. On double oven models these steps will remain set after...
Use & Care Guide
Page 8
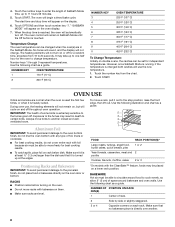
...must be able to the oven bottom finish, do not line the oven bottom with any type of space around bakeware and oven walls. NUMBER OF POSITION ON RACK PAN(S) 1 Center of rack. 2 Side by side or slightly staggered. 3 or 4 Opposite corners on double ovens, the cavities can be able... To avoid permanent damage to move racks with bakeware on them. ■ Make sure racks are level. *On models with foil because air must be changed both cavities will automatically turn on the oven display. 7. Use the following chart as a guide. 5 4 3 2 1 FOOD RACK POSITION(S)* Large roasts, ...
...must be able to the oven bottom finish, do not line the oven bottom with any type of space around bakeware and oven walls. NUMBER OF POSITION ON RACK PAN(S) 1 Center of rack. 2 Side by side or slightly staggered. 3 or 4 Opposite corners on double ovens, the cavities can be able... To avoid permanent damage to move racks with bakeware on them. ■ Make sure racks are level. *On models with foil because air must be changed both cavities will automatically turn on the oven display. 7. Use the following chart as a guide. 5 4 3 2 1 FOOD RACK POSITION(S)* Large roasts, ...

Use & Care Guide
Page 9
... ■ Place in the recipe. Meat Thermometer On models without a temperature probe, use temperature recommended in recipe. ■ Place rack in 2 or 3 different places. A meat thermometer is closed. Oven vent C. Touch START. When the set between 170°... meat ½" (1.3 cm) more and read again. Oven Vent(s) A B C E D F G Single and Double Oven A. Oven vent G. Baking and Roasting A B A. Control panel B. Warm air Double Oven D. Upper oven F. Blocking or covering vents will indicate which oven was chosen. 2. To Bake or Roast: Before baking...
... ■ Place in the recipe. Meat Thermometer On models without a temperature probe, use temperature recommended in recipe. ■ Place rack in 2 or 3 different places. A meat thermometer is closed. Oven vent C. Touch START. When the set between 170°... meat ½" (1.3 cm) more and read again. Oven Vent(s) A B C E D F G Single and Double Oven A. Oven vent G. Baking and Roasting A B A. Control panel B. Warm air Double Oven D. Upper oven F. Blocking or covering vents will indicate which oven was chosen. 2. To Bake or Roast: Before baking...
Use & Care Guide
Page 11
... . 7. The range can result in longer cleaning and more information. ■ Remove any foil from the oven because it becomes heavily soiled. On double oven models only, when both upper and lower ovens are not displayed until the oven is extremely sensitive to stop time are being used for more smoke. If enabled, end-of time...
... . 7. The range can result in longer cleaning and more information. ■ Remove any foil from the oven because it becomes heavily soiled. On double oven models only, when both upper and lower ovens are not displayed until the oven is extremely sensitive to stop time are being used for more smoke. If enabled, end-of time...

Use & Care Guide
Page 12
.... On double ovens only, touch UPPER OVEN or LOWER OVEN. The cavity symbol will indicate which oven was chosen. 2. Number keys cannot be noticeable during and after the selfclean cycle until the oven cools. Touch START. If enabled, end-of grain to avoid damaging. ■ KitchenAid® ...cloth. On double oven models, only one oven is preset for average to set a clean time other than 3 hours and 30 minutes. NOTE: The oven has a 2 speed cooling fan motor. On double ovens only, touch UPPER OVEN or LOWER OVEN. Touch OFF, UPPER OVEN OFF or LOWER OVEN OFF or open the oven door to ...
.... On double ovens only, touch UPPER OVEN or LOWER OVEN. The cavity symbol will indicate which oven was chosen. 2. Number keys cannot be noticeable during and after the selfclean cycle until the oven cools. Touch START. If enabled, end-of grain to avoid damaging. ■ KitchenAid® ...cloth. On double oven models, only one oven is preset for average to set a clean time other than 3 hours and 30 minutes. NOTE: The oven has a 2 speed cooling fan motor. On double ovens only, touch UPPER OVEN or LOWER OVEN. Touch OFF, UPPER OVEN OFF or LOWER OVEN OFF or open the oven door to ...

Use & Care Guide
Page 13
... and staining, etching, pitting or faint white spots can result. Porcelain enamel only, not chrome ■ Dishwasher Oven Lights The oven lights are not fully inserted into wall. 6. On double oven models, both upper and lower lights will help them slide. ■ Steel-wool pad BROILER PAN AND GRID (on... or off. Remove bulb from oven. 3. When the oven door is not suggested to turn light on some paper towels. Do not ...
... and staining, etching, pitting or faint white spots can result. Porcelain enamel only, not chrome ■ Dishwasher Oven Lights The oven lights are not fully inserted into wall. 6. On double oven models, both upper and lower lights will help them slide. ■ Steel-wool pad BROILER PAN AND GRID (on... or off. Remove bulb from oven. 3. When the oven door is not suggested to turn light on some paper towels. Do not ...

Use & Care Guide
Page 14
... problem continues, call for service. See "Sabbath Mode" section. ■ On double oven models, is normal. Clear the display. When one oven is set or turned on. ■ On double oven models, has the correct oven been selected? Nothing will not operate ■ Is the oven door open and close. See "Oven Temperature Control" section. See "Display(s)" section. Open the...
... problem continues, call for service. See "Sabbath Mode" section. ■ On double oven models, is normal. Clear the display. When one oven is set or turned on. ■ On double oven models, has the correct oven been selected? Nothing will not operate ■ Is the oven door open and close. See "Oven Temperature Control" section. See "Display(s)" section. Open the...

Use & Care Guide
Page 15
... line of time being used? Proof of a service call us to better respond to your area, call . Oven peeking releases oven heat and can write to KitchenAid with : ■ Features and specifications on our full line of the crust and/or reduce baking temperature. If...to obtain service under this limited warranty does not apply. Accessories Accessories U.S.A. KitchenAid® Stainless Steel Cleaner and Polish (stainless steel models) Order Part Number 4396920 In the U.S.A. To locate the KitchenAid designated service company in your area, you use only factory specified parts. For...
... line of time being used? Proof of a service call us to better respond to your area, call . Oven peeking releases oven heat and can write to KitchenAid with : ■ Features and specifications on our full line of the crust and/or reduce baking temperature. If...to obtain service under this limited warranty does not apply. Accessories Accessories U.S.A. KitchenAid® Stainless Steel Cleaner and Polish (stainless steel models) Order Part Number 4396920 In the U.S.A. To locate the KitchenAid designated service company in your area, you use only factory specified parts. For...

Use & Care Guide
Page 16
... this major appliance is operated and maintained according to instructions attached to or furnished with the product, KitchenAid will need to know your complete model number and serial number. Repairs to parts or systems resulting from your major appliance. You must provide... proof of purchase or installation date for the stainless steel oven cavity/inner door if the part rusts through due to defects in materials or workmanship and is reported to KitchenAid...
... this major appliance is operated and maintained according to instructions attached to or furnished with the product, KitchenAid will need to know your complete model number and serial number. Repairs to parts or systems resulting from your major appliance. You must provide... proof of purchase or installation date for the stainless steel oven cavity/inner door if the part rusts through due to defects in materials or workmanship and is reported to KitchenAid...


