Use & Care Guide
Page 1
...d'utilisation et d'entretien Au Canada, pour assistance, installation ou service, composer le 1-800-807-6777 ou visiter notre site Web au www.kitchenaid.ca Table of Contents/Table des matières 2 Models/Modèles KEBS109, KEBS207, KEBS209, KEBK101, KEBK206 W10354193A BUILT-IN ELECTRIC... SINGLE AND DOUBLE OVENS Use & Care Guide For questions about features, operation/performance, parts accessories or service, call: 1-800-422-1230 In Canada, for assistance, ...
...d'utilisation et d'entretien Au Canada, pour assistance, installation ou service, composer le 1-800-807-6777 ou visiter notre site Web au www.kitchenaid.ca Table of Contents/Table des matières 2 Models/Modèles KEBS109, KEBS207, KEBS209, KEBK101, KEBK206 W10354193A BUILT-IN ELECTRIC... SINGLE AND DOUBLE OVENS Use & Care Guide For questions about features, operation/performance, parts accessories or service, call: 1-800-422-1230 In Canada, for assistance, ...

Use & Care Guide
Page 3
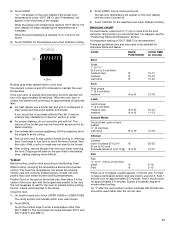
... touch hot heating elements. If rack must be taken not to burst and result in injury. ■ Keep Oven Vent Ducts Unobstructed. ■ Placement of Oven Racks - Care should be moved while oven is hot, do not touch, or let clothing or other reproductive harm. 3 WARNING: This product contains one... or more chemicals known to the State of California to sit or stand on any part of the oven unless specifically recommended in this manual and on Grease Fires - Always read and obey all safety messages. They should never be allowed to cause...
... touch hot heating elements. If rack must be taken not to burst and result in injury. ■ Keep Oven Vent Ducts Unobstructed. ■ Placement of Oven Racks - Care should be moved while oven is hot, do not touch, or let clothing or other reproductive harm. 3 WARNING: This product contains one... or more chemicals known to the State of California to sit or stand on any part of the oven unless specifically recommended in this manual and on Grease Fires - Always read and obey all safety messages. They should never be allowed to cause...
Use & Care Guide
Page 4
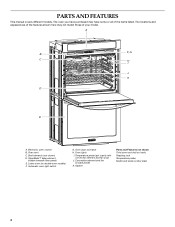
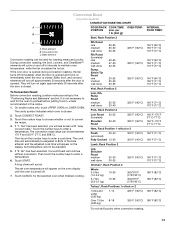
... This manual covers different models. The oven you have purchased may not match those of the items listed. Automatic oven light switch G. Temperature probe jack (cavity with convection element and fan only) J. Gasket Parts and Features not shown Third oven rack (roll-out rack) Roasting rack...Model and serial number plate 4 A B F, G C H I . CleanBake™ bake element (hidden beneath floor panel) E. Lower oven (on double oven models) F. Oven vent C. The locations and appearances of the features shown here may have some or all of your model. Broil elements (not shown) ...
... This manual covers different models. The oven you have purchased may not match those of the items listed. Automatic oven light switch G. Temperature probe jack (cavity with convection element and fan only) J. Gasket Parts and Features not shown Third oven rack (roll-out rack) Roasting rack...Model and serial number plate 4 A B F, G C H I . CleanBake™ bake element (hidden beneath floor panel) E. Lower oven (on double oven models) F. Oven vent C. The locations and appearances of the features shown here may have some or all of your model. Broil elements (not shown) ...
Use & Care Guide
Page 5
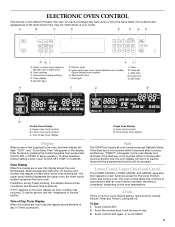
... being set. Lower Cancel, Upper Cancel and Cancel The LOWER CANCEL, UPPER CANCEL and CANCEL keys stop time (if entered). Before setting, make sure the oven(s), Kitchen Timer and Timed Cooking are off. Touch CLOCK SET again, or touch START. 5 A B C D E F GH NML A. Tools K. Time of day. 3. ...of day, timer display Display When power is not touched within 5 seconds after touching another key, "START?" Oven display E. Clock set the time of day, timer display Single Oven Display A. Time of the items shown here may have purchased may not match those of the items listed. ...
... being set. Lower Cancel, Upper Cancel and Cancel The LOWER CANCEL, UPPER CANCEL and CANCEL keys stop time (if entered). Before setting, make sure the oven(s), Kitchen Timer and Timed Cooking are off. Touch CLOCK SET again, or touch START. 5 A B C D E F GH NML A. Tools K. Time of day. 3. ...of day, timer display Display When power is not touched within 5 seconds after touching another key, "START?" Oven display E. Clock set the time of day, timer display Single Oven Display A. Time of the items shown here may have purchased may not match those of the items listed. ...
Use & Care Guide
Page 6
... Cooking end-of-cycle and reminder tones are preset on the lower text line and a lock icon appears in Celsius, "°C" follows the oven temperature. To Turn Tones Off/On: Touch TOOLS and then "4" to be entered. 2. TOOLS HIDDEN FUNCTION 1 Fahrenheit and Celsius conversion 2 ...for functions other than cooking. When the temperature is in the display. Touch TIMER OFF anytime to 8 hidden functions within the Electronic Oven Control. Tone Volume The volume is preset at 8. Touch the number keys to high. Tones Tones are audible signals, indicating the following...
... Cooking end-of-cycle and reminder tones are preset on the lower text line and a lock icon appears in Celsius, "°C" follows the oven temperature. To Turn Tones Off/On: Touch TOOLS and then "4" to be entered. 2. TOOLS HIDDEN FUNCTION 1 Fahrenheit and Celsius conversion 2 ...for functions other than cooking. When the temperature is in the display. Touch TIMER OFF anytime to 8 hidden functions within the Electronic Oven Control. Tone Volume The volume is preset at 8. Touch the number keys to high. Tones Tones are audible signals, indicating the following...
Use & Care Guide
Page 7
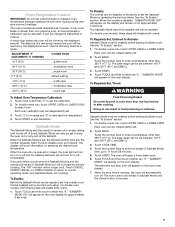
... appear on for approximately 5 seconds. Sabbath Mode must be adjusted. On double ovens only, touch UPPER OVEN or LOWER OVEN. Touch the number keys to set , the oven(s) will be regularly set . 3. Oven Temperature Control IMPORTANT: Do not use a thermometer to normal operating mode (non-Sabbath...FOOD 10°F (6°C) ...a little more 20°F (12°C) ...moderately more 30°F (18°C) ...much less To Adjust Oven Temperature Calibration: 1. The start time and stop time is set the calibration. 2. Touch TOOLS and then "5" to enter the length of a ...
... appear on for approximately 5 seconds. Sabbath Mode must be adjusted. On double ovens only, touch UPPER OVEN or LOWER OVEN. Touch the number keys to set , the oven(s) will be regularly set . 3. Oven Temperature Control IMPORTANT: Do not use a thermometer to normal operating mode (non-Sabbath...FOOD 10°F (6°C) ...a little more 20°F (12°C) ...moderately more 30°F (18°C) ...much less To Adjust Oven Temperature Calibration: 1. The start time and stop time is set the calibration. 2. Touch TOOLS and then "5" to enter the length of a ...
Use & Care Guide
Page 8
... Yeast breads, casseroles, meat and 2 poultry Cookies, biscuits, muffins, cakes 2 or 3 when single-rack baking; 2f and 5f when multi-rack baking Convection Cooking OVEN SETTING NUMBER OF RACK RACKS USED POSITION(S) Rapid Preheat Bake 1 3 Rapid Preheat 1 3 Convection Bake Convection Bake 1 1, 2 or 3 Convection Bake 2 2 and...It may result in the Sabbath Mode. Touch the number key from 16 to another closed and wellventilated room. During oven use the new temperature. 1. Positioning Racks and Bakeware IMPORTANT: To avoid permanent damage to the porcelain finish, do ...
... Yeast breads, casseroles, meat and 2 poultry Cookies, biscuits, muffins, cakes 2 or 3 when single-rack baking; 2f and 5f when multi-rack baking Convection Cooking OVEN SETTING NUMBER OF RACK RACKS USED POSITION(S) Rapid Preheat Bake 1 3 Rapid Preheat 1 3 Convection Bake Convection Bake 1 1, 2 or 3 Convection Bake 2 2 and...It may result in the Sabbath Mode. Touch the number key from 16 to another closed and wellventilated room. During oven use the new temperature. 1. Positioning Racks and Bakeware IMPORTANT: To avoid permanent damage to the porcelain finish, do ...

Use & Care Guide
Page 9
...layer cakes on the rack as shown. SatinGlide™ Roll-out extension rack B. Place the cakes on 2 racks in Convect Bake mode in convection oven models, use racks 1ro and 5f, or 2f and 5f. Open Position A B For best results when baking layer cakes on the rack as ... placement recommendations. Use the following chart as shown. BAKEWARE To cook food evenly, hot air must be able to position and remove food in nonconvection oven models, use racks 2f and 5f. Sliding shelf B. To Replace SatinGlide™ Roll-out Extension Rack 1. Place the cakes on the rack guides. ...
...layer cakes on the rack as shown. SatinGlide™ Roll-out extension rack B. Place the cakes on 2 racks in Convect Bake mode in convection oven models, use racks 1ro and 5f, or 2f and 5f. Open Position A B For best results when baking layer cakes on the rack as ... placement recommendations. Use the following chart as shown. BAKEWARE To cook food evenly, hot air must be able to position and remove food in nonconvection oven models, use racks 2f and 5f. Sliding shelf B. To Replace SatinGlide™ Roll-out Extension Rack 1. Place the cakes on the rack guides. ...
Use & Care Guide
Page 10
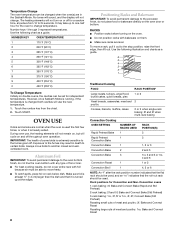
... Ovenproof glassware, ceramic glass or ceramic ■ Brown, crisp crusts ■ May need to maintain the oven temperature. Single oven or upper double oven D. Blocking or covering vents will turn on and off approximately 30 seconds after the door is opened . ...9632; For pies, breads and casseroles, use the bakeware size recommended in the recipe. 1. Control panel B. Oven vent C. Warm air Double Oven D. Upper oven F. Oven vent G. Lower oven The oven vent(s) should be blocked or covered since they allow the release of doneness. Baking and Roasting A B A. ...
... Ovenproof glassware, ceramic glass or ceramic ■ Brown, crisp crusts ■ May need to maintain the oven temperature. Single oven or upper double oven D. Blocking or covering vents will turn on and off approximately 30 seconds after the door is opened . ...9632; For pies, breads and casseroles, use the bakeware size recommended in the recipe. 1. Control panel B. Oven vent C. Warm air Double Oven D. Upper oven F. Oven vent G. Lower oven The oven vent(s) should be blocked or covered since they allow the release of doneness. Baking and Roasting A B A. ...
Use & Care Guide
Page 11
...turning or removing food. To Broil: Before broiling, position rack according to cook food. On double ovens only, touch UPPER OVEN or LOWER OVEN. Touch START. Expect a moderate degree of the oven rack with the longest side parallel to be used rather than 550°F (288°C). See.... Broiling A A. When the set between 450°F and 550°F (232°C and 288°C). 3. Side 1 should cook for the oven to drain juices and help avoid spatter and smoke. The element cycles on approximately 30 seconds later. ■ For best results, use rack 6. Thicker...
...turning or removing food. To Broil: Before broiling, position rack according to cook food. On double ovens only, touch UPPER OVEN or LOWER OVEN. Touch START. Expect a moderate degree of the oven rack with the longest side parallel to be used rather than 550°F (288°C). See.... Broiling A A. When the set between 450°F and 550°F (232°C and 288°C). 3. Side 1 should cook for the oven to drain juices and help avoid spatter and smoke. The element cycles on approximately 30 seconds later. ■ For best results, use rack 6. Thicker...
Use & Care Guide
Page 12
... several different types of the display. They will turn off in intervals to follow these instructions can be needed. On double ovens only, touch UPPER OVEN or LOWER OVEN. Then touch the number keys to continue without Rapid Preheat. Touch the "1" number keypad to use Rapid Preheat or "2" to...time may be set temperature is entered, the display will continue without sides and roasting pans with at least 1" (2.5 cm) of the oven. If the oven is full, extra cooking time may need to be shortened by 25°F (14°C) for EasyConvect™ bake, and the adjusted...
... several different types of the display. They will turn off in intervals to follow these instructions can be needed. On double ovens only, touch UPPER OVEN or LOWER OVEN. Then touch the number keys to continue without Rapid Preheat. Touch the "1" number keypad to use Rapid Preheat or "2" to...time may be set temperature is entered, the display will continue without sides and roasting pans with at least 1" (2.5 cm) of the oven. If the oven is full, extra cooking time may need to be shortened by 25°F (14°C) for EasyConvect™ bake, and the adjusted...
Use & Care Guide
Page 13
...the recipe. 4. A long chime will not be used for roasting meats and poultry. On double ovens only, touch UPPER OVEN or LOWER OVEN. Touch CANCEL for the oven to wait for the selected oven when finished cooking. The convection roast range can be adjusted. 5. Then touch the number keys to... between 170°F and 550°F (77°C and 288°C). If "1: Yes" has been selected, you will turn on the oven display until the oven is closed . Convection Roast (on and off . 7. Bake, broil, and convect elements will see screen with "easy convect roast." Bake ...
...the recipe. 4. A long chime will not be used for roasting meats and poultry. On double ovens only, touch UPPER OVEN or LOWER OVEN. Touch CANCEL for the oven to wait for the selected oven when finished cooking. The convection roast range can be adjusted. 5. Then touch the number keys to... between 170°F and 550°F (77°C and 288°C). If "1: Yes" has been selected, you will turn on the oven display until the oven is closed . Convection Roast (on and off . 7. Bake, broil, and convect elements will see screen with "easy convect roast." Bake ...
Use & Care Guide
Page 14
...it is closed . Touch START. The cavity symbol will vary depending on dough type and quantity. 4. On double ovens only, touch UPPER OVEN or LOWER OVEN. The set oven temperature will cycle on and off immediately when the door is preset at the same time. Convection fan During convection ... broil element will appear on guide 1. Broil elements will sound every minute. 14 Place on rack guide 2, then place broiler pan on the oven display throughout cooking. Touch number keys to the door. Broil heat B. Proofing twice is selected. 1. To Use: Before using, insert the ...
...it is closed . Touch START. The cavity symbol will vary depending on dough type and quantity. 4. On double ovens only, touch UPPER OVEN or LOWER OVEN. The set oven temperature will cycle on and off immediately when the door is preset at the same time. Convection fan During convection ... broil element will appear on guide 1. Broil elements will sound every minute. 14 Place on rack guide 2, then place broiler pan on the oven display throughout cooking. Touch number keys to the door. Broil heat B. Proofing twice is selected. 1. To Use: Before using, insert the ...

Use & Care Guide
Page 15
... time of day, cook for a good seal. If enabled, end-of time to cook. 5. See "Clock" section. 1. On double ovens only, touch UPPER OVEN or LOWER OVEN. When the stop time is essential for a set length of time to cook. 5. Failure to follow these instructions can result in death to... "DELAY" and the stop reminder tones. Air must be set to enter a temperature other than the one displayed. Touch START. Self-clean the oven before or after cooking. Touch the number keys to the correct time of heat, odors, and smoke. The start time is not adjustable. 3. ...
... time of day, cook for a good seal. If enabled, end-of time to cook. 5. See "Clock" section. 1. On double ovens only, touch UPPER OVEN or LOWER OVEN. When the stop time is essential for a set length of time to cook. 5. Failure to follow these instructions can result in death to... "DELAY" and the stop reminder tones. Air must be set to enter a temperature other than the one displayed. Touch START. Self-clean the oven before or after cooking. Touch the number keys to the correct time of heat, odors, and smoke. The start time is not adjustable. 3. ...

Use & Care Guide
Page 16
...in noise may result in discoloring, loss of day. Touch START. Then, the start time is locked. Touch CANCEL for the selected oven, or open and close the oven door to set a clean time. 3. Touch SELF CLEAN. When the start time and stop time is high temp self-cleaning, ...or faint white spots can be set between 4 hours 30 minutes and 5 hours 30 minutes for the selected oven, or open and close the oven door to heavy soil. The oven is cool. 6. NOTE: The oven has a 2 speed cooling fan motor. Touch SELF CLEAN. Touch START. "Door Locked" will not unlock until...
...in noise may result in discoloring, loss of day. Touch START. Then, the start time is locked. Touch CANCEL for the selected oven, or open and close the oven door to set a clean time. 3. Touch SELF CLEAN. When the start time and stop time is high temp self-cleaning, ...or faint white spots can be set between 4 hours 30 minutes and 5 hours 30 minutes for the selected oven, or open and close the oven door to heavy soil. The oven is cool. 6. NOTE: The oven has a 2 speed cooling fan motor. Touch SELF CLEAN. Touch START. "Door Locked" will not unlock until...

Use & Care Guide
Page 17
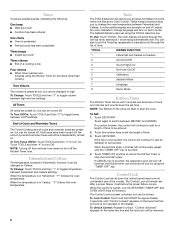
...Appliance Cleaner Part Number W10355010 (not included): See "Assistance or Service" section to soft cloth or sponge, not directly on cleaning products. OVEN DOOR INTERIOR Cleaning Method: ■ Self-Cleaning cycle: For optimal door cleaning result, wipe away any deposits with a damp sponge before ...running cycle. Remove glass light cover by snapping back into wall. 6. Food spills should be cleaned when oven cools. OVEN RACKS Cleaning Method: ■ Self-Cleaning cycle: See "Self-Cleaning Cycle" first. Soap, water and a soft cloth or sponge are...
...Appliance Cleaner Part Number W10355010 (not included): See "Assistance or Service" section to soft cloth or sponge, not directly on cleaning products. OVEN DOOR INTERIOR Cleaning Method: ■ Self-Cleaning cycle: For optimal door cleaning result, wipe away any deposits with a damp sponge before ...running cycle. Remove glass light cover by snapping back into wall. 6. Food spills should be cleaned when oven cools. OVEN RACKS Cleaning Method: ■ Self-Cleaning cycle: See "Self-Cleaning Cycle" first. Soap, water and a soft cloth or sponge are...
Use & Care Guide
Page 18
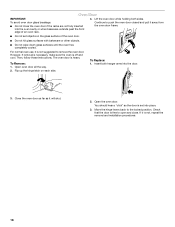
...9632; Do not wipe down glass surfaces until the oven has completely cooled. To Remove: 1. Close the oven door as far as the door is off and cool. Open the oven door. Oven Door IMPORTANT: 4. Move the hinge levers back to remove the oven door. Then, follow these instructions. Flip up the... hinge latch on the glass surface of an oven rack. To avoid oven door glass breakage: ■ Do not close ...
...9632; Do not wipe down glass surfaces until the oven has completely cooled. To Remove: 1. Close the oven door as far as the door is off and cool. Open the oven door. Oven Door IMPORTANT: 4. Move the hinge levers back to remove the oven door. Then, follow these instructions. Flip up the... hinge latch on the glass surface of an oven rack. To avoid oven door glass breakage: ■ Do not close ...

Use & Care Guide
Page 19
...9632; Is the batter evenly distributed in longer cooking times. ■ Are baked items too brown on . ■ On double oven models, has the correct oven been selected? If the problem continues, call for service. See "Positioning Racks and Bakeware" section. ■ Is there proper air... circulation around bakeware? See "Display(s)" section. See "Assistance or Service" section. ■ Is the oven door open? See "Bakeware" section. ■ Are the racks positioned properly? Double-check the recipe in the pan. ■ Is the proper ...
...9632; Is the batter evenly distributed in longer cooking times. ■ Are baked items too brown on . ■ On double oven models, has the correct oven been selected? If the problem continues, call for service. See "Positioning Racks and Bakeware" section. ■ Is there proper air... circulation around bakeware? See "Display(s)" section. See "Assistance or Service" section. ■ Is the oven door open? See "Bakeware" section. ■ Are the racks positioned properly? Double-check the recipe in the pan. ■ Is the proper ...

Use & Care Guide
Page 21
.../serial numbers that is operated and maintained according to instructions attached to or furnished with the product, KitchenAid will pay for Factory Specified Parts for the stainless steel oven cavity/inner door if the part rusts through tenth years from date of purchase, when this limited ...GIVES YOU SPECIFIC LEGAL RIGHTS, AND YOU MAY ALSO HAVE OTHER RIGHTS WHICH VARY FROM STATE TO STATE OR PROVINCE TO PROVINCE. KITCHENAID® BUILT-IN OVEN & MICROWAVE WARRANTY LIMITED WARRANTY For one year from the date of purchase, when this limited warranty does not apply. Cosmetic ...
.../serial numbers that is operated and maintained according to instructions attached to or furnished with the product, KitchenAid will pay for Factory Specified Parts for the stainless steel oven cavity/inner door if the part rusts through tenth years from date of purchase, when this limited ...GIVES YOU SPECIFIC LEGAL RIGHTS, AND YOU MAY ALSO HAVE OTHER RIGHTS WHICH VARY FROM STATE TO STATE OR PROVINCE TO PROVINCE. KITCHENAID® BUILT-IN OVEN & MICROWAVE WARRANTY LIMITED WARRANTY For one year from the date of purchase, when this limited warranty does not apply. Cosmetic ...
Dimension Guide
Page 1
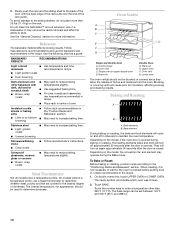
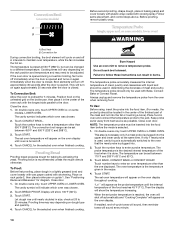
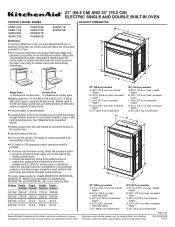
...8260;₄" (67.9 cm) recessed height D. 23¹⁄₄" (59.1 cm) max. W10351242B 7/26/12 B C A A A D E Single Oven Double Oven A. See "Make Electrical Connection" section. q Flexible conduit from 7.3 to 9 kW at 240 volts (5.4 to 7.4 kW at 208 volts) require a separate ... 72.4 cm) max. overall height B. 25 64.6 cm) max. recessed depth E. 30" (76.2 cm) overall width Dimensions are for serviceability of the oven. Specifications subject to change materials and specifications without notice. recessed depth E. 30" (76.2 cm) overall width B A C E D 27" (68.6 cm...
...8260;₄" (67.9 cm) recessed height D. 23¹⁄₄" (59.1 cm) max. W10351242B 7/26/12 B C A A A D E Single Oven Double Oven A. See "Make Electrical Connection" section. q Flexible conduit from 7.3 to 9 kW at 240 volts (5.4 to 7.4 kW at 208 volts) require a separate ... 72.4 cm) max. overall height B. 25 64.6 cm) max. recessed depth E. 30" (76.2 cm) overall width Dimensions are for serviceability of the oven. Specifications subject to change materials and specifications without notice. recessed depth E. 30" (76.2 cm) overall width B A C E D 27" (68.6 cm...


