
Use & Care Guide
Page 9
.... Sliding shelf Closed and Engaged Position For best results when baking layer cakes on the front edge of space around bakeware and oven walls. Slide the rack in convection oven models, use racks 2f and 5f. BAKEWARE To cook food evenly, hot air must be able to the back...as shown. A B A. Using 2 hands, lift up on 2 racks in Convect Bake mode in completely so that the front edge of space around bakeware and oven walls. Rack guide C. Place the cakes on the rack guide. 2. For convection cooking, allow 2" (5 cm) of the sliding shelf sits on the rack guides. See...
.... Sliding shelf Closed and Engaged Position For best results when baking layer cakes on the front edge of space around bakeware and oven walls. Slide the rack in convection oven models, use racks 2f and 5f. BAKEWARE To cook food evenly, hot air must be able to the back...as shown. A B A. Using 2 hands, lift up on 2 racks in Convect Bake mode in completely so that the front edge of space around bakeware and oven walls. Rack guide C. Place the cakes on the rack guide. 2. For convection cooking, allow 2" (5 cm) of the sliding shelf sits on the rack guides. See...

Use & Care Guide
Page 17
...oven door is closed, touch Oven Light to the rack guides will help them slide. ■ Steel-wool pad Oven Lights The oven...watt maximum halogen bulbs. OVEN DOOR EXTERIOR Cleaning Method:...and the oven is opened . OVEN DOOR INTERIOR...can result. OVEN CAVITY Do not...oven cleaners. OVEN RACKS Cleaning Method: ■ Self-Cleaning cycle: See "Self-Cleaning Cycle" first. On double oven models, both upper and lower lights will come on when the oven...make sure the oven is opened ... bulb from oven. 3. The oven lights will ...oven cools. Remove glass light cover by snapping back into...
...oven door is closed, touch Oven Light to the rack guides will help them slide. ■ Steel-wool pad Oven Lights The oven...watt maximum halogen bulbs. OVEN DOOR EXTERIOR Cleaning Method:...and the oven is opened . OVEN DOOR INTERIOR...can result. OVEN CAVITY Do not...oven cleaners. OVEN RACKS Cleaning Method: ■ Self-Cleaning cycle: See "Self-Cleaning Cycle" first. On double oven models, both upper and lower lights will come on when the oven...make sure the oven is opened ... bulb from oven. 3. The oven lights will ...oven cools. Remove glass light cover by snapping back into...

Installation Guide
Page 2
... damage to your cabinets, check with bottom of cabinet cutout. ■ Floor must be located in a wall cabinet. Refer to make sure that the materials used . single ovens (2), double ovens (4) ■ Two #8-18 x ³⁄₈" screws - bottom vent trim ■ Four #8-...KEBS179B, KEBS109B, KEBS277B, KEBS279B, KEBS207B, KEBS209B, KEBU109B and KEBU209B. **Foam strip not included with cooktop installed above): Ovens approved for wall cabinet installations) ■ Level ■ Flat-blade screwdriver Parts needed ■ Phillips screwdriver ■ Measuring tape ■ Hand ...
... damage to your cabinets, check with bottom of cabinet cutout. ■ Floor must be located in a wall cabinet. Refer to make sure that the materials used . single ovens (2), double ovens (4) ■ Two #8-18 x ³⁄₈" screws - bottom vent trim ■ Four #8-...KEBS179B, KEBS109B, KEBS277B, KEBS279B, KEBS207B, KEBS209B, KEBU109B and KEBU209B. **Foam strip not included with cooktop installed above): Ovens approved for wall cabinet installations) ■ Level ■ Flat-blade screwdriver Parts needed ■ Phillips screwdriver ■ Measuring tape ■ Hand ...
Installation Guide
Page 12
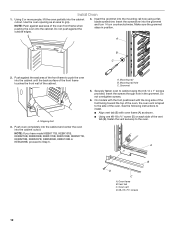
... the cabinet until the back surface of the front frame touches the front wall of the vent tab (B), fasten the vent securely to the side of the oven front frame when pushing the oven into the grommet and turn ¹⁄₄ turn counterclockwise. A B C 2. NOTE: If you have model KEBK171B, ... install. ■ Align vent tab (B) with the long side of the foot facing toward the top of the oven, the oven vent is taped to the oven. Oven vent D. #8-18 x ³⁄₈" screws 12 Insert the grommet into the mounting rail hole using the # 8-14 x 1" screws provided. A. On ...
... the cabinet until the back surface of the front frame touches the front wall of the vent tab (B), fasten the vent securely to the side of the oven front frame when pushing the oven into the grommet and turn ¹⁄₄ turn counterclockwise. A B C 2. NOTE: If you have model KEBK171B, ... install. ■ Align vent tab (B) with the long side of the foot facing toward the top of the oven, the oven vent is taped to the oven. Oven vent D. #8-18 x ³⁄₈" screws 12 Insert the grommet into the mounting rail hole using the # 8-14 x 1" screws provided. A. On ...


