Use & Care Guide
Page 1
... For questions about features, operation/performance, parts accessories or service, call: 1-800-422-1230 In Canada, for assistance, installation and service, call: 1-800-807-6777 or visit our website at... www.kitchenaid.com or www.kitchenaid.ca FOURS ÉLECTRIQUES ENCASTRÉS SIMPLE ET DOUBLE Guide d'utilisation et d'entretien Au Canada, pour assistance...
... For questions about features, operation/performance, parts accessories or service, call: 1-800-422-1230 In Canada, for assistance, installation and service, call: 1-800-807-6777 or visit our website at... www.kitchenaid.com or www.kitchenaid.ca FOURS ÉLECTRIQUES ENCASTRÉS SIMPLE ET DOUBLE Guide d'utilisation et d'entretien Au Canada, pour assistance...

Use & Care Guide
Page 3
... and windows of the oven. ■ Clean Only Parts Listed in or around any part of Oven Racks - Be sure the oven is properly installed and grounded by a qualified technician. ■ Never Use the Oven for a good seal. Do not repair or replace any part of the oven...to persons, or damage when using the oven. ■ User Servicing - All safety messages will follow basic precautions, including the following: ■ Proper Installation - Flammable materials should never be worn while using the oven, follow the safety alert symbol and either the word "DANGER" or "WARNING." Do not let...
... and windows of the oven. ■ Clean Only Parts Listed in or around any part of Oven Racks - Be sure the oven is properly installed and grounded by a qualified technician. ■ Never Use the Oven for a good seal. Do not repair or replace any part of the oven...to persons, or damage when using the oven. ■ User Servicing - All safety messages will follow basic precautions, including the following: ■ Proper Installation - Flammable materials should never be worn while using the oven, follow the safety alert symbol and either the word "DANGER" or "WARNING." Do not let...
Use & Care Guide
Page 18
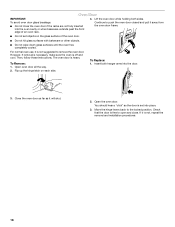
... to open and close the oven door if the racks are not fully inserted into the door. 2. If it is not, repeat the removal and installation procedures. 18 For normal oven use, it is not suggested to push the oven door closed and pull it will shut. 2. To Replace: 1. You should...
... to open and close the oven door if the racks are not fully inserted into the door. 2. If it is not, repeat the removal and installation procedures. 18 For normal oven use, it is not suggested to push the oven door closed and pull it will shut. 2. To Replace: 1. You should...

Use & Care Guide
Page 19
... cookbook. ■ Is the proper oven temperature calibration set or turned on the bottom? TROUBLESHOOTING Try the solutions suggested here first in the pan? See Installation Instructions. See "Timed Cooking" section. ■ Is the Control Lock set ? Clear the display. Close the oven door all the way. ■ Has the function...
... cookbook. ■ Is the proper oven temperature calibration set or turned on the bottom? TROUBLESHOOTING Try the solutions suggested here first in the pan? See Installation Instructions. See "Timed Cooking" section. ■ Is the Control Lock set ? Clear the display. Close the oven door all the way. ■ Has the function...
Use & Care Guide
Page 20
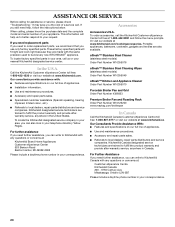
...Installation information. ■ Use and maintenance procedures. ■ Accessory and repair parts sales. ■ Specialized customer assistance (Spanish speaking, hearing impaired, limited vision, etc.). ■ Referrals to order replacement parts, we recommend that you can write to KitchenAid ...in your telephone directory Yellow Pages. Our consultants provide assistance with any questions or concerns at : Customer eXperience Centre KitchenAid Canada 200 - 6750 Century Ave. ASSISTANCE OR SERVICE Before calling for assistance or service, please check "Troubleshooting." ...
...Installation information. ■ Use and maintenance procedures. ■ Accessory and repair parts sales. ■ Specialized customer assistance (Spanish speaking, hearing impaired, limited vision, etc.). ■ Referrals to order replacement parts, we recommend that you can write to KitchenAid ...in your telephone directory Yellow Pages. Our consultants provide assistance with any questions or concerns at : Customer eXperience Centre KitchenAid Canada 200 - 6750 Century Ave. ASSISTANCE OR SERVICE Before calling for assistance or service, please check "Troubleshooting." ...

Use & Care Guide
Page 21
... codes, or use or when it is used in the country in which it is installed in an inaccessible location or is not installed in materials or workmanship and is reported to KitchenAid within 30 days from the date of purchase. 6. Outside the 50 United States and ... remote area where service by the customer. Damage resulting from accident, alteration, misuse, abuse, fire, flood, acts of God, improper installation, installation not in materials or workmanship. Expenses for travel and transportation for Factory Specified Parts and repair labor to correct defects in accordance with original ...
... codes, or use or when it is used in the country in which it is installed in an inaccessible location or is not installed in materials or workmanship and is reported to KitchenAid within 30 days from the date of purchase. 6. Outside the 50 United States and ... remote area where service by the customer. Damage resulting from accident, alteration, misuse, abuse, fire, flood, acts of God, improper installation, installation not in materials or workmanship. Expenses for travel and transportation for Factory Specified Parts and repair labor to correct defects in accordance with original ...

Use & Care Guide
Page 22
You must provide proof of purchase or installation date for future reference. You can find this book and your complete model number and serial number. Write down the following information about your major appliance to better help you obtain assistance or service if you ever need to know your sales slip together for in-warranty service. Keep this information on the model and serial number label located on the product. You will need it. Dealer name Address Phone number Model number Serial number Purchase date 22
You must provide proof of purchase or installation date for future reference. You can find this book and your complete model number and serial number. Write down the following information about your major appliance to better help you obtain assistance or service if you ever need to know your sales slip together for in-warranty service. Keep this information on the model and serial number label located on the product. You will need it. Dealer name Address Phone number Model number Serial number Purchase date 22
Dimension Guide
Page 1
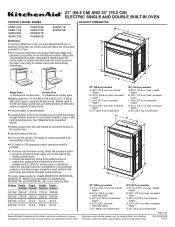
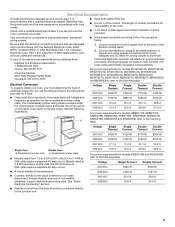
...) ELECTRIC SINGLE AND DOUBLE BUILT-IN OVEN PRODUCT MODEL SERIES PRODUCT DIMENSIONS KEBK101B KEBK171B KEBK206B KEBK276B KEBS109B KEBS179B KEBS207B KEBS209B KEBS277B KEBS279B Electrical: To properly install your oven, you must determine the type of electrical connection you will be using special connectors and/or tools designed and UL listed for joining... frequency as specified on double ovens. recessed depth E. 27" (68.6 cm) overall width 30" (76.2 cm) models A. 28 72.8 cm) max. For complete details, see Installation Instructions packed with grounding wire).
...) ELECTRIC SINGLE AND DOUBLE BUILT-IN OVEN PRODUCT MODEL SERIES PRODUCT DIMENSIONS KEBK101B KEBK171B KEBK206B KEBK276B KEBS109B KEBS179B KEBS207B KEBS209B KEBS277B KEBS279B Electrical: To properly install your oven, you must determine the type of electrical connection you will be using special connectors and/or tools designed and UL listed for joining... frequency as specified on double ovens. recessed depth E. 27" (68.6 cm) overall width 30" (76.2 cm) models A. 28 72.8 cm) max. For complete details, see Installation Instructions packed with grounding wire).
Dimension Guide
Page 2
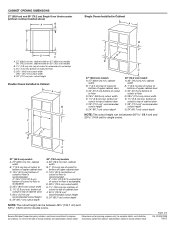
... cm) for planning purposes only. cabinet width on 30" (76.2 cm) models B. 1¹⁄₂" (3.8 cm) min. cutout height Double Ovens Installed in Cabinet A E D C A. 27" (68.6 cm) min. D. 28¹⁄₂" (72.4 cm) cutout width E. 1¹⁄₂... and 30" (76.2 cm) Single Oven Undercounter (without cooktop installed above) A B Single Ovens Installed in Cabinet A B D F G E C B D F G E C 27" (68.6 cm) models A. 27" (68.6 cm) min. For complete details, see Installation our products, we reserve the right to change materials and specifications ...
... cm) for planning purposes only. cabinet width on 30" (76.2 cm) models B. 1¹⁄₂" (3.8 cm) min. cutout height Double Ovens Installed in Cabinet A E D C A. 27" (68.6 cm) min. D. 28¹⁄₂" (72.4 cm) cutout width E. 1¹⁄₂... and 30" (76.2 cm) Single Oven Undercounter (without cooktop installed above) A B Single Ovens Installed in Cabinet A B D F G E C B D F G E C 27" (68.6 cm) models A. 27" (68.6 cm) min. For complete details, see Installation our products, we reserve the right to change materials and specifications ...
Installation Guide
Page 1
... pieds du four pour des ouvertures d'encastrement de hauteur différente 23 Raccordement électrique 26 Installation du four 28 Achever l'installation 30 BUILT-IN OVEN SAFETY Your safety and the safety of injury, and tell you don't follow instructions... Contents/Table des matières BUILT-IN OVEN SAFETY 1 SÉCURITÉ DU FOUR ENCASTR 17 INSTALLATION REQUIREMENTS 2 Tools and Parts 2 Location Requirements 2 Electrical Requirements 5 INSTALLATION INSTRUCTIONS 6 Prepare Built-In Oven 6 Remove Oven Door 6 Positioning Oven Feet for local electrical inspector's use...
... pieds du four pour des ouvertures d'encastrement de hauteur différente 23 Raccordement électrique 26 Installation du four 28 Achever l'installation 30 BUILT-IN OVEN SAFETY Your safety and the safety of injury, and tell you don't follow instructions... Contents/Table des matières BUILT-IN OVEN SAFETY 1 SÉCURITÉ DU FOUR ENCASTR 17 INSTALLATION REQUIREMENTS 2 Tools and Parts 2 Location Requirements 2 Electrical Requirements 5 INSTALLATION INSTRUCTIONS 6 Prepare Built-In Oven 6 Remove Oven Door 6 Positioning Oven Feet for local electrical inspector's use...

Installation Guide
Page 2
... dimensions provide minimum clearance with double oven. Location Requirements IMPORTANT: Observe all electrical connections be made by a licensed, qualified electrical installer. *Grommets not included with models KEBK171B, KEBK101B, KEBK276B, KEBK206B, KEBS179B, KEBS109B, KEBS277B, KEBS279B, KEBS207B, KEBS209B, KEBU109B and... KEBU209B. **Foam strip not included with oven. ■ Recessed installation area must be able to support a double oven weight of 194°F (90°C). A 1" (2.5 cm) minimum diameter ...
... dimensions provide minimum clearance with double oven. Location Requirements IMPORTANT: Observe all electrical connections be made by a licensed, qualified electrical installer. *Grommets not included with models KEBK171B, KEBK101B, KEBK276B, KEBK206B, KEBS179B, KEBS109B, KEBS277B, KEBS279B, KEBS207B, KEBS209B, KEBU109B and... KEBU209B. **Foam strip not included with oven. ■ Recessed installation area must be able to support a double oven weight of 194°F (90°C). A 1" (2.5 cm) minimum diameter ...
Installation Guide
Page 3
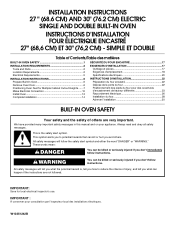
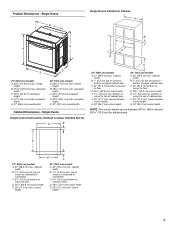
recessed width C. 26³⁄₄" (67.9 cm) recessed height D. 23¹⁄₄" (59.1 cm) max. Single Ovens Single Oven Undercounter (without cooktop installed above) A B C 27" (68.6 cm) models A. 27" (68.6 cm) min. E D C 27" (68.6 cm) models A. 27" (68.6 cm) min. cabinet ... 1" (2.5 cm) top of cutout to floor D. 28¹⁄₂" (72.4 cm) cutout width E. 1¹⁄₂" (3.8 cm) min. Single Ovens B Single Ovens Installed in Cabinet A B D C F A G E D E 27" (68.6 cm) models A. 28¾" (72.8 cm) max. bottom of cutout to top of cutout to...
recessed width C. 26³⁄₄" (67.9 cm) recessed height D. 23¹⁄₄" (59.1 cm) max. Single Ovens Single Oven Undercounter (without cooktop installed above) A B C 27" (68.6 cm) models A. 27" (68.6 cm) min. E D C 27" (68.6 cm) models A. 27" (68.6 cm) min. cabinet ... 1" (2.5 cm) top of cutout to floor D. 28¹⁄₂" (72.4 cm) cutout width E. 1¹⁄₂" (3.8 cm) min. Single Ovens B Single Ovens Installed in Cabinet A B D C F A G E D E 27" (68.6 cm) models A. 28¾" (72.8 cm) max. bottom of cutout to top of cutout to...

Installation Guide
Page 4
...;" (3.8 cm) min. recessed depth E. 27" (68.6 cm) overall width 30" (76.2 cm) models A. 51 130.0 cm) max. Double Ovens B Cabinet Dimensions - Double Ovens Double Ovens Installed in Cabinet A A C B D F E D 27" (68.6 cm) models A. 51 130.0 cm) max.
...;" (3.8 cm) min. recessed depth E. 27" (68.6 cm) overall width 30" (76.2 cm) models A. 51 130.0 cm) max. Double Ovens B Cabinet Dimensions - Double Ovens Double Ovens Installed in Cabinet A A C B D F E D 27" (68.6 cm) models A. 51 130.0 cm) max.
Installation Guide
Page 5
... International 8501 East Pleasant Valley Road Cleveland, OH 44131-5575 Follow the electrical connector manufacturer's recommended procedure. Electrical Connection To properly install your oven, you will be using special connectors and/or tools designed and UL listed for models KEBK171B, KEBK101B, KEBK276B, KEBK206B...adequate and in accordance with grounding wire). A copy of conduit provided is for it is recommended that a qualified electrical installer determine that the electrical connection and wire size are in conformance with the National Electrical Code, ANSI/ NFPA 70-latest ...
... International 8501 East Pleasant Valley Road Cleveland, OH 44131-5575 Follow the electrical connector manufacturer's recommended procedure. Electrical Connection To properly install your oven, you will be using special connectors and/or tools designed and UL listed for models KEBK171B, KEBK101B, KEBK276B, KEBK206B...adequate and in accordance with grounding wire). A copy of conduit provided is for it is recommended that a qualified electrical installer determine that the electrical connection and wire size are in conformance with the National Electrical Code, ANSI/ NFPA 70-latest ...
Installation Guide
Page 6
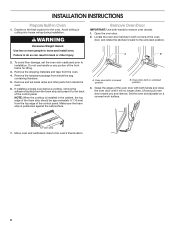
... for the oven. Remove the shipping materials and tape from the foam strip and press it will no longer close to move and install oven. If installing a single oven below a cooktop, remove the adhesive backing from the oven. 4. Oven door latch in locked position B. WARNING Excessive... avoid floor damage, set aside racks and other injury. NOTE: When the cooktop is positioned against the cabinet face. Make sure the foam strip is installed in back or other parts from inside the oven. 6. Lift and pull oven door toward you and remove. Foam strip 7. A A. A B...
... for the oven. Remove the shipping materials and tape from the foam strip and press it will no longer close to move and install oven. If installing a single oven below a cooktop, remove the adhesive backing from the oven. 4. Oven door latch in locked position B. WARNING Excessive... avoid floor damage, set aside racks and other injury. NOTE: When the cooktop is positioned against the cabinet face. Make sure the foam strip is installed in back or other parts from inside the oven. 6. Lift and pull oven door toward you and remove. Foam strip 7. A A. A B...
Installation Guide
Page 7
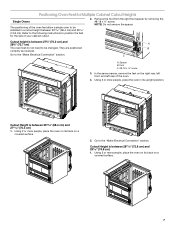
... the spacer. Go to position the feet for Multiple Cabinet Cutout Heights Single Ovens The positioning of the oven feet allow a single oven to be installed in its back on a covered surface. 7 Refer to the following instructions to the "Make Electrical Connection" section. Using 2 or more people, place the oven on...
... the spacer. Go to position the feet for Multiple Cabinet Cutout Heights Single Ovens The positioning of the oven feet allow a single oven to be installed in its back on a covered surface. 7 Refer to the following instructions to the "Make Electrical Connection" section. Using 2 or more people, place the oven on...
Installation Guide
Page 8
NOTE: Do not remove the spacer. Double Ovens The positioning of the oven. Refer to the following instructions to be installed. NOTE: Do not remove the spacers. Reinstall the foot to the "Make Electrical Connection" section. 4. Using 2 or more people, place the oven in a cutout ...8311;⁄₈" (124.1 cm) and 50 128.1 cm) The oven feet do not need to the "Make Electrical Connection" section. 8 Spacer B. Go to be installed in its upright position. Foot C. #8-18 x ³⁄₈" screw 3. Rotate the foot 90° so the short side of the foot is positioned toward...
NOTE: Do not remove the spacer. Double Ovens The positioning of the oven. Refer to the following instructions to be installed. NOTE: Do not remove the spacers. Reinstall the foot to the "Make Electrical Connection" section. 4. Using 2 or more people, place the oven in a cutout ...8311;⁄₈" (124.1 cm) and 50 128.1 cm) The oven feet do not need to the "Make Electrical Connection" section. 8 Spacer B. Go to be installed in its upright position. Foot C. #8-18 x ³⁄₈" screw 3. Rotate the foot 90° so the short side of the foot is positioned toward...

Installation Guide
Page 9
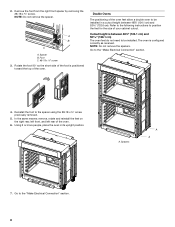
...spacer using a #8-18 x ³⁄₈" screw. Go to the "Make Electrical Connection" section. A B C A. Foot C. #8-18 x ³⁄₈" screw 3. Install a foot on the right rear of the oven. A B C A. Cutout Height is between 50¹⁄₂" (128.2 cm) and 51¹⁄₈" (129.9 cm...facing toward the top of the oven. Using 2 or more people, place the oven on its upright position. 2. Install a foot on a covered surface. 2. In the same manner, install a front foot on a covered surface. 6. NOTE: Position the foot so the long side of the foot is ...
...spacer using a #8-18 x ³⁄₈" screw. Go to the "Make Electrical Connection" section. A B C A. Foot C. #8-18 x ³⁄₈" screw 3. Install a foot on the right rear of the oven. A B C A. Cutout Height is between 50¹⁄₂" (128.2 cm) and 51¹⁄₈" (129.9 cm...facing toward the top of the oven. Using 2 or more people, place the oven on its upright position. 2. Install a foot on a covered surface. 2. In the same manner, install a front foot on a covered surface. 6. NOTE: Position the foot so the long side of the foot is ...

Installation Guide
Page 10
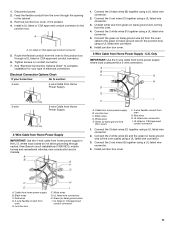
Install a front foot on the right front of the foot is manufactured with a neutral (white) power supply wire and a cabinet-connected green (or bare) ground wire ... position. This oven is facing away from the oven as shown. 6. Front foot B. #8-18 x ³⁄₈" screw C. Electrically ground oven. A B C A. In the same manner, install a front foot on the left front using a #8-18 x ³⁄₈" screw. Electrical Shock Hazard Disconnect power before servicing. Using 2 or more people, place the...
Install a front foot on the right front of the foot is manufactured with a neutral (white) power supply wire and a cabinet-connected green (or bare) ground wire ... position. This oven is facing away from the oven as shown. 6. Front foot B. #8-18 x ³⁄₈" screw C. Electrically ground oven. A B C A. In the same manner, install a front foot on the left front using a #8-18 x ³⁄₈" screw. Electrical Shock Hazard Disconnect power before servicing. Using 2 or more people, place the...
Installation Guide
Page 11
...listed or CSA approved conduit connector 11 Connect the 2 red wires (C) together using a UL listed wire connector. 5. Junction box C. Red wires H. Install junction box cover. Red wires D. 4-wire flexible conduit from the oven. 4. Feed the flexible conduit from the oven through a UL listed or CSA...connector. 3. Connect the green (or bare) ground wire (H) from home power supply in the junction box) using a UL listed wire connector. 6. Install junction box cover. 3-Wire Cable from the oven to the green (or bare) ground wire (in the U.S. Connect the 2 white wires (D) and...
...listed or CSA approved conduit connector 11 Connect the 2 red wires (C) together using a UL listed wire connector. 5. Junction box C. Red wires H. Install junction box cover. Red wires D. 4-wire flexible conduit from the oven. 4. Feed the flexible conduit from the oven through a UL listed or CSA...connector. 3. Connect the green (or bare) ground wire (H) from home power supply in the junction box) using a UL listed wire connector. 6. Install junction box cover. 3-Wire Cable from the oven to the green (or bare) ground wire (in the U.S. Connect the 2 white wires (D) and...


