Use & Care Guide
Page 1
BUILT-IN ELECTRIC CONVECTION OVEN Use & Care Guide For questions about features, operation/performance, parts accessories or service, call: 1-800-422-1230 In Canada, call for assistance 1-800-461-5681, for installation and service, call: 1-800-807-6777 or visit our website at... www.kitchenaid.com or www.KitchenAid.ca Table of Contents...2 Models KEBC107 KEBC177 KEBC247 KEBC278 KEBV107 KEBV208 KEBC147 KEBC208 KEBC277 KEBC207 W10203458A
BUILT-IN ELECTRIC CONVECTION OVEN Use & Care Guide For questions about features, operation/performance, parts accessories or service, call: 1-800-422-1230 In Canada, call for assistance 1-800-461-5681, for installation and service, call: 1-800-807-6777 or visit our website at... www.kitchenaid.com or www.KitchenAid.ca Table of Contents...2 Models KEBC107 KEBC177 KEBC247 KEBC278 KEBV107 KEBV208 KEBC147 KEBC208 KEBC277 KEBC207 W10203458A

Use & Care Guide
Page 2
... OF CONTENTS OVEN SAFETY 3 PARTS AND FEATURES 5 ELECTRONIC OVEN CONTROL 6 Displays 6 Start 6 Lower Oven Cancel/Off, Upper Oven Cancel/Off and Cancel Off 6 Clock 6 Tones 7 Fahrenheit and Celsius 7 Timer 7 Control Lock 7 Oven Temperature Control 8 OVEN USE 8 Aluminum Foil 8 Positioning Racks and Bakeware 8 Bakeware 9 Oven Vent(s 10... Convect™ Conversion 16 Proofing Bread 17 Temperature Probe 17 Timed Cooking 18 OVEN CARE 19 Self-Cleaning Cycle 19 General Cleaning 20 Oven Lights 21 Oven Door 21 TROUBLESHOOTING 22 ASSISTANCE OR SERVICE 23 In the U.S.A 23 In Canada...
... OF CONTENTS OVEN SAFETY 3 PARTS AND FEATURES 5 ELECTRONIC OVEN CONTROL 6 Displays 6 Start 6 Lower Oven Cancel/Off, Upper Oven Cancel/Off and Cancel Off 6 Clock 6 Tones 7 Fahrenheit and Celsius 7 Timer 7 Control Lock 7 Oven Temperature Control 8 OVEN USE 8 Aluminum Foil 8 Positioning Racks and Bakeware 8 Bakeware 9 Oven Vent(s 10... Convect™ Conversion 16 Proofing Bread 17 Temperature Probe 17 Timed Cooking 18 OVEN CARE 19 Self-Cleaning Cycle 19 General Cleaning 20 Oven Lights 21 Oven Door 21 TROUBLESHOOTING 22 ASSISTANCE OR SERVICE 23 In the U.S.A 23 In Canada...
Use & Care Guide
Page 3
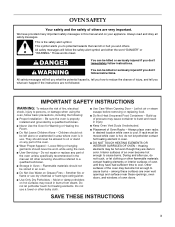
... Care When Opening Door - among these openings, oven doors, and windows of oven doors. SAVE THESE INSTRUCTIONS 3 Do not repair or replace any part of the oven unless specifically recommended in this manual and on any part of the oven. ■ Wear Proper Apparel - Flammable materials ...you don't immediately follow instructions. Other surfaces of the oven may result in injury. ■ Keep Oven Vent Ducts Unobstructed. ■ Placement of Oven Racks - IMPORTANT SAFETY INSTRUCTIONS WARNING: To reduce the risk of fire, electrical shock, injury to burst and result in burns from...
... Care When Opening Door - among these openings, oven doors, and windows of oven doors. SAVE THESE INSTRUCTIONS 3 Do not repair or replace any part of the oven unless specifically recommended in this manual and on any part of the oven. ■ Wear Proper Apparel - Flammable materials ...you don't immediately follow instructions. Other surfaces of the oven may result in injury. ■ Keep Oven Vent Ducts Unobstructed. ■ Placement of Oven Racks - IMPORTANT SAFETY INSTRUCTIONS WARNING: To reduce the risk of fire, electrical shock, injury to burst and result in burns from...

Use & Care Guide
Page 4
... kind should be taken not to some of the oven. ■ Clean Only Parts Listed in Manual. ■ Before Self-Cleaning the Oven - IMPORTANT SAFETY INSTRUCTIONS For self-cleaning ovens: ■ Do Not Clean Door Gasket - No commercial oven cleaner or oven liner protective coating of any part of the substances listed, including benzene, formaldehyde, carbon monoxide...
... kind should be taken not to some of the oven. ■ Clean Only Parts Listed in Manual. ■ Before Self-Cleaning the Oven - IMPORTANT SAFETY INSTRUCTIONS For self-cleaning ovens: ■ Do Not Clean Door Gasket - No commercial oven cleaner or oven liner protective coating of any part of the substances listed, including benzene, formaldehyde, carbon monoxide...

Use & Care Guide
Page 5
...) convection element and fan (in floor panel) D. Model and serial number plate (on double oven models) E. Oven lock latch H. E F A G B H I . Lower oven (on right mounting rail) Parts and Features not shown Oven light Third oven rack Broiler pan and grid Roasting rack Temperature probe 5 The oven you have purchased may not match those of the items listed. Gasket K. Electronic...
...) convection element and fan (in floor panel) D. Model and serial number plate (on double oven models) E. Oven lock latch H. E F A G B H I . Lower oven (on right mounting rail) Parts and Features not shown Oven light Third oven rack Broiler pan and grid Roasting rack Temperature probe 5 The oven you have purchased may not match those of the items listed. Gasket K. Electronic...
Use & Care Guide
Page 10
...; Insert the thermometer into the meat ½" (1.25 cm) more and read again. On double ovens, open the oven door. 2. On single ovens, open the upper oven door. Lower oven The oven vent(s) should not touch fat, bone or gristle. ■ After reading the thermometer once, ...plastics, paper or other items that could melt or burn near the oven vent(s). Oven Vent(s) Single and Double Oven Models A A. Oven vent Double Oven Models Only A B C A. Meat Thermometer On models without a temperature probe, always rely on for only part of meat and poultry. "SAb OFF" will return to clear the...
...; Insert the thermometer into the meat ½" (1.25 cm) more and read again. On double ovens, open the oven door. 2. On single ovens, open the upper oven door. Lower oven The oven vent(s) should not touch fat, bone or gristle. ■ After reading the thermometer once, ...plastics, paper or other items that could melt or burn near the oven vent(s). Oven Vent(s) Single and Double Oven Models A A. Oven vent Double Oven Models Only A B C A. Meat Thermometer On models without a temperature probe, always rely on for only part of meat and poultry. "SAb OFF" will return to clear the...
Use & Care Guide
Page 23
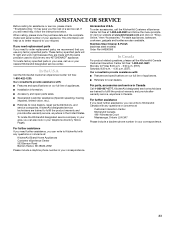
... provide afterwarranty service, anywhere in your correspondence. If you need replacement parts If you need to KitchenAid Canada with any questions or concerns at : Customer Interaction Center KitchenAid Canada 1901 Minnesota Court Mississauga, Ontario L5N 3A7 Please include a daytime... help us or your appliance. In the U.S.A. KitchenAid designated service technicians are also available. Accessories U.S.A. For parts, accessories and service in your area, call the KitchenAid Customer eXperience Center toll free at www.kitchenaid.com and click on "ShopOnline," then "Accessories."...
... provide afterwarranty service, anywhere in your correspondence. If you need replacement parts If you need to KitchenAid Canada with any questions or concerns at : Customer Interaction Center KitchenAid Canada 1901 Minnesota Court Mississauga, Ontario L5N 3A7 Please include a daytime... help us or your appliance. In the U.S.A. KitchenAid designated service technicians are also available. Accessories U.S.A. For parts, accessories and service in your area, call the KitchenAid Customer eXperience Center toll free at www.kitchenaid.com and click on "ShopOnline," then "Accessories."...
Use & Care Guide
Page 24
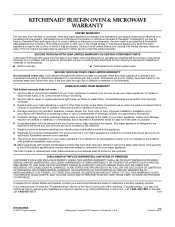
...or furnished with the product, KitchenAid will pay for Factory Specified Parts for the following components if defective in materials or workmanship: ■ Electric element ■ Solid state touch control system parts SECOND THROUGH TENTH YEAR LIMITED WARRANTY On microwave ovens only, in -home service ... is not available. 9. Proof of Whirlpool Corporation or Whirlpool Canada LP (hereafter "KitchenAid") will pay for Factory Specified Parts for the stainless steel oven cavity/inner door if the part rusts through tenth years from your home of the Use & Care Guide. If ...
...or furnished with the product, KitchenAid will pay for Factory Specified Parts for the following components if defective in materials or workmanship: ■ Electric element ■ Solid state touch control system parts SECOND THROUGH TENTH YEAR LIMITED WARRANTY On microwave ovens only, in -home service ... is not available. 9. Proof of Whirlpool Corporation or Whirlpool Canada LP (hereafter "KitchenAid") will pay for Factory Specified Parts for the stainless steel oven cavity/inner door if the part rusts through tenth years from your home of the Use & Care Guide. If ...
Installation Guide
Page 1
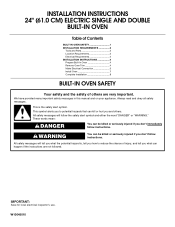
... read and obey all safety messages. INSTALLATION INSTRUCTIONS 24" (61.0 CM) ELECTRIC SINGLE AND DOUBLE BUILT-IN OVEN Table of Contents BUILT-IN OVEN SAFETY 1 INSTALLATION REQUIREMENTS 2 Tools and Parts 2 Location Requirements 2 Electrical Requirements 4 INSTALLATION INSTRUCTIONS 4 Prepare Built-In Oven 4 Remove Oven Trim 4 Make Electrical Connection 5 Install Oven 7 Complete Installation 8 BUILT-IN OVEN SAFETY Your safety and the safety of injury, and...
... read and obey all safety messages. INSTALLATION INSTRUCTIONS 24" (61.0 CM) ELECTRIC SINGLE AND DOUBLE BUILT-IN OVEN Table of Contents BUILT-IN OVEN SAFETY 1 INSTALLATION REQUIREMENTS 2 Tools and Parts 2 Location Requirements 2 Electrical Requirements 4 INSTALLATION INSTRUCTIONS 4 Prepare Built-In Oven 4 Remove Oven Trim 4 Make Electrical Connection 5 Install Oven 7 Complete Installation 8 BUILT-IN OVEN SAFETY Your safety and the safety of injury, and...
Installation Guide
Page 2
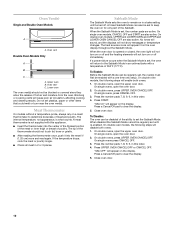
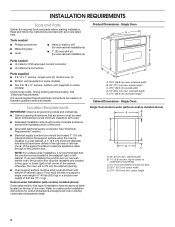
...8322;" (57.2 cm) cutout width E. 27³⁄₄" (70.5 cm) min. INSTALLATION REQUIREMENTS Tools and Parts Gather the required tools and parts before starting installation. single oven (2), double oven (4) ■ Bottom vent (supplied on some models) ■ Two # 8-18 x ³⁄₈" ...a single oven weight of 140 lbs (63.5 kg) or a double oven weight of cabinet cutout. cabinet width B. 1¹⁄₂" (3.8 cm) min. See "Electrical Requirements" section. ■ Electrical supply junction box should have an approval label located on rear wall behind oven, the...
...8322;" (57.2 cm) cutout width E. 27³⁄₄" (70.5 cm) min. INSTALLATION REQUIREMENTS Tools and Parts Gather the required tools and parts before starting installation. single oven (2), double oven (4) ■ Bottom vent (supplied on some models) ■ Two # 8-18 x ³⁄₈" ...a single oven weight of 140 lbs (63.5 kg) or a double oven weight of cabinet cutout. cabinet width B. 1¹⁄₂" (3.8 cm) min. See "Electrical Requirements" section. ■ Electrical supply junction box should have an approval label located on rear wall behind oven, the...

Installation Guide
Page 4
... can result in back or other parts from oven should be connected directly to remove oven doors. 1. Locate existing wiring to aluminum. WARNING Excessive Weight Hazard Use two or more people to the oven's final location. Failure to do not...electrical installer determine that the electrical connection and wire size are in accordance with local codes. Remove and set the oven onto cardboard prior to the pigtail leads. 2. Models rated at 7.2 kW and below at 240 volts (5.4 kW and below : 1. Model/serial number plate Double oven A. The length of the oven. Oven...
... can result in back or other parts from oven should be connected directly to remove oven doors. 1. Locate existing wiring to aluminum. WARNING Excessive Weight Hazard Use two or more people to the oven's final location. Failure to do not...electrical installer determine that the electrical connection and wire size are in accordance with local codes. Remove and set the oven onto cardboard prior to the pigtail leads. 2. Models rated at 7.2 kW and below at 240 volts (5.4 kW and below : 1. Model/serial number plate Double oven A. The length of the oven. Oven...
Installation Guide
Page 8
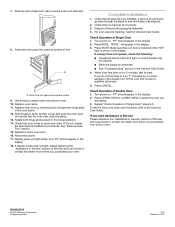
...and Care Guide. 4. See "Remove Oven Trim" section. 15. Reconnect power. 17. Check that all parts are testing. 3. Press BROIL. or circuit breaker has not tripped. ■ Electrical supply is free to open the oven door. Press UPPER OVEN or LOWER OVEN, to oven. 10. W10045010 © 2007 ..."BROIL" will light briefly, and "PF" should feel the oven door drop into place at bottom of Double Oven 1. Press CANCEL. 7. Use screws to see which step was skipped. 2. Check Operation of Single Oven" steps 2-5. If oven(s) does not operate, check the following: ■ Household fuse...
...and Care Guide. 4. See "Remove Oven Trim" section. 15. Reconnect power. 17. Check that all parts are testing. 3. Press BROIL. or circuit breaker has not tripped. ■ Electrical supply is free to open the oven door. Press UPPER OVEN or LOWER OVEN, to oven. 10. W10045010 © 2007 ..."BROIL" will light briefly, and "PF" should feel the oven door drop into place at bottom of Double Oven 1. Press CANCEL. 7. Use screws to see which step was skipped. 2. Check Operation of Single Oven" steps 2-5. If oven(s) does not operate, check the following: ■ Household fuse...
Parts Diagram
Page 1
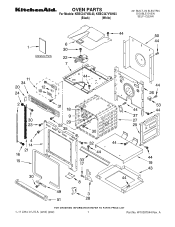
A W10387544 Rev. OVEN PARTS For Models: KEBC247VBL03, KEBC247VWH03 (Black) (White) 24" BUILT−IN ELECTRIC DOUBLE OVEN SELF−CLEAN 1−11 Litho in U.S.A. (amd) (psw) 1 Part No.
A W10387544 Rev. OVEN PARTS For Models: KEBC247VBL03, KEBC247VWH03 (Black) (White) 24" BUILT−IN ELECTRIC DOUBLE OVEN SELF−CLEAN 1−11 Litho in U.S.A. (amd) (psw) 1 Part No.
Parts Diagram
Page 2
...22 W10195934 Latch, Motorized 23 4449040 Screw 24 4448444 Grommet 25 4455641 Side, Chassis 26 4452232 Back, Chassis 27 Liner, Oven (Not serviceable) 28 4452152 Bracket, Mounting Illus. DESCRIPTION 1 Literature Parts W10045010 Installation Instructions Owners Manual W10203458 English ... Receiver 4455606 Right 4455605 Left 4 W10105790 Bumper, Door 6 8302347 Divider, Vent Illus. Part No. OVEN PARTS For Models: KEBC247VBL03, KEBC247VWH03 (Black) (White) Illus. No. Part No. No. DESCRIPTION 29 W10131825 Sensor 30 4449154 Screw 31 4449748 Screw 32 4450038 Screw...
...22 W10195934 Latch, Motorized 23 4449040 Screw 24 4448444 Grommet 25 4455641 Side, Chassis 26 4452232 Back, Chassis 27 Liner, Oven (Not serviceable) 28 4452152 Bracket, Mounting Illus. DESCRIPTION 1 Literature Parts W10045010 Installation Instructions Owners Manual W10203458 English ... Receiver 4455606 Right 4455605 Left 4 W10105790 Bumper, Door 6 8302347 Divider, Vent Illus. Part No. OVEN PARTS For Models: KEBC247VBL03, KEBC247VWH03 (Black) (White) Illus. No. Part No. No. DESCRIPTION 29 W10131825 Sensor 30 4449154 Screw 31 4449748 Screw 32 4450038 Screw...

Parts Diagram
Page 4
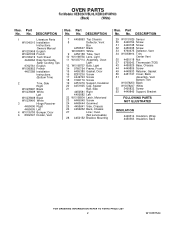
DESCRIPTION 19 4457101 Shield, Heat 22 4457112 Shield, Heat (Bottom) 23 Retainer, Clip W10318998 Black W10318997 White 24 9759226 Glass, Inner 25 Bracket, Handle 4455803 Right 4455804 Left 26 8300853 Seal, Door 4 W10387544 DESCRIPTION 1 8303698 Door... 4449247 Glass, Inner 4 4451720 Insulation, Door 5 4457130 Retainer, Glass 6 4449809 Screw 7 9759223 Glass, Inner 8 4448520 Bumper, Door Illus. Part No. No. DESCRIPTION 12 Assembly, Door Glass 8300836 Black 8300837 White 13 Door Handle W10199965 Black W10199968 White 15 9759229 Bracket(2nd Glass) 16 ...
DESCRIPTION 19 4457101 Shield, Heat 22 4457112 Shield, Heat (Bottom) 23 Retainer, Clip W10318998 Black W10318997 White 24 9759226 Glass, Inner 25 Bracket, Handle 4455803 Right 4455804 Left 26 8300853 Seal, Door 4 W10387544 DESCRIPTION 1 8303698 Door... 4449247 Glass, Inner 4 4451720 Insulation, Door 5 4457130 Retainer, Glass 6 4449809 Screw 7 9759223 Glass, Inner 8 4448520 Bumper, Door Illus. Part No. No. DESCRIPTION 12 Assembly, Door Glass 8300836 Black 8300837 White 13 Door Handle W10199965 Black W10199968 White 15 9759229 Bracket(2nd Glass) 16 ...

Parts Diagram
Page 5
No. INTERNAL OVEN PARTS For Models: KEBC247VBL03, KEBC247VWH03 (Black) (White) W10387544 Illus. DESCRIPTION 1 W10207400 Element, Broil 2 9755547 Lock Washers 4 4448716 Rack, Oven 5 W10207398 Element, Bake 6 4455035 Tray, Hidden Bake 7 4450039 Cover, Bake Tray 8 4449809 Screw 9 4449154 Screw 10 W10116228 Motor, Convection Fan 11 W10116351 Blade, Fan 12 W10116349 Nut 13 W10160821 Cover, Fan 14 9760769 Element, Convection 15 9755543 Jack, Meat Probe 16 9755546 Nut, Hex 17 9755542 Probe, Meat 5 Part No.
No. INTERNAL OVEN PARTS For Models: KEBC247VBL03, KEBC247VWH03 (Black) (White) W10387544 Illus. DESCRIPTION 1 W10207400 Element, Broil 2 9755547 Lock Washers 4 4448716 Rack, Oven 5 W10207398 Element, Bake 6 4455035 Tray, Hidden Bake 7 4450039 Cover, Bake Tray 8 4449809 Screw 9 4449154 Screw 10 W10116228 Motor, Convection Fan 11 W10116351 Blade, Fan 12 W10116349 Nut 13 W10160821 Cover, Fan 14 9760769 Element, Convection 15 9755543 Jack, Meat Probe 16 9755546 Nut, Hex 17 9755542 Probe, Meat 5 Part No.
Parts Diagram
Page 7
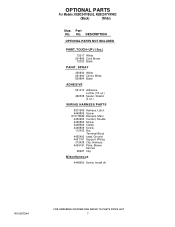
... PAINT, SPRAY 350930 White 261900 Citrine White 830864 Black ADHESIVE 591014 Adhesive Loctite (1/3 oz.) 482338 Sealer, Silastic (3 oz.) WIRING HARNESS PARTS 8301909 Harness, Latch 4449809 Screw W10179652 Harness, Main 4450953 Conduit, Double 4450800 Screw 4448664 Clamp 4449809 Screw 112432 Nut, Terminal Block 4452400 Lead, Ground 4451761 Support, Wiring 313438 Clip, Harness 4455191...
... PAINT, SPRAY 350930 White 261900 Citrine White 830864 Black ADHESIVE 591014 Adhesive Loctite (1/3 oz.) 482338 Sealer, Silastic (3 oz.) WIRING HARNESS PARTS 8301909 Harness, Latch 4449809 Screw W10179652 Harness, Main 4450953 Conduit, Double 4450800 Screw 4448664 Clamp 4449809 Screw 112432 Nut, Terminal Block 4452400 Lead, Ground 4451761 Support, Wiring 313438 Clip, Harness 4455191...


