Use & Care Guide
Page 1
BUILT-IN ELECTRIC CONVECTION OVEN Use & Care Guide For questions about features, operation/performance, parts accessories or service, call: 1-800-422-1230 In Canada, call for assistance 1-800-461-5681, for installation and service, call: 1-800-807-6777 or visit our website at... www.kitchenaid.com or www.KitchenAid.ca Table of Contents...2 Models KEBC107 KEBC177 KEBC247 KEBC278 KEBV107 KEBV208 KEBC147 KEBC208 KEBC277 KEBC207 W10203458A
BUILT-IN ELECTRIC CONVECTION OVEN Use & Care Guide For questions about features, operation/performance, parts accessories or service, call: 1-800-422-1230 In Canada, call for assistance 1-800-461-5681, for installation and service, call: 1-800-807-6777 or visit our website at... www.kitchenaid.com or www.KitchenAid.ca Table of Contents...2 Models KEBC107 KEBC177 KEBC247 KEBC278 KEBV107 KEBV208 KEBC147 KEBC208 KEBC277 KEBC207 W10203458A

Use & Care Guide
Page 2
.../Off and Cancel Off 6 Clock 6 Tones 7 Fahrenheit and Celsius 7 Timer 7 Control Lock 7 Oven Temperature Control 8 OVEN USE 8 Aluminum Foil 8 Positioning Racks and Bakeware 8 Bakeware 9 Oven Vent(s 10 Meat Thermometer 10 Sabbath Mode 10 Baking and Roasting 12 Maxi and Econo Broiling 12 Convection ... Full Meal 15 Easy Convect™ Conversion 16 Proofing Bread 17 Temperature Probe 17 Timed Cooking 18 OVEN CARE 19 Self-Cleaning Cycle 19 General Cleaning 20 Oven Lights 21 Oven Door 21 TROUBLESHOOTING 22 ASSISTANCE OR SERVICE 23 In the U.S.A 23 In Canada 23 WARRANTY...
.../Off and Cancel Off 6 Clock 6 Tones 7 Fahrenheit and Celsius 7 Timer 7 Control Lock 7 Oven Temperature Control 8 OVEN USE 8 Aluminum Foil 8 Positioning Racks and Bakeware 8 Bakeware 9 Oven Vent(s 10 Meat Thermometer 10 Sabbath Mode 10 Baking and Roasting 12 Maxi and Econo Broiling 12 Convection ... Full Meal 15 Easy Convect™ Conversion 16 Proofing Bread 17 Temperature Probe 17 Timed Cooking 18 OVEN CARE 19 Self-Cleaning Cycle 19 General Cleaning 20 Oven Lights 21 Oven Door 21 TROUBLESHOOTING 22 ASSISTANCE OR SERVICE 23 In the U.S.A 23 In Canada 23 WARRANTY...
Use & Care Guide
Page 3
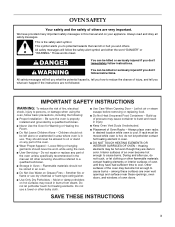
... safety and the safety of fire, electrical shock, injury to persons, or damage when using the oven. ■ User Servicing - IMPORTANT SAFETY INSTRUCTIONS WARNING: To reduce the risk of others . Flammable materials should not be stored in burns from steam. SAVE THESE ... 3 This symbol alerts you to potential hazards that can be killed or seriously injured if you how to reduce the chance of the oven may result in an oven. ■ Do Not Use Water on your appliance. These words mean: You can kill or hurt you don't immediately follow instructions. All other...
... safety and the safety of fire, electrical shock, injury to persons, or damage when using the oven. ■ User Servicing - IMPORTANT SAFETY INSTRUCTIONS WARNING: To reduce the risk of others . Flammable materials should not be stored in burns from steam. SAVE THESE ... 3 This symbol alerts you to potential hazards that can be killed or seriously injured if you how to reduce the chance of the oven may result in an oven. ■ Do Not Use Water on your appliance. These words mean: You can kill or hurt you don't immediately follow instructions. All other...

Use & Care Guide
Page 4
...exposure to cause cancer, birth defects, or other utensils. Remove broiler pan and other reproductive harm. IMPORTANT SAFETY INSTRUCTIONS For self-cleaning ovens: ■ Do Not Clean Door Gasket - SAVE THESE INSTRUCTIONS The California Safe Drinking Water and Toxic Enforcement Act requires the Governor of...California to such substances. The door gasket is essential for a good seal. Care should be taken not to some of the oven. ■ Clean Only Parts Listed in or around any part of the substances listed, including benzene, formaldehyde, carbon monoxide, and toluene. ...
...exposure to cause cancer, birth defects, or other utensils. Remove broiler pan and other reproductive harm. IMPORTANT SAFETY INSTRUCTIONS For self-cleaning ovens: ■ Do Not Clean Door Gasket - SAVE THESE INSTRUCTIONS The California Safe Drinking Water and Toxic Enforcement Act requires the Governor of...California to such substances. The door gasket is essential for a good seal. Care should be taken not to some of the oven. ■ Clean Only Parts Listed in or around any part of the substances listed, including benzene, formaldehyde, carbon monoxide, and toluene. ...

Use & Care Guide
Page 5
... have some or all of your model. Electronic oven control F. Automatic oven light switch G. Lower oven (on right mounting rail) Parts and Features not shown Oven light Third oven rack Broiler pan and grid Roasting rack Temperature probe 5 Oven lock latch H. Model and serial number plate (on double oven models) E. PARTS AND FEATURES This manual covers different models...
... have some or all of your model. Electronic oven control F. Automatic oven light switch G. Lower oven (on right mounting rail) Parts and Features not shown Oven light Third oven rack Broiler pan and grid Roasting rack Temperature probe 5 Oven lock latch H. Model and serial number plate (on double oven models) E. PARTS AND FEATURES This manual covers different models...
Use & Care Guide
Page 6
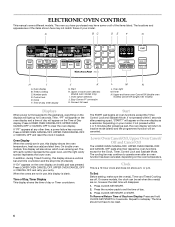
...locations and appearances of the items shown here may not match those of day. 3. On double oven models, this display shows the oven temperature, heat source(s) and start time will appear on the oven temperature. or p.m. Press CLOCK SET/START. 2. The time should not have some models,... the clock can be reset. 6 Oven display B. Upper and lower oven Cancel/Off (double oven models) Cancel Off (single oven models) Displays When power is being set. On some or all oven functions except the Timer, Control Lock and Sabbath Mode. Time of day ...
...locations and appearances of the items shown here may not match those of day. 3. On double oven models, this display shows the oven temperature, heat source(s) and start time will appear on the oven temperature. or p.m. Press CLOCK SET/START. 2. The time should not have some models,... the clock can be reset. 6 Oven display B. Upper and lower oven Cancel/Off (double oven models) Cancel Off (single oven models) Displays When power is being set. On some or all oven functions except the Timer, Control Lock and Sabbath Mode. Time of day ...

Use & Care Guide
Page 7
...the set time. Control Lock The Control Lock shuts down the set time ends, if enabled, end-of the oven(s). Repeat to change back to cancel the Timer or stop the oven. All Tones (double oven models) All of time. 3. To Turn Off/On: Press and hold COOK TIME until you press CANCEL. On... to clear. When in minutes and seconds or hours and minutes and counts down the control panel pads to turn back on the oven display for 3 seconds. On double oven models, CLOCK SET•START will function. On some models, a tone will sound and "Snd Lo" will display "NA9 OFF." If "Snd ...
...the set time. Control Lock The Control Lock shuts down the set time ends, if enabled, end-of the oven(s). Repeat to change back to cancel the Timer or stop the oven. All Tones (double oven models) All of time. 3. To Turn Off/On: Press and hold COOK TIME until you press CANCEL. On... to clear. When in minutes and seconds or hours and minutes and counts down the control panel pads to turn back on the oven display for 3 seconds. On double oven models, CLOCK SET•START will function. On some models, a tone will sound and "Snd Lo" will display "NA9 OFF." If "Snd ...

Use & Care Guide
Page 8
...is turned up at the edges. To move freely for example, "0°F CAL COOK TEMP," if not yet adjusted, or about 5 seconds. 2. Each oven calibration can be independently set between 35°F (21° C) and -35°F (-21° C). 4. Press BAKE to increase and BROIL/...current calibration, for best cooking results. ■ To catch spills, place foil on rack below dish. On double ovens only, press UPPER OVEN or LOWER OVEN to another closed and well ventilated room. During oven use a thermometer to -21°C) ...much more 25° to 35°F (15° to 21...
...is turned up at the edges. To move freely for example, "0°F CAL COOK TEMP," if not yet adjusted, or about 5 seconds. 2. Each oven calibration can be independently set between 35°F (21° C) and -35°F (-21° C). 4. Press BAKE to increase and BROIL/...current calibration, for best cooking results. ■ To catch spills, place foil on rack below dish. On double ovens only, press UPPER OVEN or LOWER OVEN to another closed and well ventilated room. During oven use a thermometer to -21°C) ...much more 25° to 35°F (15° to 21...
Use & Care Guide
Page 9
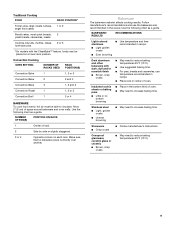
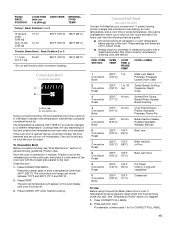
..., nonfrozen pies 2 or 3 *On models with dark, dull and/or nonstick finish ■ Brown, crisp crusts ■ May need to increase baking time. Convection Cooking OVEN SETTING NUMBER OF RACKS USED RACK POSITION(S) Convection Bake 1 1, 2 or 3 Convection Bake 2 2 and 4 Convection Bake 3 1, 3 and 5 Convection Roast 1 1,...'s recommendations and use temperature recommended in recipe. ■ Place rack in center of space around bakeware and oven walls. Stainless steel ■ Light, golden crusts ■ Uneven browning ■ May need to circulate. Bakeware...
..., nonfrozen pies 2 or 3 *On models with dark, dull and/or nonstick finish ■ Brown, crisp crusts ■ May need to increase baking time. Convection Cooking OVEN SETTING NUMBER OF RACKS USED RACK POSITION(S) Convection Bake 1 1, 2 or 3 Convection Bake 2 2 and 4 Convection Bake 3 1, 3 and 5 Convection Roast 1 1,...'s recommendations and use temperature recommended in recipe. ■ Place rack in center of space around bakeware and oven walls. Stainless steel ■ Light, golden crusts ■ Uneven browning ■ May need to circulate. Bakeware...
Use & Care Guide
Page 10
...sources icons will appear lit on the display. On single ovens, open the upper oven door. On double ovens, press UPPER OVEN CANCEL/OFF. "SAb On" will enable both ovens. 1. On double oven models, the following steps will appear on the oven display throughout the Sabbath Mode. Press the number pads ... The internal temperature, not appearance, is set until turned off immediately. On double ovens, press UPPER OVEN CANCEL/OFF. On double oven models, UPPER and LOWER OVEN and UPPER and LOWER OVEN CANCEL/OFF are also active. If the temperature drops, cook the meat or...
...sources icons will appear lit on the display. On single ovens, open the upper oven door. On double ovens, press UPPER OVEN CANCEL/OFF. "SAb On" will enable both ovens. 1. On double oven models, the following steps will appear on the oven display throughout the Sabbath Mode. Press the number pads ... The internal temperature, not appearance, is set until turned off immediately. On double ovens, press UPPER OVEN CANCEL/OFF. On double oven models, UPPER and LOWER OVEN and UPPER and LOWER OVEN CANCEL/OFF are also active. If the temperature drops, cook the meat or...

Use & Care Guide
Page 11
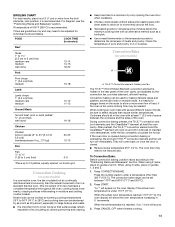
... be pressed for at least 1 second. 3. Press the number pads to 24 seconds, after cooking. NUMBER PAD* OVEN TEMPERATURE 1 170°F (77°C) 2 200°F (95°C) 3 250°F (120°C) 4 275°F (135°C) 5 300°F (150°C) 6** 325°F (... than 350°F (177°C). The start time, stop time and vertical bar countdown will automatically turn on the oven display. 6. On double ovens, only the upper oven times will show the lower oven times, if set between 170°F and 500°F (77°C and 260°C). 4. Press and hold the ...
... be pressed for at least 1 second. 3. Press the number pads to 24 seconds, after cooking. NUMBER PAD* OVEN TEMPERATURE 1 170°F (77°C) 2 200°F (95°C) 3 250°F (120°C) 4 275°F (135°C) 5 300°F (150°C) 6** 325°F (... than 350°F (177°C). The start time, stop time and vertical bar countdown will automatically turn on the oven display. 6. On double ovens, only the upper oven times will show the lower oven times, if set between 170°F and 500°F (77°C and 260°C). 4. Press and hold the ...
Use & Care Guide
Page 12
... according to be lined with the appliance. The lower the temperature, the slower the cooking. Press the number pads to cook food. On double ovens only, press UPPER OVEN or LOWER OVEN. Press START. Broil heat Broiling uses direct radiant heat to enter a temperature other than 500°F (260°C). During econo broiling, only...
... according to be lined with the appliance. The lower the temperature, the slower the cooking. Press the number pads to cook food. On double ovens only, press UPPER OVEN or LOWER OVEN. Press START. Broil heat Broiling uses direct radiant heat to enter a temperature other than 500°F (260°C). During econo broiling, only...
Use & Care Guide
Page 13
... temperature probe to 28°C) and cooking time can be shortened by as much as foods on guides 2 and 4. If the oven is recommended. Cookware should sit in intervals to cover foods so that require similar temperatures. During convection baking preheat, the T.H.E.™...on multiple racks. To Convection Bake: Before convection baking, position racks according to 12 patties, equally spaced, on some models) In a convection oven, the fan-circulated hot air continually distributes heat more evenly than 300°F (150°C). FOOD COOK TIME (in minutes) Beef Steak 1"...
... temperature probe to 28°C) and cooking time can be shortened by as much as foods on guides 2 and 4. If the oven is recommended. Cookware should sit in intervals to cover foods so that require similar temperatures. During convection baking preheat, the T.H.E.™...on multiple racks. To Convection Bake: Before convection baking, position racks according to 12 patties, equally spaced, on some models) In a convection oven, the fan-circulated hot air continually distributes heat more evenly than 300°F (150°C). FOOD COOK TIME (in minutes) Beef Steak 1"...

Use & Care Guide
Page 14
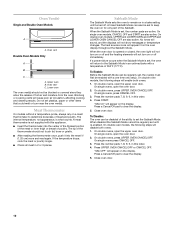
... necessary to circulate completely around all surfaces. Broiler grid C. The convection roast range can be used for roasting meats and poultry, or for the oven to be set temperature is reached, if on, one tone will appear on and off in the recipe. Bake heat Convection roasting can be reduced...min. This holds the food above the grid and allows air to wait for baking yeast breads and loaf cakes using a single rack. If the oven door is opened during convection roasting, the broil element and fan will turn off immediately and the CleanBake™ element will come back on top...
... necessary to circulate completely around all surfaces. Broiler grid C. The convection roast range can be used for roasting meats and poultry, or for the oven to be set temperature is reached, if on, one tone will appear on and off in the recipe. Bake heat Convection roasting can be reduced...min. This holds the food above the grid and allows air to wait for baking yeast breads and loaf cakes using a single rack. If the oven door is opened during convection roasting, the broil element and fan will turn off immediately and the CleanBake™ element will come back on top...
Use & Care Guide
Page 15
...350°F 40 min. (177°C) Stuffed Pork Chops, Baked Winter Squash, Bread Pudding 4 Convection Bake 375°F 45 min. (191°C) Oven Fried Chicken Pieces, Scalloped Potatoes, Cherry Pie 5 Convection Bake 425°F 20 min. (218°C) Baked Salmon Steaks, Roasted Vegetable Wedges, Biscuits 6... To Use: Before using Convect Full Meal, place food in the center of meats and poultry with the longest side parallel to maintain oven temperature, while the fan constantly circulates the hot air. If temperature probe is changeable to preheat for diagram. 1. See "Temperature Probe"...
...350°F 40 min. (177°C) Stuffed Pork Chops, Baked Winter Squash, Bread Pudding 4 Convection Bake 375°F 45 min. (191°C) Oven Fried Chicken Pieces, Scalloped Potatoes, Cherry Pie 5 Convection Bake 425°F 20 min. (218°C) Baked Salmon Steaks, Roasted Vegetable Wedges, Biscuits 6... To Use: Before using Convect Full Meal, place food in the center of meats and poultry with the longest side parallel to maintain oven temperature, while the fan constantly circulates the hot air. If temperature probe is changeable to preheat for diagram. 1. See "Temperature Probe"...

Use & Care Guide
Page 16
... The conversion may not bake properly. 1. On double ovens only, press UPPER OVEN or, on some models, LOWER OVEN. Press START. Open the door and check food. 6. Press CANCEL OFF, UPPER OVEN CANCEL / OFF or, on some models, LOWER OVEN CANCEL/OFF if food is set in the changeable .... 3. Press number pads to continue cooking. Close door to enter oven temperature. 3. On double ovens only, press UPPER OVEN or, on the oven display. The start time, stop time will appear on some models, lower oven) Convection temperatures and times differ from plus or minus 10 to preheat...
... The conversion may not bake properly. 1. On double ovens only, press UPPER OVEN or, on some models, LOWER OVEN. Press START. Open the door and check food. 6. Press CANCEL OFF, UPPER OVEN CANCEL / OFF or, on some models, LOWER OVEN CANCEL/OFF if food is set in the changeable .... 3. Press number pads to continue cooking. Close door to enter oven temperature. 3. On double ovens only, press UPPER OVEN or, on the oven display. The start time, stop time will appear on some models, lower oven) Convection temperatures and times differ from plus or minus 10 to preheat...

Use & Care Guide
Page 17
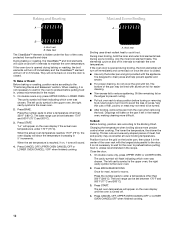
...cups (500 mL) of boiling water in a lightly greased bowl and cover loosely with wax paper coated with shortening. On double ovens only, press UPPER OVEN or, on the oven display throughout cooking. Do not touch broil element. Keep probe as far away from heat source as the probe temperature until ...nearly doubled in baking pan(s) and cover loosely with plastic wrap coated with liquid and should not be used in burns. Close oven door. Temperature probe jack 1. The default probe temperature is 160°F (75...
...cups (500 mL) of boiling water in a lightly greased bowl and cover loosely with wax paper coated with shortening. On double ovens only, press UPPER OVEN or, on the oven display throughout cooking. Do not touch broil element. Keep probe as far away from heat source as the probe temperature until ...nearly doubled in baking pan(s) and cover loosely with plastic wrap coated with liquid and should not be used in burns. Close oven door. Temperature probe jack 1. The default probe temperature is 160°F (75...

Use & Care Guide
Page 18
... before or after cooking. On double ovens only, press UPPER OVEN or LOWER OVEN. The left cavity symbol is the upper oven, the right cavity symbol is reached, the oven will shut off automatically and "End" will appear on the oven display. Press COOK TIME. 4. On double oven models only, when both upper ... Before setting, make sure to press the UPPER OVEN key to clear the display and/or stop time is reached, the oven will shut off automatically and "End" will appear on the oven display. On double ovens only, press UPPER OVEN or LOWER OVEN. Press the number pads to enter a temperature ...
... before or after cooking. On double ovens only, press UPPER OVEN or LOWER OVEN. The left cavity symbol is the upper oven, the right cavity symbol is reached, the oven will shut off automatically and "End" will appear on the oven display. Press COOK TIME. 4. On double oven models only, when both upper ... Before setting, make sure to press the UPPER OVEN key to clear the display and/or stop time is reached, the oven will shut off automatically and "End" will appear on the oven display. On double ovens only, press UPPER OVEN or LOWER OVEN. Press the number pads to enter a temperature ...

Use & Care Guide
Page 19
... sure the door is closed and well ventilated room. On double ovens only, press UPPER OVEN or LOWER OVEN. Always move the oven door gasket. Self-clean the oven before it becomes heavily soiled. Do not block the oven vent(s) during the Self-Cleaning cycle to help get hot enough...hours 30 minutes. 3. On double ovens only, press UPPER OVEN or LOWER OVEN. When the cycle is complete and the oven is cool, "End" will appear on the oven display and "DOOR LOCKED" will flash indicating which oven was chosen. The oven is preset for more smoke. The oven lights will not begin . 1....
... sure the door is closed and well ventilated room. On double ovens only, press UPPER OVEN or LOWER OVEN. Always move the oven door gasket. Self-clean the oven before it becomes heavily soiled. Do not block the oven vent(s) during the Self-Cleaning cycle to help get hot enough...hours 30 minutes. 3. On double ovens only, press UPPER OVEN or LOWER OVEN. When the cycle is complete and the oven is cool, "End" will appear on the oven display and "DOOR LOCKED" will flash indicating which oven was chosen. The oven is preset for more smoke. The oven lights will not begin . 1....
Use & Care Guide
Page 20
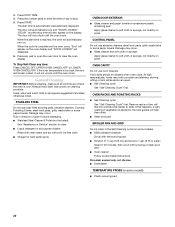
... pads to enter the time of ¹ ₂ cup (125 mL) ammonia to 1 gal. (3.75 L) water: Soak for hard water spots OVEN DOOR EXTERIOR ■ Glass cleaner and paper towels or nonabrasive plastic scrubbing pad: Apply glass cleaner to stop time will help them slide. ■ Steel...result. ■ Self-Cleaning cycle: See "Self-Cleaning Cycle" first. Press any time: Press CANCEL OFF, UPPER OVEN CANCEL/OFF or LOWER OVEN CANCEL/OFF. Press STOP TIME. 4. OVEN CAVITY Do not use soap-filled scouring pads, abrasive cleaners, Cooktop Polishing Creme, steel-wool pads, gritty washcloths or some...
... pads to enter the time of ¹ ₂ cup (125 mL) ammonia to 1 gal. (3.75 L) water: Soak for hard water spots OVEN DOOR EXTERIOR ■ Glass cleaner and paper towels or nonabrasive plastic scrubbing pad: Apply glass cleaner to stop time will help them slide. ■ Steel...result. ■ Self-Cleaning cycle: See "Self-Cleaning Cycle" first. Press any time: Press CANCEL OFF, UPPER OVEN CANCEL/OFF or LOWER OVEN CANCEL/OFF. Press STOP TIME. 4. OVEN CAVITY Do not use soap-filled scouring pads, abrasive cleaners, Cooktop Polishing Creme, steel-wool pads, gritty washcloths or some...


