
Installation Guide
Page 5
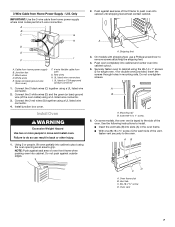
... or any portion of the oven trim 5. Remove the hardware package from inside the bag containing literature. 5. Grasp the edges of the oven door with shipping feet attached: To avoid product damage, do so can result in both corners of the oven. Remove Oven Trim IMPORTANT: Use both hands... and close the oven door until it will protect the lower oven trim until the oven is inserted into or severing ...
... or any portion of the oven trim 5. Remove the hardware package from inside the bag containing literature. 5. Grasp the edges of the oven door with shipping feet attached: To avoid product damage, do so can result in both corners of the oven. Remove Oven Trim IMPORTANT: Use both hands... and close the oven door until it will protect the lower oven trim until the oven is inserted into or severing ...
Installation Guide
Page 7
... the green (or bare) ground wire (of the vent, fasten vent securely to remove screws attaching the shipping feet. 4. A A. On some models, the oven vent is taped to cabinet using the #8-14 x 1" screws (2 for single oven, 4 for each side of the oven cable) using a UL listed wire connector. 2. Connect the 2 red wires (G) together using the...
... the green (or bare) ground wire (of the vent, fasten vent securely to remove screws attaching the shipping feet. 4. A A. On some models, the oven vent is taped to cabinet using the #8-14 x 1" screws (2 for single oven, 4 for each side of the oven cable) using a UL listed wire connector. 2. Connect the 2 red wires (G) together using the...
Installation Guide
Page 8
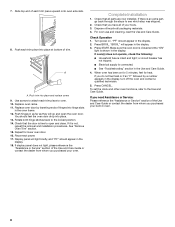
...Guide or contact the dealer from whom you purchased your oven. For oven use and cleaning, read the Use and Care Guide. If oven(s) does not operate, check the following: I Household fuse is connected. I Electrical supply is intact and tight; When oven has been on . Push each trim piece into ...Please reference the "Assistance or Service" section of each trim piece to attach each trim piece upward onto oven side rails. 8. To set the clock and other oven functions, refer to the locked position. 14. Use screws to oven. 10. Rotate both hinge latches back to the Use and Care ...
...Guide or contact the dealer from whom you purchased your oven. For oven use and cleaning, read the Use and Care Guide. If oven(s) does not operate, check the following: I Household fuse is connected. I Electrical supply is intact and tight; When oven has been on . Push each trim piece into ...Please reference the "Assistance or Service" section of each trim piece to attach each trim piece upward onto oven side rails. 8. To set the clock and other oven functions, refer to the locked position. 14. Use screws to oven. 10. Rotate both hinge latches back to the Use and Care ...
Use and Care Guide
Page 20
...you may also have other than normal, single-family household use. 3. SECOND THROUGH FIFTH YEAR LIMITED WARRANTY ON ELECTRIC ELEMENTS, CERAMIC GLASS COOKTOP, GAS BURNERS, SOLID STATE TOUCH CONTROL SYSTEM, AND MAGNETRON TUBE On electric ranges and electric cooktops, in materials or workmanship. On ... appliance is operated and maintained according to instructions attached to or furnished with the product, KitchenAid will pay for factory specified parts for future reference. You will not burn out. KITCHENAID® COOKTOP, BUILT-IN OVEN AND RANGE WARRANTY ONE-YEAR FULL WARRANTY For one...
...you may also have other than normal, single-family household use. 3. SECOND THROUGH FIFTH YEAR LIMITED WARRANTY ON ELECTRIC ELEMENTS, CERAMIC GLASS COOKTOP, GAS BURNERS, SOLID STATE TOUCH CONTROL SYSTEM, AND MAGNETRON TUBE On electric ranges and electric cooktops, in materials or workmanship. On ... appliance is operated and maintained according to instructions attached to or furnished with the product, KitchenAid will pay for factory specified parts for future reference. You will not burn out. KITCHENAID® COOKTOP, BUILT-IN OVEN AND RANGE WARRANTY ONE-YEAR FULL WARRANTY For one...
