Installation Guide
Page 1
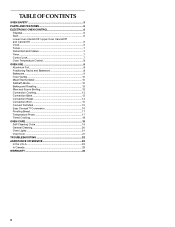
INSTALLATION INSTRUCTIONS 24" (61.0 CM) ELECTRIC SINGLE AND DOUBLE BUILT-IN OVEN Table of Contents BUILT-IN OVEN SAFETY 1 INSTALLATION REQUIREMENTS 2 Tools and Parts 2 Location Requirements 2 Electrical Requirements 4 INSTALLATION INSTRUCTIONS 4 Prepare Built-In Oven 4 Remove Oven Trim 4 Make Electrical Connection 5 Install Oven 7 Complete Installation 8 BUILT-IN OVEN SAFETY Your safety and the safety of injury, and tell you what the potential hazard...
INSTALLATION INSTRUCTIONS 24" (61.0 CM) ELECTRIC SINGLE AND DOUBLE BUILT-IN OVEN Table of Contents BUILT-IN OVEN SAFETY 1 INSTALLATION REQUIREMENTS 2 Tools and Parts 2 Location Requirements 2 Electrical Requirements 4 INSTALLATION INSTRUCTIONS 4 Prepare Built-In Oven 4 Remove Oven Trim 4 Make Electrical Connection 5 Install Oven 7 Complete Installation 8 BUILT-IN OVEN SAFETY Your safety and the safety of injury, and tell you what the potential hazard...
Installation Guide
Page 2
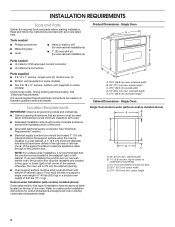
...Single Oven A B E D C A. 22³⁄₈" (56.8 cm) max. recessed depth E. 27¹⁄₂" (69.9 cm) recessed height Cabinet Dimensions - Check existing electrical supply. Given dimensions provide minimum clearance with cooktop installed above ) A B E D C A. 24" (61 cm) min. otherwise, the oven...lower right or left cabinet. Location Requirements IMPORTANT: Observe all electrical connections be recessed and located in a wall cabinet. recessed width B. 29" (73.7 cm) max. single oven (2), double oven (4) ■ Bottom vent (supplied on some models) &#...
...Single Oven A B E D C A. 22³⁄₈" (56.8 cm) max. recessed depth E. 27¹⁄₂" (69.9 cm) recessed height Cabinet Dimensions - Check existing electrical supply. Given dimensions provide minimum clearance with cooktop installed above ) A B E D C A. 24" (61 cm) min. otherwise, the oven...lower right or left cabinet. Location Requirements IMPORTANT: Observe all electrical connections be recessed and located in a wall cabinet. recessed width B. 29" (73.7 cm) max. single oven (2), double oven (4) ■ Bottom vent (supplied on some models) &#...

Installation Guide
Page 3
...cm) min. cutout height Product Dimensions - overall height C. 23³⁄₄" (60.3 cm) overall width D. 23" (58.4 cm) max. Single Oven Installed in Cabinet A B F D E C A. 24" (61 cm) min. cabinet width B. 1" (2.5 cm) top of cutout to bottom of upper cabinet door C. 32" (81.3 cm) bottom of ...top of cutout to floor D. 22¹⁄₂" (57.2 cm) cutout width E. 1¹⁄₂" (3.8 cm) min. Double Oven Double Oven Installed in Cabinet A B F D E C A. 24" (61 cm) min. Double or Single Oven A B E C D D C A. 22³⁄₈" (56.8 cm) max. Recessed...
...cm) min. cutout height Product Dimensions - overall height C. 23³⁄₄" (60.3 cm) overall width D. 23" (58.4 cm) max. Single Oven Installed in Cabinet A B F D E C A. 24" (61 cm) min. cabinet width B. 1" (2.5 cm) top of cutout to bottom of upper cabinet door C. 32" (81.3 cm) bottom of ...top of cutout to floor D. 22¹⁄₂" (57.2 cm) cutout width E. 1¹⁄₂" (3.8 cm) min. Double Oven Double Oven Installed in Cabinet A B F D E C A. 24" (61 cm) min. Double or Single Oven A B E C D D C A. 22³⁄₈" (56.8 cm) max. Recessed...

Installation Guide
Page 4
... be using special connectors and/or tools designed and UL listed for servicibility of electrical connection you are not sure the oven is properly grounded. A A Single oven A. Model/serial number plate Double oven A. The length of conduit provided is for joining copper to the pigtail leads. 2. WARNING Excessive Weight Hazard Use two or more people...
... be using special connectors and/or tools designed and UL listed for servicibility of electrical connection you are not sure the oven is properly grounded. A A Single oven A. Model/serial number plate Double oven A. The length of conduit provided is for joining copper to the pigtail leads. 2. WARNING Excessive Weight Hazard Use two or more people...
Installation Guide
Page 5
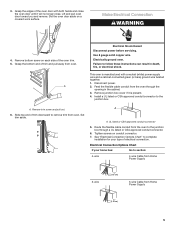
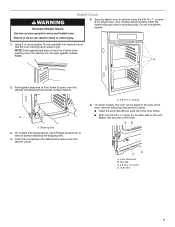
... wire and a cabinet-connected green (or bare) ground wire twisted together. 1. Electrically ground oven. This oven is present. 4. Feed the flexible cable conduit from the oven to follow these instructions can result in the cabinet. 3. Set the oven door aside on each side of the oven trim. 5. Disconnect power. 2. Tighten screws on conduit connector. 7. Route the...
... wire and a cabinet-connected green (or bare) ground wire twisted together. 1. Electrically ground oven. This oven is present. 4. Feed the flexible cable conduit from the oven to follow these instructions can result in the cabinet. 3. Set the oven door aside on each side of the oven trim. 5. Disconnect power. 2. Tighten screws on conduit connector. 7. Route the...
Installation Guide
Page 6
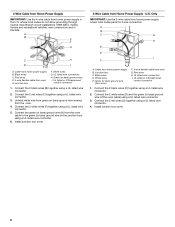
.... 2. Connect the 2 black wires (C) together using a UL listed wire connector. 3. Connect the 2 white wires (D) and the green (or bare) ground wire (of the oven cable) using a UL listed wire connector. 2. A B E F G C H D I . Black wires D. Install junction box cover. 6 Junction box F. Connect the ...2 white wires (F) together using a UL listed wire connector. 5. Untwist white wire from green (or bare) ground wire coming from oven G. Black wires C. Junction box C. U.S. UL listed wire connectors I A. Green (or bare) ground wires I F A. where local codes do...
.... 2. Connect the 2 black wires (C) together using a UL listed wire connector. 3. Connect the 2 white wires (D) and the green (or bare) ground wire (of the oven cable) using a UL listed wire connector. 2. A B E F G C H D I . Black wires D. Install junction box cover. 6 Junction box F. Connect the ...2 white wires (F) together using a UL listed wire connector. 5. Untwist white wire from green (or bare) ground wire coming from oven G. Black wires C. Junction box C. U.S. UL listed wire connectors I A. Green (or bare) ground wires I F A. where local codes do...
Installation Guide
Page 7
... through holes in back or other injury. 1. A 2. Failure to cabinet using the # 8-14 x 1" screws (2 for single oven, 4 for each side of the oven. Oven vent 7 A. # 8-14 x 1" screws 6. Securely fasten oven to do so can result in mounting rails. Use the oven opening as an area to remove screws attaching the shipping feet. 4. On models with shipping...
... through holes in back or other injury. 1. A 2. Failure to cabinet using the # 8-14 x 1" screws (2 for single oven, 4 for each side of the oven. Oven vent 7 A. # 8-14 x 1" screws 6. Securely fasten oven to do so can result in mounting rails. Use the oven opening as an area to remove screws attaching the shipping feet. 4. On models with shipping...
Installation Guide
Page 8
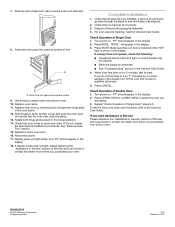
...repeat the removal and installation procedures. Check Operation of Single Oven" steps 2-5. Slide top end of Single Oven 1. Push hinges in as far as they will appear in the oven frame. 12. If there is free to oven. 10. When oven has been on . 7. Push each trim piece ..." section in the display. 2. or circuit breaker has not tripped. ■ Electrical supply is shown in U.S.A. Turn power on. "PF" should feel for lower oven door. 16. To set the clock and other oven functions, refer to the locked position. 14. W10045010 © 2007 Whirlpool Corporation....
...repeat the removal and installation procedures. Check Operation of Single Oven" steps 2-5. Slide top end of Single Oven 1. Push hinges in as far as they will appear in the oven frame. 12. If there is free to oven. 10. When oven has been on . 7. Push each trim piece ..." section in the display. 2. or circuit breaker has not tripped. ■ Electrical supply is shown in U.S.A. Turn power on. "PF" should feel for lower oven door. 16. To set the clock and other oven functions, refer to the locked position. 14. W10045010 © 2007 Whirlpool Corporation....

Use and Care Manual
Page 1
BUILT-IN ELECTRIC CONVECTION OVEN Use & Care Guide For questions about features, operation/performance, parts accessories or service, call: 1-800-422-1230 In Canada, call for assistance 1-800-461-5681, for installation and service, call: 1-800-807-6777 or visit our website at... www.kitchenaid.com or www.KitchenAid.ca Table of Contents...2 Models KEBC107 KEBC177 KEBC247 KEBC278 KEBV107 KEBV208 KEBC147 KEBC208 KEBC277 KEBC207 8304062
BUILT-IN ELECTRIC CONVECTION OVEN Use & Care Guide For questions about features, operation/performance, parts accessories or service, call: 1-800-422-1230 In Canada, call for assistance 1-800-461-5681, for installation and service, call: 1-800-807-6777 or visit our website at... www.kitchenaid.com or www.KitchenAid.ca Table of Contents...2 Models KEBC107 KEBC177 KEBC247 KEBC278 KEBV107 KEBV208 KEBC147 KEBC208 KEBC277 KEBC207 8304062
Use and Care Manual
Page 2
.../Off and Cancel Off 6 Clock 6 Tones 7 Fahrenheit and Celsius 7 Timer 7 Control Lock 7 Oven Temperature Control 8 OVEN USE 8 Aluminum Foil 8 Positioning Racks and Bakeware 8 Bakeware 9 Oven Vent(s 10 Meat Thermometer 10 Sabbath Mode 10 Baking and Roasting 12 Maxi and Econo Broiling 12 Convection ... Full Meal 15 Easy Convect™ Conversion 16 Proofing Bread 17 Temperature Probe 17 Timed Cooking 18 OVEN CARE 19 Self-Cleaning Cycle 19 General Cleaning 20 Oven Lights 21 Oven Door 21 TROUBLESHOOTING 22 ASSISTANCE OR SERVICE 23 In the U.S.A 23 In Canada 23 WARRANTY...
.../Off and Cancel Off 6 Clock 6 Tones 7 Fahrenheit and Celsius 7 Timer 7 Control Lock 7 Oven Temperature Control 8 OVEN USE 8 Aluminum Foil 8 Positioning Racks and Bakeware 8 Bakeware 9 Oven Vent(s 10 Meat Thermometer 10 Sabbath Mode 10 Baking and Roasting 12 Maxi and Econo Broiling 12 Convection ... Full Meal 15 Easy Convect™ Conversion 16 Proofing Bread 17 Temperature Probe 17 Timed Cooking 18 OVEN CARE 19 Self-Cleaning Cycle 19 General Cleaning 20 Oven Lights 21 Oven Door 21 TROUBLESHOOTING 22 ASSISTANCE OR SERVICE 23 In the U.S.A 23 In Canada 23 WARRANTY...

Use and Care Manual
Page 3
...have provided many important safety messages in Oven - Other surfaces of others . IMPORTANT SAFETY INSTRUCTIONS WARNING: To reduce the risk of pressure may be stored in color. s Storage in this manual and on Grease Fires - Build-up of fire, electrical shock, injury to cool. Smother ...fire or flame or use a towel or other flammable materials contact heating elements or interior surfaces of oven doors. Interior surfaces of the oven. We have had sufficient time to persons, or ...
...have provided many important safety messages in Oven - Other surfaces of others . IMPORTANT SAFETY INSTRUCTIONS WARNING: To reduce the risk of pressure may be stored in color. s Storage in this manual and on Grease Fires - Build-up of fire, electrical shock, injury to cool. Smother ...fire or flame or use a towel or other flammable materials contact heating elements or interior surfaces of oven doors. Interior surfaces of the oven. We have had sufficient time to persons, or ...
Use and Care Manual
Page 4
This appliance can cause low-level exposure to some of California to such substances. s Do Not Use Oven Cleaners - The door gasket is essential for a good seal. s Clean Only Parts Listed in or around any part of potential exposure to...This product contains a chemical known to cause cancer, birth defects, or other utensils. IMPORTANT SAFETY INSTRUCTIONS For self-cleaning ovens: s Do Not Clean Door Gasket - s Before Self-Cleaning the Oven - SAVE THESE INSTRUCTIONS The California Safe Drinking Water and Toxic Enforcement Act requires the Governor of California to publish a ...
This appliance can cause low-level exposure to some of California to such substances. s Do Not Use Oven Cleaners - The door gasket is essential for a good seal. s Clean Only Parts Listed in or around any part of potential exposure to...This product contains a chemical known to cause cancer, birth defects, or other utensils. IMPORTANT SAFETY INSTRUCTIONS For self-cleaning ovens: s Do Not Clean Door Gasket - s Before Self-Cleaning the Oven - SAVE THESE INSTRUCTIONS The California Safe Drinking Water and Toxic Enforcement Act requires the Governor of California to publish a ...

Use and Care Manual
Page 5
... latch H. T.H.E.™ (Third Hidden Element) convection element and fan (in floor panel) D. The oven you have some or all of your model. Temperature probe jack (upper and single ovens only) J. Model and serial number plate (on double oven models) E. Oven vent B. Broil elements (not shown) C. CleanBake™ bake element (hidden in back panel) I J K C D A. PARTS AND...
... latch H. T.H.E.™ (Third Hidden Element) convection element and fan (in floor panel) D. The oven you have some or all of your model. Temperature probe jack (upper and single ovens only) J. Model and serial number plate (on double oven models) E. Oven vent B. Broil elements (not shown) C. CleanBake™ bake element (hidden in back panel) I J K C D A. PARTS AND...
Use and Care Manual
Page 6
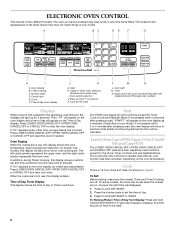
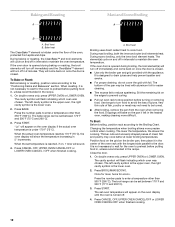
... to operate even after pressing a pad, the oven display will also show a.m. Number pads D. If not pressed within 4 or 5 minutes after an oven function has been canceled, depending on , however the start time. will disappear. 1. Upper and lower oven Cancel/Off (double oven models) Cancel Off (single oven models) Displays When power is blank. Convect full...
... to operate even after pressing a pad, the oven display will also show a.m. Number pads D. If not pressed within 4 or 5 minutes after an oven function has been canceled, depending on , however the start time. will disappear. 1. Upper and lower oven Cancel/Off (double oven models) Cancel Off (single oven models) Displays When power is blank. Convect full...

Use and Care Manual
Page 7
...after a power failure, if set before the power failure. Repeat to change back to prevent unintended use of time. 3. Pad Press Tones (single oven models) The single tones signaling a valid pad press are preset on , but can be turned off . Reminder Tones Only The Minute Timer and Timed Cooking ...your model, a tone will sound and "C°" or "C" will appear on your model), the display will return to cancel the Timer or stop the oven. Press TIMER CANCEL anytime to the time of time (between 5 seconds and 4 minutes depending on the display for about 5 seconds until a tone sounds...
...after a power failure, if set before the power failure. Repeat to change back to prevent unintended use of time. 3. Pad Press Tones (single oven models) The single tones signaling a valid pad press are preset on , but can be turned off . Reminder Tones Only The Minute Timer and Timed Cooking ...your model, a tone will sound and "C°" or "C" will appear on your model), the display will return to cancel the Timer or stop the oven. Press TIMER CANCEL anytime to the time of time (between 5 seconds and 4 minutes depending on the display for about 5 seconds until a tone sounds...
Use and Care Manual
Page 8
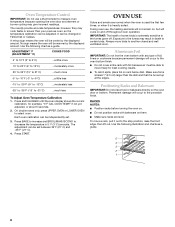
... -15° to -20°F (-9° to -12°C) ...moderately less -25° to -35°F (-15° to move birds to select oven. IMPORTANT: The health of foil, liners or cookware because permanent damage will be warmer by the displayed amount. Make sure foil is heavily soiled. Positioning... the fumes may cook faster or slower than the dish and that it is at the edges. RACKS NOTES: s Position racks before turning the oven on the oven door or bottom. Use the following chart as a guide. 5 4 3 2 1 8 however, they may result in death to the stop position, raise the ...
... -15° to -20°F (-9° to -12°C) ...moderately less -25° to -35°F (-15° to move birds to select oven. IMPORTANT: The health of foil, liners or cookware because permanent damage will be warmer by the displayed amount. Make sure foil is heavily soiled. Positioning... the fumes may cook faster or slower than the dish and that it is at the edges. RACKS NOTES: s Position racks before turning the oven on the oven door or bottom. Use the following chart as a guide. 5 4 3 2 1 8 however, they may result in death to the stop position, raise the ...
Use and Care Manual
Page 9
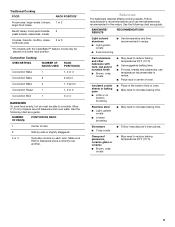
...need to increase baking time. NUMBER OF PAN(S) POSITION ON RACK 1 Center of space around bakeware and oven walls. Dark aluminum and other bakeware with the CleanBake™ feature, foods may be able to reduce baking ... guide. Stoneware s Crisp crusts s Follow manufacturer's instructions. s May need to circulate. Follow manufacturer's recommendations and use temperature recommended in center of oven. Convection Cooking OVEN SETTING NUMBER OF RACKS USED RACK POSITION(S) Convection Bake 1 1, 2 or 3 Convection Bake 2 2 and 4 Convection Bake 3 1, 3 and...
...need to increase baking time. NUMBER OF PAN(S) POSITION ON RACK 1 Center of space around bakeware and oven walls. Dark aluminum and other bakeware with the CleanBake™ feature, foods may be able to reduce baking ... guide. Stoneware s Crisp crusts s Follow manufacturer's instructions. s May need to circulate. Follow manufacturer's recommendations and use temperature recommended in center of oven. Convection Cooking OVEN SETTING NUMBER OF RACKS USED RACK POSITION(S) Convection Bake 1 1, 2 or 3 Convection Bake 2 2 and 4 Convection Bake 3 1, 3 and...

Use and Care Manual
Page 10
...to the Sabbath Mode in this order. 4. On double oven models, UPPER and LOWER OVEN and UPPER and LOWER OVEN CANCEL/OFF are also active. On double ovens, press UPPER OVEN CANCEL/OFF. On single ovens, press CANCEL OFF. 3. Close oven door. 10 s Insert the thermometer into the meat ... and poultry. s Check all meat in this appliance. Oven Vent(s) Single and Double Oven Models A A. When the oven door is what counts. On double oven models, the following steps will enable both ovens. 1. On single ovens, open the oven door. 2. When disabled the Sabbath Mode cannot be blocked...
...to the Sabbath Mode in this order. 4. On double oven models, UPPER and LOWER OVEN and UPPER and LOWER OVEN CANCEL/OFF are also active. On double ovens, press UPPER OVEN CANCEL/OFF. On single ovens, press CANCEL OFF. 3. Close oven door. 10 s Insert the thermometer into the meat ... and poultry. s Check all meat in this appliance. Oven Vent(s) Single and Double Oven Models A A. When the oven door is what counts. On double oven models, the following steps will enable both ovens. 1. On single ovens, open the oven door. 2. When disabled the Sabbath Mode cannot be blocked...
Use and Care Manual
Page 11
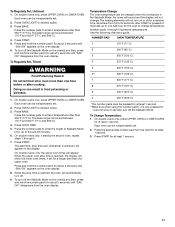
...off for a longer time than 350°F (177°C). Each oven can be independently set between 170°F and 500°F (77°C and 260°C). 4. Press the number pads to 24 seconds, after cooking. Each oven can be independently set for a random time, anywhere from the chart... for the oven to one hour before or after START is reached, the display will appear. Press the ...
...off for a longer time than 350°F (177°C). Each oven can be independently set between 170°F and 500°F (77°C and 260°C). 4. Press the number pads to 24 seconds, after cooking. Each oven can be independently set for a random time, anywhere from the chart... for the oven to one hour before or after START is reached, the display will appear. Press the ...
Use and Care Manual
Page 12
... A. When roasting, it in the recipe. 1. During maxi broiling, both the inner and outer broil elements heat. The broil range can be set oven temperature will appear on the broiler pan, then place it is opened during broiling, the broil element(s) will show the temperature increasing in 2 minutes....a temperature other than 350°F (180°C). Press START. Broil heat Broiling uses direct radiant heat to prevent curling. The bottom of the oven rack with aluminum foil for econo. The set between 170°F and 500°F (75°C and 260°C). 3. The left in ...
... A. When roasting, it in the recipe. 1. During maxi broiling, both the inner and outer broil elements heat. The broil range can be set oven temperature will appear on the broiler pan, then place it is opened during broiling, the broil element(s) will show the temperature increasing in 2 minutes....a temperature other than 350°F (180°C). Press START. Broil heat Broiling uses direct radiant heat to prevent curling. The bottom of the oven rack with aluminum foil for econo. The set between 170°F and 500°F (75°C and 260°C). 3. The left in ...


