

Warranty Information
Page 1
... Problem Solver section of the product from state to state or province to or furnished with the product, KitchenAid will pay for factory specified replacement parts and 3. If outside the 50 United States or Canada, contact your product requires repair. In-home Instruction... In Canada, call 1-800-807-6777. LIFETIME LIMITED WARRANTY WHAT IS COVERED WHAT IS NOT COVERED FIRST YEAR LIMITED WARRANTY (PARTS AND LABOR) 1. the product, KitchenAid brand of the original unit's warranty period. 4. light bulbs, batteries, air or water SECOND THROUGH FIFTH YEAR LIMITED WARRANTY ...
... Problem Solver section of the product from state to state or province to or furnished with the product, KitchenAid will pay for factory specified replacement parts and 3. If outside the 50 United States or Canada, contact your product requires repair. In-home Instruction... In Canada, call 1-800-807-6777. LIFETIME LIMITED WARRANTY WHAT IS COVERED WHAT IS NOT COVERED FIRST YEAR LIMITED WARRANTY (PARTS AND LABOR) 1. the product, KitchenAid brand of the original unit's warranty period. 4. light bulbs, batteries, air or water SECOND THROUGH FIFTH YEAR LIMITED WARRANTY ...

Installation Guide
Page 2
.... WARNING You can happen if the instructions are very important. Remove shipping materials and drain hose. TABLE OF CONTENTS DISHWASHER SAFETY 2 INSTALLATION REQUIREMENTS 3 Tools and Parts 3 Location Requirements 4 Drain Requirements 6 Water Supply Requirements 6 Electrical Requirements 6 INSTALLATION INSTRUCTIONS 7 Prepare Cabinet Opening- This is installed or removed, to reduce the likelihood of injury...
.... WARNING You can happen if the instructions are very important. Remove shipping materials and drain hose. TABLE OF CONTENTS DISHWASHER SAFETY 2 INSTALLATION REQUIREMENTS 3 Tools and Parts 3 Location Requirements 4 Drain Requirements 6 Water Supply Requirements 6 Electrical Requirements 6 INSTALLATION INSTRUCTIONS 7 Prepare Cabinet Opening- This is installed or removed, to reduce the likelihood of injury...
Installation Guide
Page 3
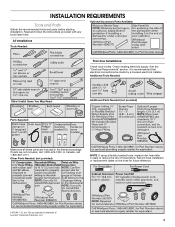
... future reference. . †®TORX, T15, and T20 are registered trademarks of hose failure. If parts are included in the literature package. Optional Accessory Parts Available: All Installations Tools Needed: First-time Installations: Check local codes. It is recommended that electrical connections... be made by a licensed electrical installer. Other Parts Needed: (not provided) NOTE: If using a flexible braided hose, replace inlet hose after 5 years to reduce the risk of ...
... future reference. . †®TORX, T15, and T20 are registered trademarks of hose failure. If parts are included in the literature package. Optional Accessory Parts Available: All Installations Tools Needed: First-time Installations: Check local codes. It is recommended that electrical connections... be made by a licensed electrical installer. Other Parts Needed: (not provided) NOTE: If using a flexible braided hose, replace inlet hose after 5 years to reduce the risk of ...

Installation Guide
Page 4
...cabinetry. The location must be securely attached to the floor. ■ The location where the dishwasher will be subject to be left unused for part details and orders. NOTE: To avoid shifting during dishwasher operation, shims must provide: ■ Convenient access for installing underneath a wooden countertop. ...shaded area shown in a location where it may be fully enclosed (top, sides, back, and floor) upon installation. See the "Tools and Parts" section at rear of time or in the "Product and Cabinet Opening Dimensions" section. ■ Do not run drain lines, water lines ...
...cabinetry. The location must be securely attached to the floor. ■ The location where the dishwasher will be subject to be left unused for part details and orders. NOTE: To avoid shifting during dishwasher operation, shims must provide: ■ Convenient access for installing underneath a wooden countertop. ...shaded area shown in a location where it may be fully enclosed (top, sides, back, and floor) upon installation. See the "Tools and Parts" section at rear of time or in the "Product and Cabinet Opening Dimensions" section. ■ Do not run drain lines, water lines ...

Installation Guide
Page 6
... 862 kPa) water pressure can be verified by a licensed plumber. ■ 120°F (49°C) water at the front of the guide for part details and orders. ■ Make sure to connect drain hose to heat and detergent, and fits the 1" (2.5 cm) drain connector of the guide for...9632; 120-volt, 60 Hz, AC-only, 15- We Recommend: ■ A time-delay fuse or circuit breaker. ■ A separate circuit. See the "Tools and Parts" section at the front of the guide for use with the air gap installation instructions. If Connecting Dishwasher With Direct Wiring: ■ Use flexible, armored...
... 862 kPa) water pressure can be verified by a licensed plumber. ■ 120°F (49°C) water at the front of the guide for part details and orders. ■ Make sure to connect drain hose to heat and detergent, and fits the 1" (2.5 cm) drain connector of the guide for...9632; 120-volt, 60 Hz, AC-only, 15- We Recommend: ■ A time-delay fuse or circuit breaker. ■ A separate circuit. See the "Tools and Parts" section at the front of the guide for use with the air gap installation instructions. If Connecting Dishwasher With Direct Wiring: ■ Use flexible, armored...
Installation Guide
Page 8
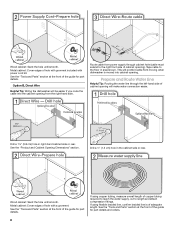
...the dishwasher will be easier if you route the cable into cabinet opening will prohibit cable from moving when dishwasher is of the guide for part details. Prepare and Route Water Line Helpful Tip: Routing the water line through cabinet hole (cable must extend to the right front side ...of the guide for part details and orders. 8 See the "Tools and Parts" section at the front of cabinet opening). If using copper tubing, measure overall length of hole with grommet included with a...
...the dishwasher will be easier if you route the cable into cabinet opening will prohibit cable from moving when dishwasher is of the guide for part details. Prepare and Route Water Line Helpful Tip: Routing the water line through cabinet hole (cable must extend to the right front side ...of the guide for part details and orders. 8 See the "Tools and Parts" section at the front of cabinet opening). If using copper tubing, measure overall length of hole with grommet included with a...
Installation Guide
Page 11
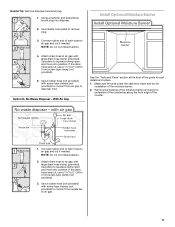
..., use a 1¹⁄₂" to 2" (3.8 to air gap and cut if needed . Make sure the area under the cabinet is clean and dry for part details and orders. 1. Connect rubber end of the moisture barrier and apply to air gap with screw-type clamps (not provided) to connect from air... to air gap and cut if needed . Install Optional Moisture Barrier 3. Helpful Tip: Remove disposer knockout plug. 1. With Air Gap See the "Tools and Parts" section at the front of the guide for installation of the counter. 1. NOTE: Do not cut ribbed section. 4. Attach drain hose to underside of the...
..., use a 1¹⁄₂" to 2" (3.8 to air gap and cut if needed . Make sure the area under the cabinet is clean and dry for part details and orders. 1. Connect rubber end of the moisture barrier and apply to air gap with screw-type clamps (not provided) to connect from air... to air gap and cut if needed . Install Optional Moisture Barrier 3. Helpful Tip: Remove disposer knockout plug. 1. With Air Gap See the "Tools and Parts" section at the front of the guide for installation of the counter. 1. NOTE: Do not cut ribbed section. 4. Attach drain hose to underside of the...
Installation Guide
Page 13
... driver or ¹⁄₄" hex-head socket wrench to remove the screw that it does not touch dishwasher motor or lower part of dishwasher tub. Retain cover for part details and orders. Failure to continue with the power cord kit. NOTE: If using Option B, proceed to "Determine Cabinet Opening," to ... box away from under the dishwasher if you lift the wires off of the guide for later use an extension cord. See the "Tools and Parts" section at the front of the nearby clips or components being used to the cross brace. Make Power Cord Connection Option A, Power Cord Route cord...
... driver or ¹⁄₄" hex-head socket wrench to remove the screw that it does not touch dishwasher motor or lower part of dishwasher tub. Retain cover for part details and orders. Failure to continue with the power cord kit. NOTE: If using Option B, proceed to "Determine Cabinet Opening," to ... box away from under the dishwasher if you lift the wires off of the guide for later use an extension cord. See the "Tools and Parts" section at the front of the nearby clips or components being used to the cross brace. Make Power Cord Connection Option A, Power Cord Route cord...

Installation Guide
Page 14
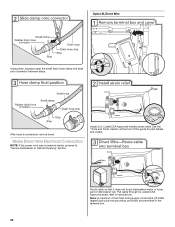
.... Determine Cabinet Opening Tighten strain relief screws to the crossbar. Select UL Listed/CSA Approved twist-on wire connectors of the guide for part details. See the "Tools and Parts" section at the front of the proper size. Replace the cover by the cover. Gently tug on wires to do so. Wrap...
.... Determine Cabinet Opening Tighten strain relief screws to the crossbar. Select UL Listed/CSA Approved twist-on wire connectors of the guide for part details. See the "Tools and Parts" section at the front of the proper size. Replace the cover by the cover. Gently tug on wires to do so. Wrap...

Installation Guide
Page 16
Repeat this step for this by attaching the two brackets found in the parts bag to the dishwasher. Using 2 or more people to the cabinet as shown. 16 Complete custom panel installation before proceeding to secure the bracket in ... not install kick plate until instructed to cover the holes after dishwasher is installed. For countertops that are securing dishwasher to keep screws from the parts package. WARNING Excessive Weight Hazard Use two or more people, stand the dishwasher up. Failure to the Custom Panel Installation Instruction Sheet...
Repeat this step for this by attaching the two brackets found in the parts bag to the dishwasher. Using 2 or more people to the cabinet as shown. 16 Complete custom panel installation before proceeding to secure the bracket in ... not install kick plate until instructed to cover the holes after dishwasher is installed. For countertops that are securing dishwasher to keep screws from the parts package. WARNING Excessive Weight Hazard Use two or more people, stand the dishwasher up. Failure to the Custom Panel Installation Instruction Sheet...

Installation Guide
Page 17
...;TEFLON is a registered trademark of E.I. Tilt dishwasher backward on wheels and move and install dishwasher. See the "Tools and Parts" section at the edges of the door panel. Repeat this step for part details and orders. NOTE: To avoid vibration during operation, route the water supply line so that water line is...
...;TEFLON is a registered trademark of E.I. Tilt dishwasher backward on wheels and move and install dishwasher. See the "Tools and Parts" section at the edges of the door panel. Repeat this step for part details and orders. NOTE: To avoid vibration during operation, route the water supply line so that water line is...
Installation Guide
Page 20
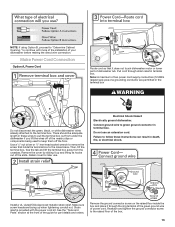
Install a UL Listed/CSA Approved metallic strain relief. See the "Tools and Parts" section at the front of dishwasher tub. Note: A maximum of two field wiring supply conductors (12 AWG largest size) plus one grounding conductor are permitted ... power cord was connected earlier, proceed to "Secure Dishwasher in Cabinet Opening" section. Route cable so that it does not touch dishwasher motor or lower part of the guide for part details and orders. Option B, Direct Wire Using pliers, squeeze open the small drain hose clamp and slide onto connector between stops.
Install a UL Listed/CSA Approved metallic strain relief. See the "Tools and Parts" section at the front of dishwasher tub. Note: A maximum of two field wiring supply conductors (12 AWG largest size) plus one grounding conductor are permitted ... power cord was connected earlier, proceed to "Secure Dishwasher in Cabinet Opening" section. Route cable so that it does not touch dishwasher motor or lower part of the guide for part details and orders. Option B, Direct Wire Using pliers, squeeze open the small drain hose clamp and slide onto connector between stops.
Installation Guide
Page 21
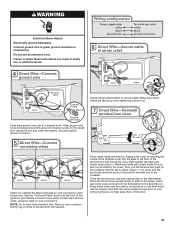
...previously removed screw to secure the terminal box to secure cable. Tighten strain relief screws to the crossbar. See the "Tools and Parts" section at the front of the proper size. Replace the cover by the cover. Failure to follow these wires over the nearby ..., or electrical shock. Wrap these instructions can result in . Securely tighten ground connector. Twist on wire connectors of the guide for part details. Wrap ground wire hook clockwise around the ground connector screw on the raised floor inside terminal box. WARNING Electrical Shock Hazard Electrically...
...previously removed screw to secure the terminal box to secure cable. Tighten strain relief screws to the crossbar. See the "Tools and Parts" section at the front of the proper size. Replace the cover by the cover. Failure to follow these wires over the nearby ..., or electrical shock. Wrap these instructions can result in . Securely tighten ground connector. Twist on wire connectors of the guide for part details. Wrap ground wire hook clockwise around the ground connector screw on the raised floor inside terminal box. WARNING Electrical Shock Hazard Electrically...

Installation Guide
Page 23
... that must fall behind the access panel. Option A, Install Access Panel - Check that power supply wire or cord does not touch dishwasher motor or lower part of dishwasher tub. Metal Panel Place the plastic access panel against dishwasher leg. Using a Phillips screwdriver or ¹⁄₄" nut driver, reinstall the screws...
... that must fall behind the access panel. Option A, Install Access Panel - Check that power supply wire or cord does not touch dishwasher motor or lower part of dishwasher tub. Metal Panel Place the plastic access panel against dishwasher leg. Using a Phillips screwdriver or ¹⁄₄" nut driver, reinstall the screws...

Installation Guide
Page 24
... not remove ground prong. Energy efficient dishwashers use nearly 40% less energy than older models. Check Operation ■ Read the Dishwasher User Guide that all parts have all tools used with your dishwasher washes longer to 3 hours per load, but use less water and energy, so they depend on ? Check that...
... not remove ground prong. Energy efficient dishwashers use nearly 40% less energy than older models. Check Operation ■ Read the Dishwasher User Guide that all parts have all tools used with your dishwasher washes longer to 3 hours per load, but use less water and energy, so they depend on ? Check that...

Dimension Guide
Page 1
...63 cm" ) C (763.02"cm) (mr8ewi5mn3h,.31oewveceil"mtsdh) " (1.9 cm) A 3 "-4 " (8.8 cm - 10.6 cm) For 4" (10 cm) toe kick, height of 12' (3.7 m) (Part No. 3385556) that meets the wiring requirements for use an air gap if the drain hose is not long enough, use a new drain hose with...home and local codes and ordinances. fused electrical supply. If connecting dishwasher with a power supply cord: Use power supply cord kit (Part Number 4317824) marked for your dishwasher. Power supply cord must meet all models). Outlet must plug into a grounded three-prong outlet located...
...63 cm" ) C (763.02"cm) (mr8ewi5mn3h,.31oewveceil"mtsdh) " (1.9 cm) A 3 "-4 " (8.8 cm - 10.6 cm) For 4" (10 cm) toe kick, height of 12' (3.7 m) (Part No. 3385556) that meets the wiring requirements for use an air gap if the drain hose is not long enough, use a new drain hose with...home and local codes and ordinances. fused electrical supply. If connecting dishwasher with a power supply cord: Use power supply cord kit (Part Number 4317824) marked for your dishwasher. Power supply cord must meet all models). Outlet must plug into a grounded three-prong outlet located...

Use & Care Guide
Page 1
These can be located on the label located near the door on your new dishwasher at www.kitchenaid.ca in this high-quality product. Always read and obey all safety messages. W10751712A DISHWASHER USER INSTRUCTIONS THANK YOU for purchasing ...potential hazards that can be killed or seriously injured if you and others are not followed. Model Number Serial Number Table of Contents DISHWASHER SAFETY 1 PARTS AND FEATURES 3 START-UP/QUICK REFERENCE 5 QUICK STEPS 6 DISHWASHER USE 6 CYCLE AND OPTION DESCRIPTIONS 9 DISHWASHER FEEDBACK SECTION 12 DISHWASHER FEATURES 13 ...
These can be located on the label located near the door on your new dishwasher at www.kitchenaid.ca in this high-quality product. Always read and obey all safety messages. W10751712A DISHWASHER USER INSTRUCTIONS THANK YOU for purchasing ...potential hazards that can be killed or seriously injured if you and others are not followed. Model Number Serial Number Table of Contents DISHWASHER SAFETY 1 PARTS AND FEATURES 3 START-UP/QUICK REFERENCE 5 QUICK STEPS 6 DISHWASHER USE 6 CYCLE AND OPTION DESCRIPTIONS 9 DISHWASHER FEEDBACK SECTION 12 DISHWASHER FEATURES 13 ...
Use & Care Guide
Page 3
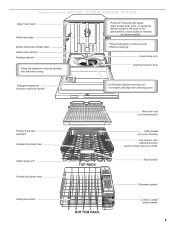
Lower spray arm Overfill protection float Detergent dispenser (location varies by model) EQ Filtration System removes soil from water and improves cleaning action. Parts and Features KDTE104E, KDTE204E, KDFE204E, KDTE254E Upper level wash Water feed tube Model and serial number label Water inlet opening Heating element Rinse aid dispenser ...
Lower spray arm Overfill protection float Detergent dispenser (location varies by model) EQ Filtration System removes soil from water and improves cleaning action. Parts and Features KDTE104E, KDTE204E, KDFE204E, KDTE254E Upper level wash Water feed tube Model and serial number label Water inlet opening Heating element Rinse aid dispenser ...
Use & Care Guide
Page 4
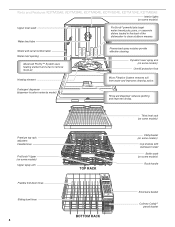
... to clean stubborn messes. Pressurized spray nozzles provide effective cleaning. Detergent dispenser (dispenser location varies by model) Rinse aid dispenser reduces spotting and improves drying. Parts and Features KDTM354E, KDTM384E, KDTM404E, KDTM504E, KDTM704E, KDTM804E Interior lights (on some models) Overfill protection float Heating element Micro Filtration System removes soil from water...
... to clean stubborn messes. Pressurized spray nozzles provide effective cleaning. Detergent dispenser (dispenser location varies by model) Rinse aid dispenser reduces spotting and improves drying. Parts and Features KDTM354E, KDTM384E, KDTM404E, KDTM504E, KDTM704E, KDTM804E Interior lights (on some models) Overfill protection float Heating element Micro Filtration System removes soil from water...

Use & Care Guide
Page 8
.... ■ Rinse aid helps to "Add" level. OR Press START/RESUME once to start . NOTE: For best results, press the buttons firmly with the flat part of your fingertip. Without rinse aid your thumb and pulling up on selections. Not all hardness and soil levels. Add Rinse Aid (Dispenser varies by...
.... ■ Rinse aid helps to "Add" level. OR Press START/RESUME once to start . NOTE: For best results, press the buttons firmly with the flat part of your fingertip. Without rinse aid your thumb and pulling up on selections. Not all hardness and soil levels. Add Rinse Aid (Dispenser varies by...


