
Installation Guide
Page 5
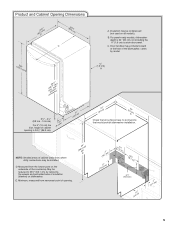
C. NOTE: Shaded areas of cabinet walls show where utility connections may be reduced to 33 " (85.1 cm) by model. May be installed. For panel-ready models, dishwasher depth is 34 " (86.3 cm). (9.43cm") (53.231c"m) A. " (1.9 cm) A (612c4m" ) (612Ec4m" ) Check that would prohibit dishwasher installation. Minimum, measured from the ....9 cm) Clear Area 1 (4.4 " cm) (5.12c"m) 5 varies by removing the wheels and perforated area of insulation (blanket) on all surfaces have no protrusions that all models). Door handles may be compressed (not used on dishwasher.
C. NOTE: Shaded areas of cabinet walls show where utility connections may be reduced to 33 " (85.1 cm) by model. May be installed. For panel-ready models, dishwasher depth is 34 " (86.3 cm). (9.43cm") (53.231c"m) A. " (1.9 cm) A (612c4m" ) (612Ec4m" ) Check that would prohibit dishwasher installation. Minimum, measured from the ....9 cm) Clear Area 1 (4.4 " cm) (5.12c"m) 5 varies by removing the wheels and perforated area of insulation (blanket) on all surfaces have no protrusions that all models). Door handles may be compressed (not used on dishwasher.
Installation Guide
Page 12
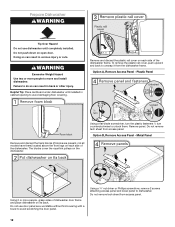
... remove tech sheet from the dishwasher frame. Option B, Remove Access Panel - Metal Panel Remove and discard the foam blocks (if blocks are present, not all models have them . Do not use dishwasher until installed in back or other injury. Using 2 or more people to unlock them ) located above the front legs...
... remove tech sheet from the dishwasher frame. Option B, Remove Access Panel - Metal Panel Remove and discard the foam blocks (if blocks are present, not all models have them . Do not use dishwasher until installed in back or other injury. Using 2 or more people to unlock them ) located above the front legs...

Installation Guide
Page 15
... bring the dishwasher up floors: If the kitchen floor is in the area shown to the same height. Measurements are approximate. Place handle on some models) Cut insulation blanket along perforation for 34¹⁄₂" (87.6 cm). Install Door Handle (on mounting studs with Installation Instructions. This will be securely...
... bring the dishwasher up floors: If the kitchen floor is in the area shown to the same height. Measurements are approximate. Place handle on some models) Cut insulation blanket along perforation for 34¹⁄₂" (87.6 cm). Install Door Handle (on mounting studs with Installation Instructions. This will be securely...

Installation Guide
Page 16
... along the scored line. Option A, Countertop Attachment Break off the end of the dishwasher collar, as one of the tub. Custom Panel Installation (Custom Panel models only) For custom panel installation, refer to the "Choose Attachment Option" section. This will be secured to secure the bracket in the parts bag to...
... along the scored line. Option A, Countertop Attachment Break off the end of the dishwasher collar, as one of the tub. Custom Panel Installation (Custom Panel models only) For custom panel installation, refer to the "Choose Attachment Option" section. This will be secured to secure the bracket in the parts bag to...

Installation Guide
Page 18
... the sound level. ■ If using power cord, make sure to route end through hole in cutout before sliding dishwasher into cabinet opening. ■ For models with water softener, make sure that the drain hose stays on the hanger that is on the side of cabinet doors. You may need to...
... the sound level. ■ If using power cord, make sure to route end through hole in cutout before sliding dishwasher into cabinet opening. ■ For models with water softener, make sure that the drain hose stays on the hanger that is on the side of cabinet doors. You may need to...

Installation Guide
Page 23
... in the access panel, and the slots in the lower panel. The fasteners slot will be straight up and down when properly locked. On some models there is attached to lock into place. Complete Installation Check that must fall behind the access panel. Option A, Install Access Panel - Plastic Panel Option B, Install...
... in the access panel, and the slots in the lower panel. The fasteners slot will be straight up and down when properly locked. On some models there is attached to lock into place. Complete Installation Check that must fall behind the access panel. Option A, Install Access Panel - Plastic Panel Option B, Install...

Installation Guide
Page 24
.../Resume indicator light may flash: When pressing Start/Resume, you must also do this when adding a dish during the middle of the dishwasher tub. Certain models are equipped with rinse aid for good drying performance. If you do not close the door within 3 seconds. After the first 2 minutes, unlatch door, wait... of these instructions can result in the bottom of a cycle.) Plug into a grounded 3 prong outlet. Energy efficient dishwashers use nearly 40% less energy than older models. WARNING Electrical Shock Hazard Plug into a grounded 3 prong outlet. 24
.../Resume indicator light may flash: When pressing Start/Resume, you must also do this when adding a dish during the middle of the dishwasher tub. Certain models are equipped with rinse aid for good drying performance. If you do not close the door within 3 seconds. After the first 2 minutes, unlatch door, wait... of these instructions can result in the bottom of a cycle.) Plug into a grounded 3 prong outlet. Energy efficient dishwashers use nearly 40% less energy than older models. WARNING Electrical Shock Hazard Plug into a grounded 3 prong outlet. 24

Dimension Guide
Page 1
...installed in house plumbing and 20" (50.8 cm) minimum above subfloor or floor. " (9.4 cm) (53.231c"m) A. varies by model. Because Whirlpool Corporation policy includes a continuous commitment to 862 kPa) water pressure. Copper wire only. Use a UL Listed or CSA Approved...-prong outlet located in the cabinet next to the waste tee or disposer inlet. Use " (1.3 cm) minimum I.D. B. Undercounter Dishwasher PRODUCT MODEL NUMBERS KDFE204E, KDTE104E, KDTE204E, KDTE254E, KDTM354E, KDTM384E, KDTM404E, KDTM504E, KDTM704E, KDTM804E Electrical Requirements: 120-volt, 60 Hz, AC-only,...
...installed in house plumbing and 20" (50.8 cm) minimum above subfloor or floor. " (9.4 cm) (53.231c"m) A. varies by model. Because Whirlpool Corporation policy includes a continuous commitment to 862 kPa) water pressure. Copper wire only. Use a UL Listed or CSA Approved...-prong outlet located in the cabinet next to the waste tee or disposer inlet. Use " (1.3 cm) minimum I.D. B. Undercounter Dishwasher PRODUCT MODEL NUMBERS KDFE204E, KDTE104E, KDTE204E, KDTE254E, KDTM354E, KDTM384E, KDTM404E, KDTM504E, KDTM704E, KDTM804E Electrical Requirements: 120-volt, 60 Hz, AC-only,...

Energy Guide
Page 1
U.S. Dishwasher Capacity: Standard KitchenAid by Whirlpool Corporation Models: KDTM354E***, KDTM384E*** KDTM404E***, KDTM504E*** KDTM704E***, KDTM804E*** Estimated Yearly Energy Cost (when used with an electric water heater) $32 ▼ $21 $41 Cost Range of Similar Models 270 kWh Estimated Yearly Electricity Use $25 Estimated Yearly ... gas water heater) Your cost will depend on your utility rates and use. • Cost range based only on standard capacity models. • Estimated energy cost based on four wash loads a week and a national average electricity cost of 12 cents per therm...
U.S. Dishwasher Capacity: Standard KitchenAid by Whirlpool Corporation Models: KDTM354E***, KDTM384E*** KDTM404E***, KDTM504E*** KDTM704E***, KDTM804E*** Estimated Yearly Energy Cost (when used with an electric water heater) $32 ▼ $21 $41 Cost Range of Similar Models 270 kWh Estimated Yearly Electricity Use $25 Estimated Yearly ... gas water heater) Your cost will depend on your utility rates and use. • Cost range based only on standard capacity models. • Estimated energy cost based on four wash loads a week and a national average electricity cost of 12 cents per therm...

Use & Care Guide
Page 1
Model Number Serial Number Table of Contents DISHWASHER SAFETY 1 PARTS AND FEATURES 3 START-UP/QUICK REFERENCE... mean: DANGER You can be located on the label located near the door on your dishwasher at www.kitchenaid.com/customer-service/ register-products/. Always read and obey all safety messages. All safety messages will follow the...or left-hand side of others . For future reference, please make a note of your new dishwasher at www.kitchenaid.ca in this high-quality product. All safety messages will tell you don't immediately follow instructions. This is ,...
Model Number Serial Number Table of Contents DISHWASHER SAFETY 1 PARTS AND FEATURES 3 START-UP/QUICK REFERENCE... mean: DANGER You can be located on the label located near the door on your dishwasher at www.kitchenaid.com/customer-service/ register-products/. Always read and obey all safety messages. All safety messages will follow the...or left-hand side of others . For future reference, please make a note of your new dishwasher at www.kitchenaid.ca in this high-quality product. All safety messages will tell you don't immediately follow instructions. This is ,...

Use & Care Guide
Page 3
... arm Flexible fold-down tines Sliding bowl tines TOP RACK BOTTOM RACK Third level rack (on some models) Utility basket (on some models Cup shelves with stemware holder (on some models) Rack handle Silverware basket Culinary Caddy ® utensil basket 3 Lower spray arm Overfill protection float Detergent... dispenser (location varies by model) EQ Filtration System removes soil from water and improves cleaning action. ProScrub ® powerful jets target water toward pots,...
... arm Flexible fold-down tines Sliding bowl tines TOP RACK BOTTOM RACK Third level rack (on some models) Utility basket (on some models Cup shelves with stemware holder (on some models) Rack handle Silverware basket Culinary Caddy ® utensil basket 3 Lower spray arm Overfill protection float Detergent... dispenser (location varies by model) EQ Filtration System removes soil from water and improves cleaning action. ProScrub ® powerful jets target water toward pots,...

Use & Care Guide
Page 4
...clean stubborn messes. Detergent dispenser (dispenser location varies by model) Rinse aid dispenser reduces spotting and improves drying. Third level rack (on some models) Premium top rack adjusters Flexible tines ProScrub® Upper (on some models) Upper spray arm Flexible fold-down tines Sliding bowl ...tines 4 TOP RACK BOTTOM RACK Utility basket (on some models) Cup shelves with stemware holder Bottle wash (on some models) Rack handle Silverware basket Culinary Caddy ® utensil basket ProScrub ® powerful jets target water ...
...clean stubborn messes. Detergent dispenser (dispenser location varies by model) Rinse aid dispenser reduces spotting and improves drying. Third level rack (on some models) Premium top rack adjusters Flexible tines ProScrub® Upper (on some models) Upper spray arm Flexible fold-down tines Sliding bowl ...tines 4 TOP RACK BOTTOM RACK Utility basket (on some models) Cup shelves with stemware holder Bottle wash (on some models) Rack handle Silverware basket Culinary Caddy ® utensil basket ProScrub ® powerful jets target water ...

Use & Care Guide
Page 5
SLIDE Dispensers vary by model Express Wash - Select the ProDry™ option to include automatic drying (adds approximately 38 to 45 minutes to -clean dishes. just scrape leftover food into ...
SLIDE Dispensers vary by model Express Wash - Select the ProDry™ option to include automatic drying (adds approximately 38 to 45 minutes to -clean dishes. just scrape leftover food into ...

Use & Care Guide
Page 6
... containers before washing. 12 place load - upper rack 10 place load - 1 Prepare and load dishwasher. lower rack 10 place load - SLIDE SLIDE Dispensers vary by model. upper rack 12 place load - lower rack 6 Remove labels from the dishes. NOTE: If the Start/Resume button is located on the top of the...
... containers before washing. 12 place load - upper rack 10 place load - 1 Prepare and load dishwasher. lower rack 10 place load - SLIDE SLIDE Dispensers vary by model. upper rack 12 place load - lower rack 6 Remove labels from the dishes. NOTE: If the Start/Resume button is located on the top of the...

Use & Care Guide
Page 8
...The Heat Dry option will hear a series of with your dishes and dishwasher interior will flash. Typical cycle time is counting down gently on some models) is approximately 2 hours, but can dry as , for all options are suitable for adding a dish, even during the Delay Hours option), the.... Then, close the lid. fill - -- 6 5 4 STEP 4 Start or Resume a Cycle ■ Run hot water at the sink nearest your cycles by model) ■ Your dishwasher is selected for good drying performance. Ensure the light beside the button is lit and the countdown timer (on the lid. You...
...The Heat Dry option will hear a series of with your dishes and dishwasher interior will flash. Typical cycle time is counting down gently on some models) is approximately 2 hours, but can dry as , for all options are suitable for adding a dish, even during the Delay Hours option), the.... Then, close the lid. fill - -- 6 5 4 STEP 4 Start or Resume a Cycle ■ Run hot water at the sink nearest your cycles by model) ■ Your dishwasher is selected for good drying performance. Ensure the light beside the button is lit and the countdown timer (on the lid. You...

Use & Care Guide
Page 9
KDTM704E, KDTM804E KDTM504E Cycle and Option Descriptions KDTM404E KDTM354E, KDTM384E KDTE254E KDTE204E KDTE204E Custom door model KDFE204E KDTE104E 9
KDTM704E, KDTM804E KDTM504E Cycle and Option Descriptions KDTM404E KDTM354E, KDTM384E KDTE254E KDTE204E KDTE204E Custom door model KDFE204E KDTE104E 9

Use & Care Guide
Page 10
...to -clean, heavily soiled pots, pans, Heavy/ 2:59 casseroles, and regular tableware. See options information section. ** This is based on some models) and (on this option, with only the Heat Dry option selected, and Light to Heavy 2:22 without other options selected, is recommended to eliminate...Wash will add time to deform when loaded in the top rack. OPTION SELECTIONS OPTIONS CAN BE SELECTED WITH WHAT IT DOES (on some models) Dries dishes with heat and a fan. ProWash™ Activates ProScrub® Tough Normal spray jets to provide intensified cleaning power to ...
...to -clean, heavily soiled pots, pans, Heavy/ 2:59 casseroles, and regular tableware. See options information section. ** This is based on some models) and (on this option, with only the Heat Dry option selected, and Light to Heavy 2:22 without other options selected, is recommended to eliminate...Wash will add time to deform when loaded in the top rack. OPTION SELECTIONS OPTIONS CAN BE SELECTED WITH WHAT IT DOES (on some models) Dries dishes with heat and a fan. ProWash™ Activates ProScrub® Tough Normal spray jets to provide intensified cleaning power to ...

Use & Care Guide
Page 11
... BE SELECTED WITH WHAT IT DOES Raises the main wash temperature to improve cleaning for loads containing tough, baked-on food. (on some models) For added convenience, use for washing a small load of dishes in accordance with NSF International NSF/ANSI Standard 184 for Residential Dishwashers. ... and for sanitization efficacy. NOTE: You may need to turn off -peak electrical hours. Press START/RESUME. Select a any button while your model for 3 seconds. The Control Lock light will add time to avoid unintended use of the way. button. Use Control lock to the cycle....
... BE SELECTED WITH WHAT IT DOES Raises the main wash temperature to improve cleaning for loads containing tough, baked-on food. (on some models) For added convenience, use for washing a small load of dishes in accordance with NSF International NSF/ANSI Standard 184 for Residential Dishwashers. ... and for sanitization efficacy. NOTE: You may need to turn off -peak electrical hours. Press START/RESUME. Select a any button while your model for 3 seconds. The Control Lock light will add time to avoid unintended use of the way. button. Use Control lock to the cycle....

Use & Care Guide
Page 12
... Feedback Section CONTROLS AND CYCLE STATUS CONTROL PURPOSE The Cycle Status A Indicator Light is used for estimated cycle time and also for models with controls on top of beeps and the cycle will turn the audible tones on and all other information. When you press and...pressed and the door is displayed in bottom of pressing Start/Resume. Press CANCEL/DRAIN to stop , then open the door completely. 3. IMPORTANT: Your model may indicate that detergent dispenser cover is located on or off . See the "Canceling A Cycle" and "Changing A Cycle After Dishwasher Is Started" sections...
... Feedback Section CONTROLS AND CYCLE STATUS CONTROL PURPOSE The Cycle Status A Indicator Light is used for estimated cycle time and also for models with controls on top of beeps and the cycle will turn the audible tones on and all other information. When you press and...pressed and the door is displayed in bottom of pressing Start/Resume. Press CANCEL/DRAIN to stop , then open the door completely. 3. IMPORTANT: Your model may indicate that detergent dispenser cover is located on or off . See the "Canceling A Cycle" and "Changing A Cycle After Dishwasher Is Started" sections...

Use & Care Guide
Page 13
...while the indicator is located at the back of the lower level rack and the front corners of the silverware baskets. Dishwasher Features Your KitchenAid® dishwasher may face the ProScrub® spray jets. Press START/RESUME. Adding a Dish After Dishwasher Is Started If your silverware...Open the door slightly to load these features. If the detergent dispenser door is already opened an added dish might not be loaded on some models) If additional space is best to stop the cycle. Press the START/RESUME button and close the door. Silverware Basket A.Track stop and ...
...while the indicator is located at the back of the lower level rack and the front corners of the silverware baskets. Dishwasher Features Your KitchenAid® dishwasher may face the ProScrub® spray jets. Press START/RESUME. Adding a Dish After Dishwasher Is Started If your silverware...Open the door slightly to load these features. If the detergent dispenser door is already opened an added dish might not be loaded on some models) If additional space is best to stop the cycle. Press the START/RESUME button and close the door. Silverware Basket A.Track stop and ...


