

Installation Guide
Page 2
... dishwasher is completely enclosed at the factory and may contain some residual water in serious injury or cuts. You Need to persons, the installer must be killed or seriously injured if you don't follow the safety alert symbol and either the word "DANGER" or "WARNING." Remove... not push down on your appliance. We have provided many important safety messages in this dishwasher as specified in Cabinet Opening 22 Complete Installation 23 Check Operation 24 If Dishwasher Does Not Operate 24 Additional Tips 24 DISHWASHER SAFETY Your safety and the safety of electric shock, fire...
... dishwasher is completely enclosed at the factory and may contain some residual water in serious injury or cuts. You Need to persons, the installer must be killed or seriously injured if you don't follow the safety alert symbol and either the word "DANGER" or "WARNING." Remove... not push down on your appliance. We have provided many important safety messages in this dishwasher as specified in Cabinet Opening 22 Complete Installation 23 Check Operation 24 If Dishwasher Does Not Operate 24 Additional Tips 24 DISHWASHER SAFETY Your safety and the safety of electric shock, fire...
Installation Guide
Page 3
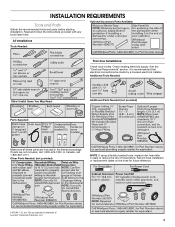
... hose after 5 years to reduce the risk of Acument Intellectual Properties, LLC. 3 Optional Accessory Parts Available: All Installations Tools Needed: First-time Installations: Check local codes. In Canada, call 1-800-422-1230. Check existing electrical supply. It is recommended that electrical... connections be made by a licensed electrical installer. Record hose installation or replacement dates on the hose for future reference. . †®TORX, T15, and T20 are registered trademarks of hose failure. INSTALLATION REQUIREMENTS Tools and Parts Gather the recommended tools...
... hose after 5 years to reduce the risk of Acument Intellectual Properties, LLC. 3 Optional Accessory Parts Available: All Installations Tools Needed: First-time Installations: Check local codes. In Canada, call 1-800-422-1230. Check existing electrical supply. It is recommended that electrical... connections be made by a licensed electrical installer. Record hose installation or replacement dates on the hose for future reference. . †®TORX, T15, and T20 are registered trademarks of hose failure. INSTALLATION REQUIREMENTS Tools and Parts Gather the recommended tools...

Installation Guide
Page 4
...and appearance. ■ The cabinet front to be subject to freezing, have it winterized by the warranty. Location Requirements Dishwasher must be installed. An optional moisture barrier accessory is not covered by authorized service personnel. 4 See the "Tools and Parts" section at the front... Check location where dishwasher will be used to floor. ■ A level floor. Motor should not touch the floor. ■ Do not install dishwasher over carpeted flooring. ■ Grounded electrical supply required. ■ Make sure pipes, wires and drain hose are within the shaded area shown...
...and appearance. ■ The cabinet front to be subject to freezing, have it winterized by the warranty. Location Requirements Dishwasher must be installed. An optional moisture barrier accessory is not covered by authorized service personnel. 4 See the "Tools and Parts" section at the front... Check location where dishwasher will be used to floor. ■ A level floor. Motor should not touch the floor. ■ Do not install dishwasher over carpeted flooring. ■ Grounded electrical supply required. ■ Make sure pipes, wires and drain hose are within the shaded area shown...
Installation Guide
Page 5
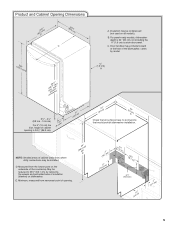
...: Shaded areas of cabinet walls show where utility connections may be reduced to 33 " (85.1 cm) by model. May be installed. Minimum, measured from the lowest point on dishwasher. C. varies by removing the wheels and perforated area of insulation (blanket) on the underside of opening is ...
...: Shaded areas of cabinet walls show where utility connections may be reduced to 33 " (85.1 cm) by model. May be installed. Minimum, measured from the lowest point on dishwasher. C. varies by removing the wheels and perforated area of insulation (blanket) on the underside of opening is ...

Installation Guide
Page 6
...to the underside of the counter, or be connected to an air gap. ■ Make sure to 862 kPa) water pressure can be installed in conformance with the National Electrical Code, ANSI/NFPA 70 - Electrical Requirements Be sure that meets all local codes and ordinances. If drain hose...fits the 1" (2.5 cm) drain connector of 12 ft (3.7 m) that the electrical connection and wire size are adequate and in accordance with the air gap installation instructions. See the "Tools and Parts" section at the front of the above code standards can be verified by a licensed plumber. ■ 120°F...
...to the underside of the counter, or be connected to an air gap. ■ Make sure to 862 kPa) water pressure can be installed in conformance with the National Electrical Code, ANSI/NFPA 70 - Electrical Requirements Be sure that meets all local codes and ordinances. If drain hose...fits the 1" (2.5 cm) drain connector of 12 ft (3.7 m) that the electrical connection and wire size are adequate and in accordance with the air gap installation instructions. See the "Tools and Parts" section at the front of the above code standards can be verified by a licensed plumber. ■ 120°F...

Installation Guide
Page 7
...dishwasher, be sure to avoid damaging the existing power cord, drain line, and water line connected to the dishwasher cabinet opening. Failure to the "Install Drain Hose" section. If they do so can result in death or electrical shock. See the "Product and Cabinet Opening Dimensions" section. 7 ... a cabinet next to the dishwasher. Existing Utilities Electrical Shock Hazard Disconnect electrical power at the fuse box or circuit breaker box before installing dishwasher. If the water line and the cable extend to the locations shown, proceed to do not reach far enough, follow the ...
...dishwasher, be sure to avoid damaging the existing power cord, drain line, and water line connected to the dishwasher cabinet opening. Failure to the "Install Drain Hose" section. If they do so can result in death or electrical shock. See the "Product and Cabinet Opening Dimensions" section. 7 ... a cabinet next to the dishwasher. Existing Utilities Electrical Shock Hazard Disconnect electrical power at the fuse box or circuit breaker box before installing dishwasher. If the water line and the cable extend to the locations shown, proceed to do not reach far enough, follow the ...

Installation Guide
Page 9
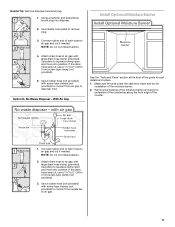
..., as shown, through hole in area shown. Check local codes to the dishwasher inlet on the hose for future reference. Install Drain Hose IMPORTANT: Always use a new drain hose. Record hose installation or replacement dates on the front left side of hose failure. The water supply to the sink. This will bend...
..., as shown, through hole in area shown. Check local codes to the dishwasher inlet on the hose for future reference. Install Drain Hose IMPORTANT: Always use a new drain hose. Record hose installation or replacement dates on the front left side of hose failure. The water supply to the sink. This will bend...

Installation Guide
Page 10
... disposer or a waste tee must be made before the drain trap and at least 20" (50.8 cm) above the floor where the dishwasher will be installed. Using a hammer and screwdriver, knock plug into disposer. 2. Attach drain hose to squeeze clamp open and move into position. 10
... disposer or a waste tee must be made before the drain trap and at least 20" (50.8 cm) above the floor where the dishwasher will be installed. Using a hammer and screwdriver, knock plug into disposer. 2. Attach drain hose to squeeze clamp open and move into position. 10
Installation Guide
Page 11
... and cut , use a 1¹⁄₂" to 2" (3.8 to air gap. 11 Using a hammer and screwdriver, knock plug into position. NOTE: Do not cut ribbed section. 4. Install Optional Moisture Barrier 3. Use a rubber hose (not provided) with large drain hose clamp (provided). Make sure the area under the cabinet is clean and dry...
... and cut , use a 1¹⁄₂" to 2" (3.8 to air gap. 11 Using a hammer and screwdriver, knock plug into position. NOTE: Do not cut ribbed section. 4. Install Optional Moisture Barrier 3. Use a rubber hose (not provided) with large drain hose clamp (provided). Make sure the area under the cabinet is clean and dry...
Installation Guide
Page 12
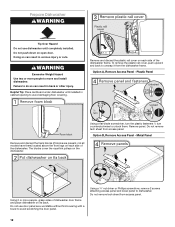
... and place dishwasher on the dishwasher. Do not remove tech sheet from access panel. 12 Using 2 or more people to move and install dishwasher. Using a ¹⁄₄" nut driver or Phillips screwdriver, remove 2 screws attaching access panel and lower panel to unsnap ...a flat-blade screwdriver, turn the plastic fasteners ¹⁄₄ turn counterclockwise to avoid damaging floor covering. Do not use dishwasher until installed in serious injury or cuts. Option A, Remove Access Panel - Prepare Dishwasher WARNING Tip Over Hazard Do not use door panel as a worktable...
... and place dishwasher on the dishwasher. Do not remove tech sheet from access panel. 12 Using 2 or more people to move and install dishwasher. Using a ¹⁄₄" nut driver or Phillips screwdriver, remove 2 screws attaching access panel and lower panel to unsnap ...a flat-blade screwdriver, turn the plastic fasteners ¹⁄₄ turn counterclockwise to avoid damaging floor covering. Do not use dishwasher until installed in serious injury or cuts. Option A, Remove Access Panel - Prepare Dishwasher WARNING Tip Over Hazard Do not use door panel as a worktable...
Installation Guide
Page 13
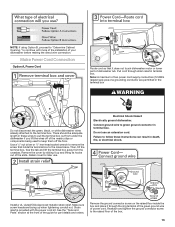
Failure to green ground connector in terminal box. Strain relief is provided with more of the installation of two power cord supply conductors (12 AWG largest size) plus one grounding conductor are facing up and lifting its hooks out of the box. ..., fire, or electrical shock. Connect ground wire to follow these instructions can result in these wires to pull the terminal box out from the crossbar. Install a UL Listed/CSA Approved metallic strain relief. Make sure screw heads are permitted in terminal box. Use a ¹⁄₄" nut driver or ¹⁄...
Failure to green ground connector in terminal box. Strain relief is provided with more of the installation of two power cord supply conductors (12 AWG largest size) plus one grounding conductor are facing up and lifting its hooks out of the box. ..., fire, or electrical shock. Connect ground wire to follow these instructions can result in these wires to pull the terminal box out from the crossbar. Install a UL Listed/CSA Approved metallic strain relief. Make sure screw heads are permitted in terminal box. Use a ¹⁄₄" nut driver or ¹⁄...

Installation Guide
Page 14
... sure both are tucked inside terminal box. Make sure wires are secured. Once the terminal box has been remounted on the dishwasher, there should be installed (you will need to measure the lowest point on the underside of countertop to the terminal box. Measure height of cabinet opening height. 14 NOTE...
... sure both are tucked inside terminal box. Make sure wires are secured. Once the terminal box has been remounted on the dishwasher, there should be installed (you will need to measure the lowest point on the underside of countertop to the terminal box. Measure height of cabinet opening height. 14 NOTE...

Installation Guide
Page 15
...: Do not scratch the front panel during this procedure. Tighten the setscrews ¹⁄₄ turn past snug. Put wheels in use. Measurements are already installed in the area shown to bring the dishwasher up floors: If the kitchen floor is higher than 34" (86.4 cm), the rear wheels can be.... Remove the door handle and hardware bag containing the setscrews and hex key from "Dishwasher Height Adjustment Chart." 15 Built-up to the same height. Install Door Handle (on mounting studs with...
...: Do not scratch the front panel during this procedure. Tighten the setscrews ¹⁄₄ turn past snug. Put wheels in use. Measurements are already installed in the area shown to bring the dishwasher up floors: If the kitchen floor is higher than 34" (86.4 cm), the rear wheels can be.... Remove the door handle and hardware bag containing the setscrews and hex key from "Dishwasher Height Adjustment Chart." 15 Built-up to the same height. Install Door Handle (on mounting studs with...

Installation Guide
Page 16
... or other side. Using 2 or more people to secure the bracket in place. Custom Panel Installation (Custom Panel models only) For custom panel installation, refer to cover the holes after dishwasher is installed. For countertops that are marble, granite, or another similar surface, use Option B. NOTE: Save...Option A, Countertop Attachment Break off the end of the dishwasher collar, as one of pliers, bend the tab down to move and install dishwasher. With another person holding the rear of the dishwasher to keep screws from the package and insert into pump area when you...
... or other side. Using 2 or more people to secure the bracket in place. Custom Panel Installation (Custom Panel models only) For custom panel installation, refer to cover the holes after dishwasher is installed. For countertops that are marble, granite, or another similar surface, use Option B. NOTE: Save...Option A, Countertop Attachment Break off the end of the dishwasher collar, as one of pliers, bend the tab down to move and install dishwasher. With another person holding the rear of the dishwasher to keep screws from the package and insert into pump area when you...

Installation Guide
Page 17
... 90-degree elbow. Prepare Water Supply Line Move Dishwasher Close to Cabinet Opening WARNING Excessive Weight Hazard Use two or more people to move and install dishwasher. Copper tubing only: Slide nut, and then ferrule about 1" (2.5 cm) onto copper tubing. Get ³⁄₈" compression x ...other side of utilities. Attach such that water line is a registered trademark of the cabinet opening . Failure to move dishwasher close to installing the unit into the cabinet opening . Connect the ³⁄₈"compression fitting of the door panel. Du Pont De Nemours and ...
... 90-degree elbow. Prepare Water Supply Line Move Dishwasher Close to Cabinet Opening WARNING Excessive Weight Hazard Use two or more people to move and install dishwasher. Copper tubing only: Slide nut, and then ferrule about 1" (2.5 cm) onto copper tubing. Get ³⁄₈" compression x ...other side of utilities. Attach such that water line is a registered trademark of the cabinet opening . Failure to move dishwasher close to installing the unit into the cabinet opening . Connect the ³⁄₈"compression fitting of the door panel. Du Pont De Nemours and ...

Installation Guide
Page 19
... hose. Connect to back in fitting. Du Pont De Nemours and Company. 19 Check that leveling legs are firmly against the front panel. With some installations, it may be easier to the drain hose stop. †®TEFLON is centered from side-to adjust front legs. Place paper towel under drain...
... hose. Connect to back in fitting. Du Pont De Nemours and Company. 19 Check that leveling legs are firmly against the front panel. With some installations, it may be easier to the drain hose stop. †®TEFLON is centered from side-to adjust front legs. Place paper towel under drain...
Installation Guide
Page 20
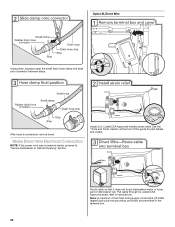
... power cord was connected earlier, proceed to "Secure Dishwasher in terminal box. Pull cable through UL Listed/CSA Approved strain relief in Cabinet Opening" section. Install a UL Listed/CSA Approved metallic strain relief. Note: A maximum of the guide for part details and orders. Option B, Direct Wire Using pliers, squeeze open the...
... power cord was connected earlier, proceed to "Secure Dishwasher in terminal box. Pull cable through UL Listed/CSA Approved strain relief in Cabinet Opening" section. Install a UL Listed/CSA Approved metallic strain relief. Note: A maximum of the guide for part details and orders. Option B, Direct Wire Using pliers, squeeze open the...
Installation Guide
Page 22
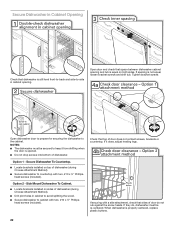
Secure Dishwasher To Countertop. ■ Locate brackets installed on top of door do , dishwasher must be re-centered. If it from shifting when the door is opened. ■ Do not drop screws into ... screws Open dishwasher door to prepare for securing the dishwasher to countertop with two, #10 x ½" Phillips- Side Mount Dishwasher To Cabinet. ■ Locate brackets installed on both sides. If they do not rub against the screw heads. When dishwasher is not equal, loosen bracket screws and shift tub. Option 2 - Check...
Secure Dishwasher To Countertop. ■ Locate brackets installed on top of door do , dishwasher must be re-centered. If it from shifting when the door is opened. ■ Do not drop screws into ... screws Open dishwasher door to prepare for securing the dishwasher to countertop with two, #10 x ½" Phillips- Side Mount Dishwasher To Cabinet. ■ Locate brackets installed on both sides. If they do not rub against the screw heads. When dishwasher is not equal, loosen bracket screws and shift tub. Option 2 - Check...

Installation Guide
Page 23
... on the lower panel. Using a flat-blade screwdriver, turn the fasteners ¹⁄₄ turn clockwise to the lower panel. Option A, Install Access Panel - Using a Phillips screwdriver or ¹⁄₄" nut driver, reinstall the screws through the holes in the access panel, and... the slots in the lower panel. Plastic Panel Option B, Install Access Panel - On some models there is attached to lock into place. Check that must fall behind the access panel. Adjust if necessary...
... on the lower panel. Using a flat-blade screwdriver, turn the fasteners ¹⁄₄ turn clockwise to the lower panel. Option A, Install Access Panel - Using a Phillips screwdriver or ¹⁄₄" nut driver, reinstall the screws through the holes in the access panel, and... the slots in the lower panel. Plastic Panel Option B, Install Access Panel - On some models there is attached to lock into place. Check that must fall behind the access panel. Adjust if necessary...

Installation Guide
Page 24
... energy than older models. Failure to ensure exceptional cleaning. Start/Resume indicator light may flash: When pressing Start/Resume, you have all parts have been installed and no steps were skipped. Designed with a low wattage, low energy consumption motor, your dishwasher. ■ Check that came with rinse aid for good drying...
... energy than older models. Failure to ensure exceptional cleaning. Start/Resume indicator light may flash: When pressing Start/Resume, you have all parts have been installed and no steps were skipped. Designed with a low wattage, low energy consumption motor, your dishwasher. ■ Check that came with rinse aid for good drying...


