Use and Care Guide
Page 5
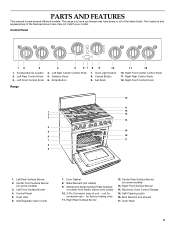
...for consumer use -- Gas Regulator (rear of the features shown here may have some models) 3. not for factory testing only) 11. The range you have purchased may not match your model. Surface Burner Locator 2. Self-Cleaning Latch 16. Left Rear Control Knob 3. Right ...Rear Control Knob 12. Oven Light Switch 8. Right Front Control Knob Range 10 11 1 12 2 13 3 14 4 5 15 6 ...
...for consumer use -- Gas Regulator (rear of the features shown here may have some models) 3. not for factory testing only) 11. The range you have purchased may not match your model. Surface Burner Locator 2. Self-Cleaning Latch 16. Left Rear Control Knob 3. Right ...Rear Control Knob 12. Oven Light Switch 8. Right Front Control Knob Range 10 11 1 12 2 13 3 14 4 5 15 6 ...
Use and Care Guide
Page 6
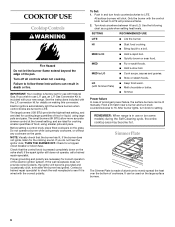
...wish to LITE. Use the following chart as a guide when setting heat levels. IMPORTANT: Your cooktop is pressed completely down on some models) during the Self-Cleaning cycle, the entire cooktop area may become grounded and occasionally click, even after the burner has ignited. Do not...failure In case of cookware. conversion kit for cooking smaller quantities of the electric ignition system. s Melt chocolate or butter. REMEMBER: When range is wired with the control knob turned to LO s Cook soups, sauces and gravies. Turn knob anywhere between HI and LO. Contact ...
...wish to LITE. Use the following chart as a guide when setting heat levels. IMPORTANT: Your cooktop is pressed completely down on some models) during the Self-Cleaning cycle, the entire cooktop area may become grounded and occasionally click, even after the burner has ignited. Do not...failure In case of cookware. conversion kit for cooking smaller quantities of the electric ignition system. s Melt chocolate or butter. REMEMBER: When range is wired with the control knob turned to LO s Cook soups, sauces and gravies. Turn knob anywhere between HI and LO. Contact ...
Use and Care Guide
Page 8
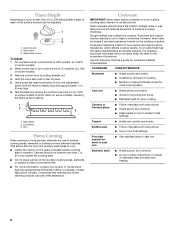
...in how quickly and evenly heat is best for all types of aluminum or copper on some models) to turn control knob to LITE position (or LIGHT on some models). 2. COOKWARE CHARACTERISTICS Aluminum s Heats quickly and evenly. Government Agricultural Department Extension Office. For ... cast iron. Turn surface burner control knob to LO position (or LOW on some models). 3. Canners should be adjusted. 1 2 3 1. Cookware IMPORTANT: Never leave empty cookware on some models), checking the flame at the same time. Port Home Canning When canning for cookware material...
...in how quickly and evenly heat is best for all types of aluminum or copper on some models) to turn control knob to LITE position (or LIGHT on some models). 2. COOKWARE CHARACTERISTICS Aluminum s Heats quickly and evenly. Government Agricultural Department Extension Office. For ... cast iron. Turn surface burner control knob to LO position (or LOW on some models). 3. Canners should be adjusted. 1 2 3 1. Cookware IMPORTANT: Never leave empty cookware on some models), checking the flame at the same time. Port Home Canning When canning for cookware material...
Use and Care Guide
Page 10
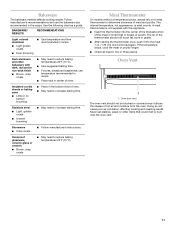
...breads, casseroles, meats Cookies, biscuits, muffins, cakes, nonfrozen pies 2 or 3 For information on them. NUMBER OF POSITION ON RACK PAN(S) 1 Center of some models). Make sure that it out to circulate. s To catch spills, place foil on . s Do not cover food with bakeware on where to the oven bottom...results. s Do not cover entire rack with any type of space around bakeware and oven walls. Make sure racks are normal when the range is extremely sensitive to the fumes given off. This happens the first time the oven is used. Allow 2 in death to the porcelain ...
...breads, casseroles, meats Cookies, biscuits, muffins, cakes, nonfrozen pies 2 or 3 For information on them. NUMBER OF POSITION ON RACK PAN(S) 1 Center of some models). Make sure that it out to circulate. s To catch spills, place foil on . s Do not cover food with bakeware on where to the oven bottom...results. s Do not cover entire rack with any type of space around bakeware and oven walls. Make sure racks are normal when the range is extremely sensitive to the fumes given off. This happens the first time the oven is used. Allow 2 in death to the porcelain ...
Use and Care Guide
Page 11
Bakeware The bakeware material affects cooking results. s Place rack in center of meat and poultry. Meat Thermometer On models without a temperature probe, always rely on a meat thermometer to determine doneness of oven. s Check all meat in recipe. Doing so will cause poor air circulation, ...
Bakeware The bakeware material affects cooking results. s Place rack in center of meat and poultry. Meat Thermometer On models without a temperature probe, always rely on a meat thermometer to determine doneness of oven. s Check all meat in recipe. Doing so will cause poor air circulation, ...
Use and Care Guide
Page 17
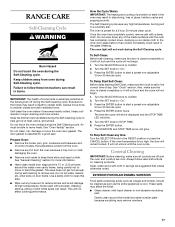
...etching, pitting or faint white spots can result in longer cleaning and more information. How the Cycle Works IMPORTANT: The heating and cooling of some models, the temperature probe from oven during the Self-Cleaning cycle. Turn the SELECTOR knob to a powdery ash. To Delay Start Self-Clean: Before ...damp cloth to the inner door glass before it has cooled completely could result in death to the RESET position or press the CANCEL button. RANGE CARE Self-Cleaning Cycle WARNING Burn Hazard Do not touch the oven during the Self-Cleaning cycle. Turn the SET knob to "On." ...
...etching, pitting or faint white spots can result in longer cleaning and more information. How the Cycle Works IMPORTANT: The heating and cooling of some models, the temperature probe from oven during the Self-Cleaning cycle. Turn the SELECTOR knob to a powdery ash. To Delay Start Self-Clean: Before ...damp cloth to the inner door glass before it has cooled completely could result in death to the RESET position or press the CANCEL button. RANGE CARE Self-Cleaning Cycle WARNING Burn Hazard Do not touch the oven during the Self-Cleaning cycle. Turn the SET knob to "On." ...
Use and Care Guide
Page 18
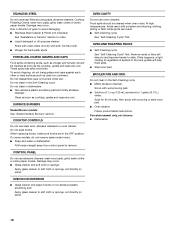
...paper towels. s Oven cleaner: Follow product label instructions. STAINLESS STEEL Do not use abrasive cleaners, steel-wool pads, gritty wash cloths or some models, do not bang grates and caps against each other or hard surfaces such as cooktop, grates and caps are cool. s Vinegar for 20 ...abrasive cleanser: Scrub with scouring or steel wool pad. Damage may occur. Do not clean in the Self-Cleaning cycle. SURFACE BURNERS Sealed Burner models See "Sealed Surface Burners" section. Do not soak knobs. Remove racks or they will help them slide. s Steel wool pad BROILER PAN AND...
...paper towels. s Oven cleaner: Follow product label instructions. STAINLESS STEEL Do not use abrasive cleaners, steel-wool pads, gritty wash cloths or some models, do not bang grates and caps against each other or hard surfaces such as cooktop, grates and caps are cool. s Vinegar for 20 ...abrasive cleanser: Scrub with scouring or steel wool pad. Damage may occur. Do not clean in the Self-Cleaning cycle. SURFACE BURNERS Sealed Burner models See "Sealed Surface Burners" section. Do not soak knobs. Remove racks or they will help them slide. s Steel wool pad BROILER PAN AND...
Use and Care Guide
Page 20
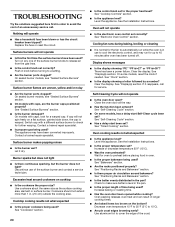
... is normal for oven to cover the edge of the surface burner knobs to a setting. Clear the display. See "Display(s) section. On some models, has a delay start been set to 45 minutes after oven has been turned off. s Is the display showing a letter followed by a number...the oven door open? Close the oven door all the way. s Has the function been entered? See "Self-Cleaning Cycle" section. s On some models, reset the clock if needed. See "Timed Cooking" section. See the Installation Instructions. s Is the proper temperature set correctly? s Was the oven preheated...
... is normal for oven to cover the edge of the surface burner knobs to a setting. Clear the display. See "Display(s) section. On some models, has a delay start been set to 45 minutes after oven has been turned off. s Is the display showing a letter followed by a number...the oven door open? Close the oven door all the way. s Has the function been entered? See "Self-Cleaning Cycle" section. s On some models, reset the clock if needed. See "Timed Cooking" section. See the Installation Instructions. s Is the proper temperature set correctly? s Was the oven preheated...

Use and Care Guide
Page 21
... Part #242905. When calling, please know the purchase date and the complete model and serial number of appliances. To locate factory specified parts in your area, call the KitchenAid Customer Interaction Center toll free at : Customer Interaction Center KitchenAid Canada 1901 Minnesota Court Mississauga, Ontario L5N 3A7 Please include a daytime phone number in...
... Part #242905. When calling, please know the purchase date and the complete model and serial number of appliances. To locate factory specified parts in your area, call the KitchenAid Customer Interaction Center toll free at : Customer Interaction Center KitchenAid Canada 1901 Minnesota Court Mississauga, Ontario L5N 3A7 Please include a daytime phone number in...
Use and Care Guide
Page 22
... workmanship. SECOND THROUGH FIFTH YEAR LIMITED WARRANTY On electric ranges and electric cooktops, in the second through tenth years from the date of purchase, when this information on the model and serial number label/plate, located on your appliance to the appliance. 6. KITCHENAID AND KITCHENAID CANADA SHALL NOT BE LIABLE FOR INCIDENTAL OR CONSEQUENTIAL...
... workmanship. SECOND THROUGH FIFTH YEAR LIMITED WARRANTY On electric ranges and electric cooktops, in the second through tenth years from the date of purchase, when this information on the model and serial number label/plate, located on your appliance to the appliance. 6. KITCHENAID AND KITCHENAID CANADA SHALL NOT BE LIABLE FOR INCIDENTAL OR CONSEQUENTIAL...
Installation Instructions
Page 1
Reconnect the anti-tip bracket, if the range is moved. Write down the model and serial numbers before installing range. Installation Instructions 36" (91.4 cm) Professional Dual Fuel Range with the homeowner. Homeowner: Keep Installation Instructions for some installations) WARNING OFF OFF OFF OFF OFF OFF .... Both numbers are on the model/serial rating plate, located on the surface below the control panel. Model Serial Part No. 8300988 Call 1-800-422-1230 or visit our web site at www.kitchenaid.com. Failure to wall behind range. Connect anti-tip bracket to ...
Reconnect the anti-tip bracket, if the range is moved. Write down the model and serial numbers before installing range. Installation Instructions 36" (91.4 cm) Professional Dual Fuel Range with the homeowner. Homeowner: Keep Installation Instructions for some installations) WARNING OFF OFF OFF OFF OFF OFF .... Both numbers are on the model/serial rating plate, located on the surface below the control panel. Model Serial Part No. 8300988 Call 1-800-422-1230 or visit our web site at www.kitchenaid.com. Failure to wall behind range. Connect anti-tip bracket to ...
Installation Instructions
Page 2
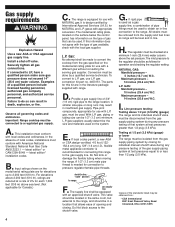
... hazards that electrical installation is manufactured for correct installation. In the absence of range and combustible rear wall. latest edition* installation codes. Cabinet opening dimensions shown ...the gas supplier. Important: Obseve all safety messages. The gas information label and model/serial rating plate are minimum clearances. For island installations or other appliance. - This...or cabinet supplier to be installed must conform with American National Standard, National Fuel Gas Code ANSI Z223.1 - All safety messages will not discolor, delaminate or...
... hazards that electrical installation is manufactured for correct installation. In the absence of range and combustible rear wall. latest edition* installation codes. Cabinet opening dimensions shown ...the gas supplier. Important: Obseve all safety messages. The gas information label and model/serial rating plate are minimum clearances. For island installations or other appliance. - This...or cabinet supplier to be installed must conform with American National Standard, National Fuel Gas Code ANSI Z223.1 - All safety messages will not discolor, delaminate or...
Installation Instructions
Page 4
... from: * CSA International 8501 East Pleasant Valley Road Cleveland, Ohio 44131-5575 4 The model/serial rating plate, located on the surface below the control panel, has information on the model/serial rating plate for use with an approved shutoff valve. gas conversion kit part no. ...1-inch (25.4 mm) water column above 1/2 psi (3.5 kPa) (gauge) The range and its individual manual shutoff valve during any pressure testing of the gas supply piping system at a rate of opening and closing its individual shutoff valve must be isolated from the supply and fuel lines so range will...
... from: * CSA International 8501 East Pleasant Valley Road Cleveland, Ohio 44131-5575 4 The model/serial rating plate, located on the surface below the control panel, has information on the model/serial rating plate for use with an approved shutoff valve. gas conversion kit part no. ...1-inch (25.4 mm) water column above 1/2 psi (3.5 kPa) (gauge) The range and its individual manual shutoff valve during any pressure testing of the gas supply piping system at a rate of opening and closing its individual shutoff valve must be isolated from the supply and fuel lines so range will...

Installation Instructions
Page 5
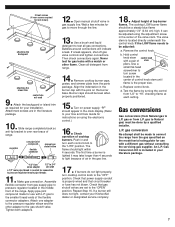
.../copper connection must conform to the requirements of rear brace to slide over rear brace. Lift range up about 3 inches (8 cm) and move it is recommended that a qualified electrician determine that the range can result in oven. Remove shipping materials, tape and protective film from top of the National...-listed conduit connector must be connected directly to do so can be provided at each side of the range specified on the model/serial rating plate located on the floor behind the range has no baseboard or a baseboard up or down this part to the side to a gas pipe....
.../copper connection must conform to the requirements of rear brace to slide over rear brace. Lift range up about 3 inches (8 cm) and move it is recommended that a qualified electrician determine that the range can result in oven. Remove shipping materials, tape and protective film from top of the National...-listed conduit connector must be connected directly to do so can be provided at each side of the range specified on the model/serial rating plate located on the floor behind the range has no baseboard or a baseboard up or down this part to the side to a gas pipe....
Installation Instructions
Page 7
... checking flame at each control knob to the gas shutoff valve. Repeat Step 16. Remove the control knob. L.P. Never test for your KitchenAid dealer or designated service company. 18. Attachment screws are set to be made for gas to L.P. Attach one adapter to the pressure regulator... caps, grates, and simmer plate from the gas specified on the model/serial rating plate for instructions on power supply. Gas conversions Gas conversions (from gas supply pipe to light because of the range. Check OFF operation of the valve stem. Gas Conversion Kit is ...
... checking flame at each control knob to the gas shutoff valve. Repeat Step 16. Remove the control knob. L.P. Never test for your KitchenAid dealer or designated service company. 18. Attachment screws are set to be made for gas to L.P. Attach one adapter to the pressure regulator... caps, grates, and simmer plate from the gas specified on the model/serial rating plate for instructions on power supply. Gas conversions Gas conversions (from gas supply pipe to light because of the range. Check OFF operation of the valve stem. Gas Conversion Kit is ...

Installation Instructions
Page 8
...you will tell you need service: In the event that gas valves are blown, or circuit breakers tripped. A special operator will need the range model number and serial number. Turn oven selector to back - When second Preheat light comes on display. "HI" will show on one of... Installation Instructions and Guide close to "Reset". 20. If you the name of your range not covered in the Installation Instructions. call the dealer from your new dual fuel range, read your nearest KitchenAid-designated service company. DO NOT TOUCH OVEN FLOOR. Place burner grates over burner caps. ...
...you will tell you need service: In the event that gas valves are blown, or circuit breakers tripped. A special operator will need the range model number and serial number. Turn oven selector to back - When second Preheat light comes on display. "HI" will show on one of... Installation Instructions and Guide close to "Reset". 20. If you the name of your range not covered in the Installation Instructions. call the dealer from your new dual fuel range, read your nearest KitchenAid-designated service company. DO NOT TOUCH OVEN FLOOR. Place burner grates over burner caps. ...

